After having introduced you, in a previous post, the led strips and after having explained how to control adigital strip, today’s post is about a simple project I made after a request from a friend: make a strip led blink at a variable frequency.
What you need
Being the project is very simple, I decided to make it on a breadboard, with the help of the following components:
- an Arduino Mini Pro
- a 4.7Kohm potentiometer
- a STP16NF06 MOSFET transistor (datasheet)
- a 12V strip led and its power supply
Connections
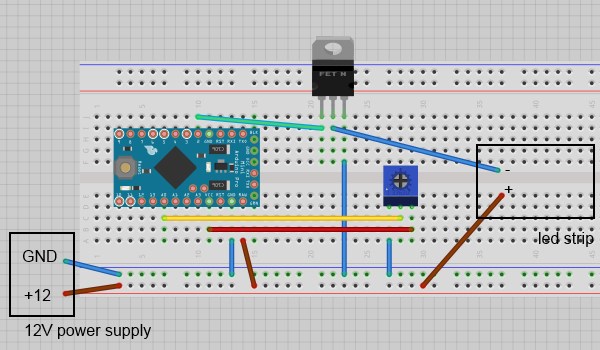
The different components are connected following the schematics below:

Arduino
The sketch for Arduino is available in my repository on Github.
Let’s discover how it works:
#define ledPin        13
#define stripPin      2
#define analogInPin   A0
First it defines a couple of constants: the PINs the led (on board), the strip and the potentiometer are connected to (an analog pin is used to read the potentiometer’s value).
int outState = LOW;
long previousMillis = 0;
long interval = 1000;
Then it sets the initial value of the variables that keep the output status, the elapsed time and the blink frequency (1 second).
pinMode(ledPin, OUTPUT);
pinMode(stripPin, OUTPUT);
In the setup(), it configures led and strip PINs as output.
int potValue = analogRead(analogInPin);
interval = map(potValue, 0, 1023, 50, 2000);
In the main loop it reads the value (between 0 and 1023) of the potentiometer and it scales that value, using the map function, to the interval 50-2000. This means the blinking interval can be a value between 50 and 2000ms.
if(currentMillis - previousMillis > interval) {
It a time interval has passed…
if (outState == LOW) outState = HIGH;
else outState = LOW;
… it inverts the output syatus …
digitalWrite(ledPin, outState);
digitalWrite(stripPin, outState);
… and powers on/off the led and the strip.
Demo
Here’s a short video about the sketch:


Leave a Reply
You must be logged in to post a comment.