- Installation Video
2. How to connect with cloud platform
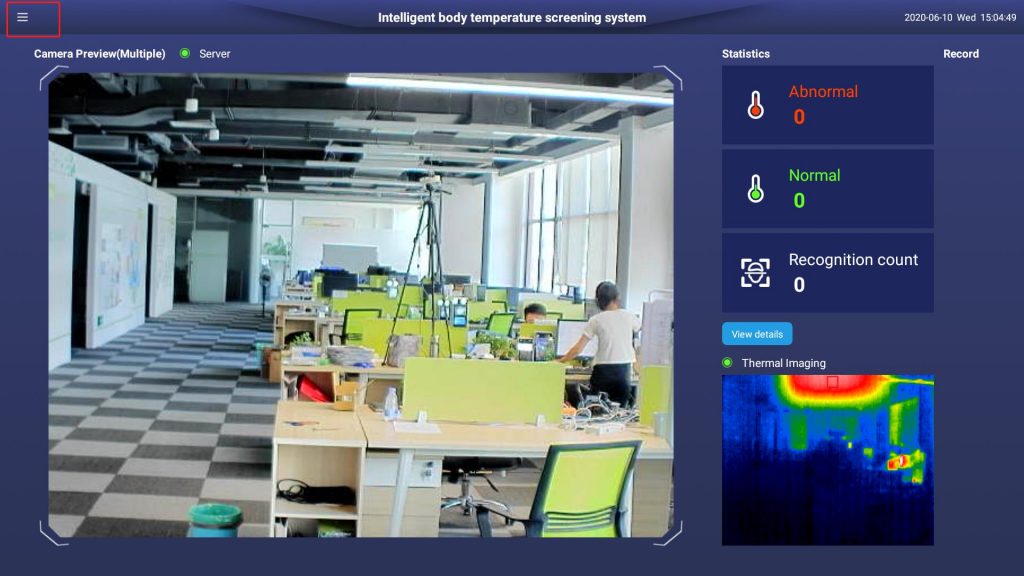
Step 1: Click the left upside of UI.
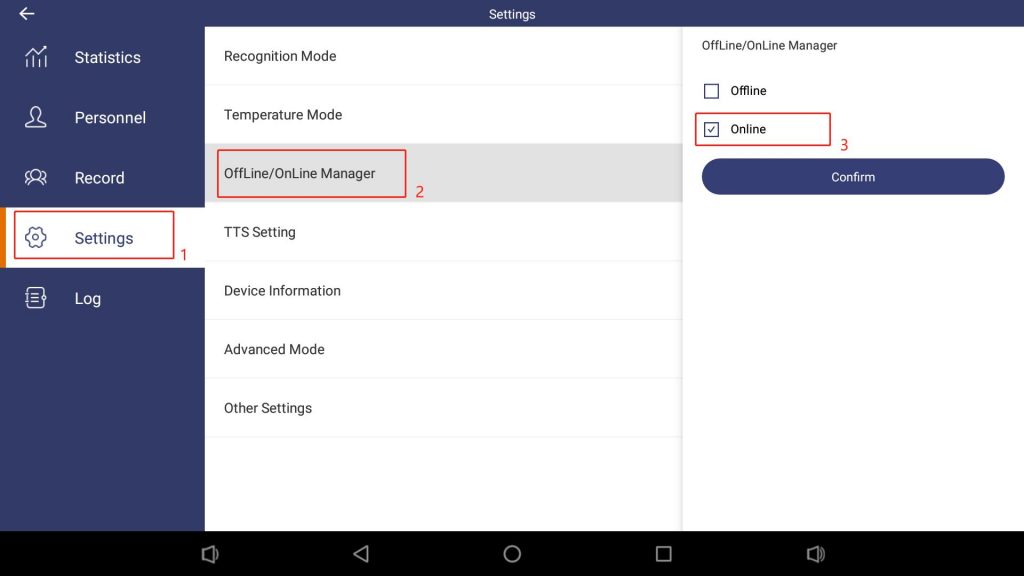
Step 2: Settings—offline/online manager—-online—confirm
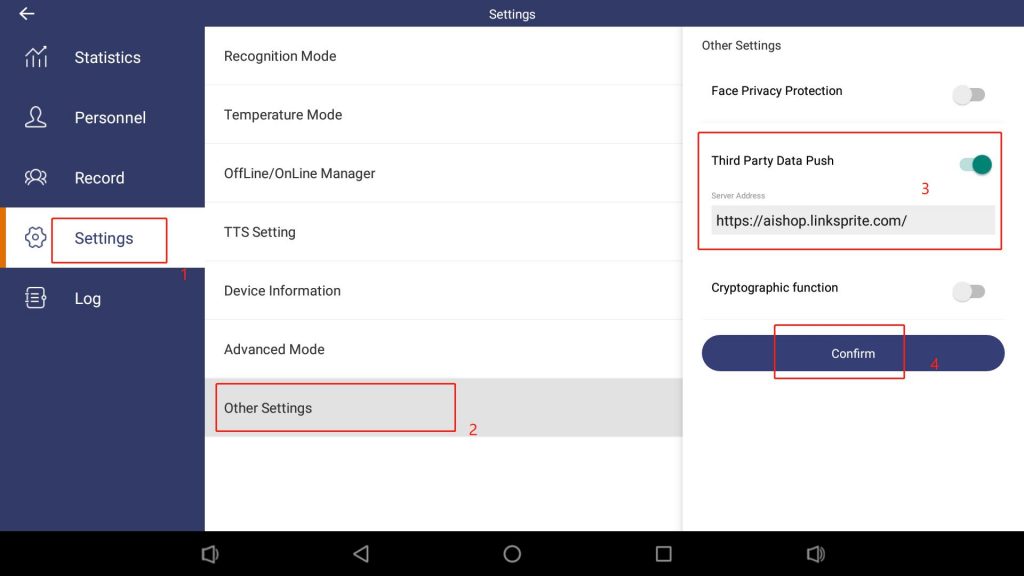
Step3: Settings—Other Settings—Third party data push— Address: https://aishop.linksprite.com/——Confirm
Now, you can do operating in the cloud platform.
3. How to set Cloud Platform
3.1 User Register
Access to https://aishop.linksprite.com,click [Free Registration], input the required information, and then click [register], the page will pop up a prompt that wait for the platform administrator to review, and after the review is passed (the SMS or email notification will be received), you can log in to the platform.
In addition, the main account can invite others to register as a sub account by sending a link and manage it.

3.2 Adding Devices
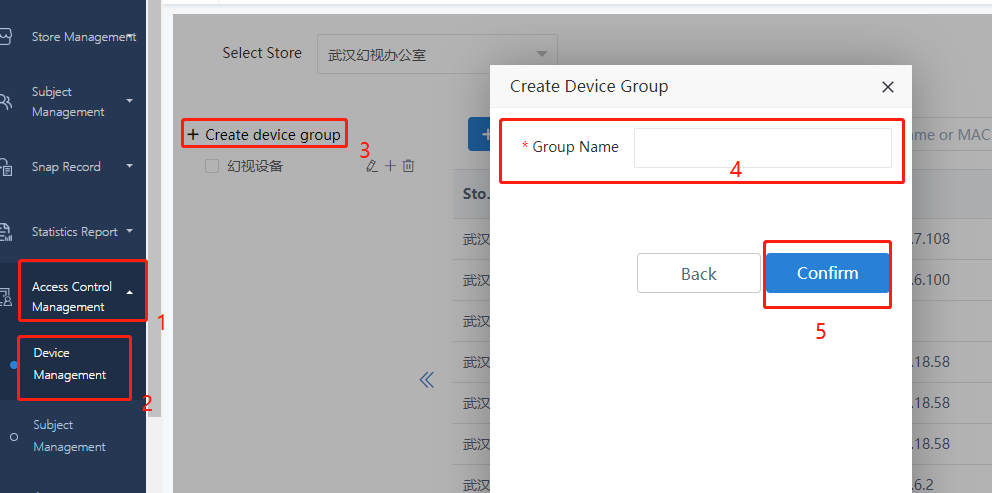
Click “Access Control Management” — “Device Management” on the left navigation bar, and then click “+ Add New Device” on the right page to complete the access control tablet creation. It means that the device group has not been created if the button [+ Add New Device] cannot be displayed. In that situation, please click [+ Create Device Group] to complete the creation of the device group first. After the device group is created, the device is allowed to be added.
Note: one device only can be associated with one of device groups.
Please refer to next steps:
- Create Device Group
2. Add New Device
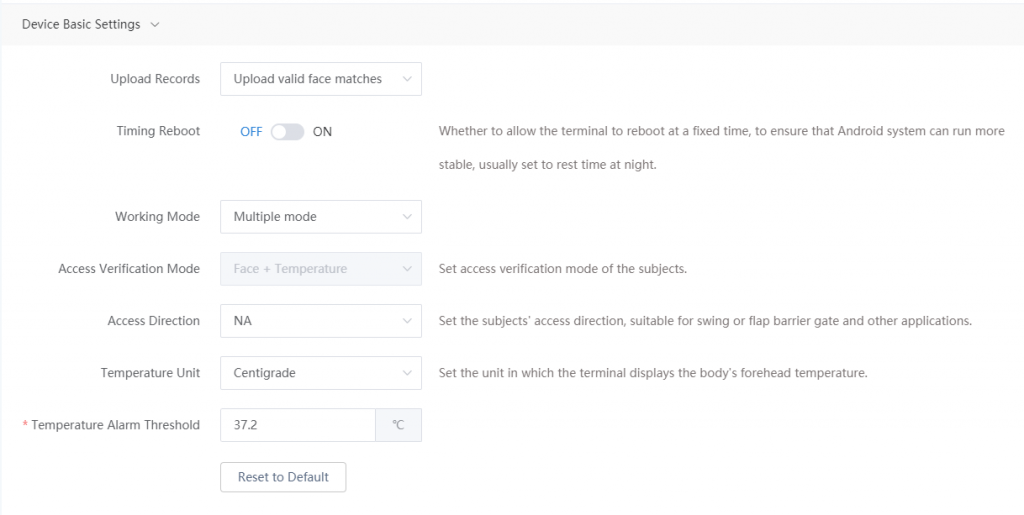
The prompts next to the boxes with reference to complete the basic information and device basic settings. The advanced settings part do not need to be modified and can be submitted by default.(you can check “help” if you not sure which device type.)
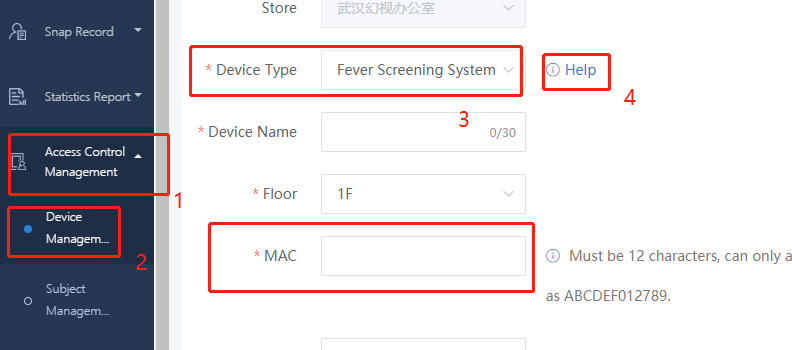
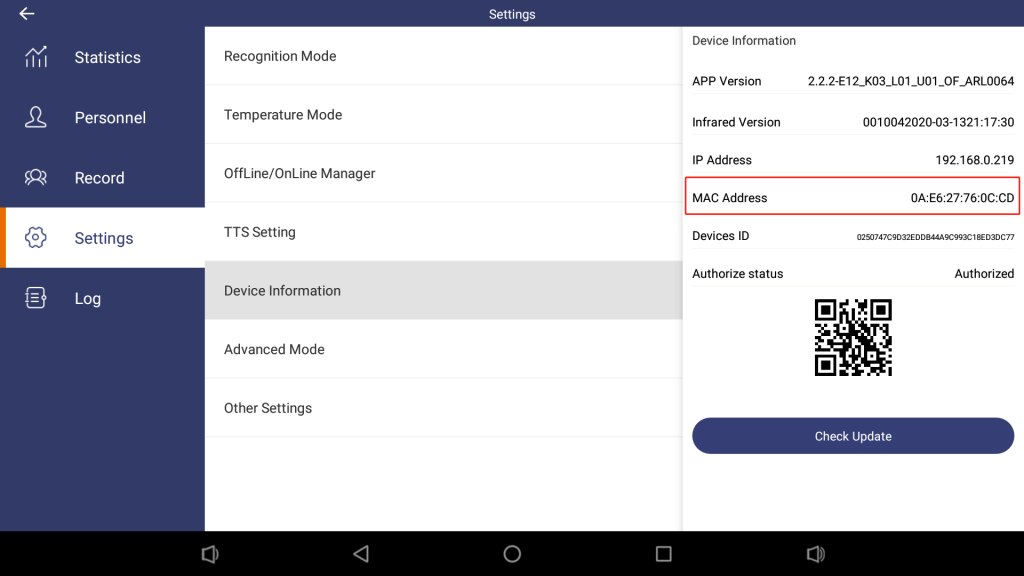
Note: Mac address can be found in device as follow:(Must be 12 characters, can only contain capital letters A to F, and digits 0 to 9.)

3. View Device List
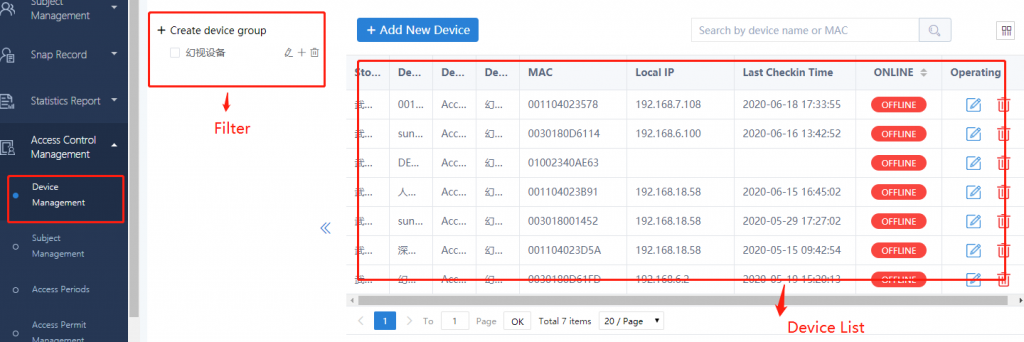
After the device is added, it can be viewed in the right page of “Device Management”. You can also filter queries by selecting the device group on the left side of the page
3.3 Add Subjects
Click “Access Control Management” – “Subject Management” on the left navigation bar, and then click “+ Add New Subject” on the right page to complete subject creation. It means that the subject group has not been created if the button “+ Add New Subject” cannot be displayed. In that situation, please click “+ Create Subject Group” to complete the subject group creation first. After that, it is allowed to add subjects.
Note: one subject only can be associated with one of subject groups.
Please refer to next steps:
- Create Subject Group
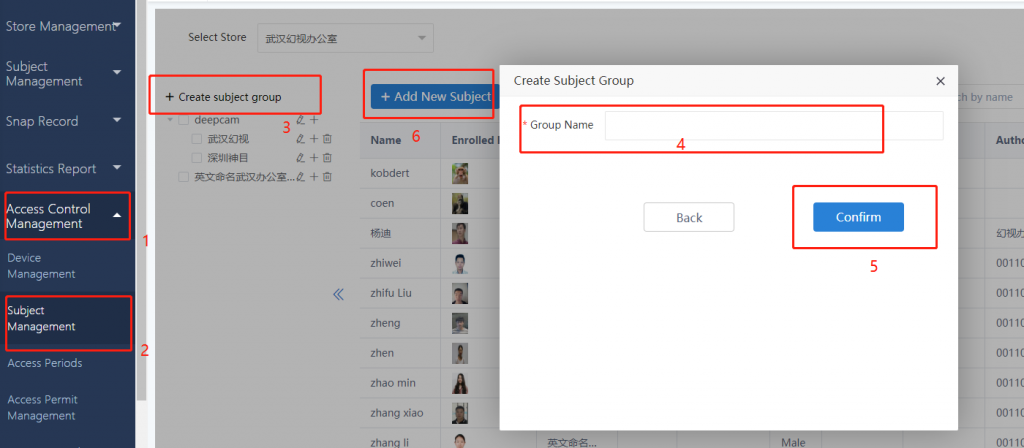
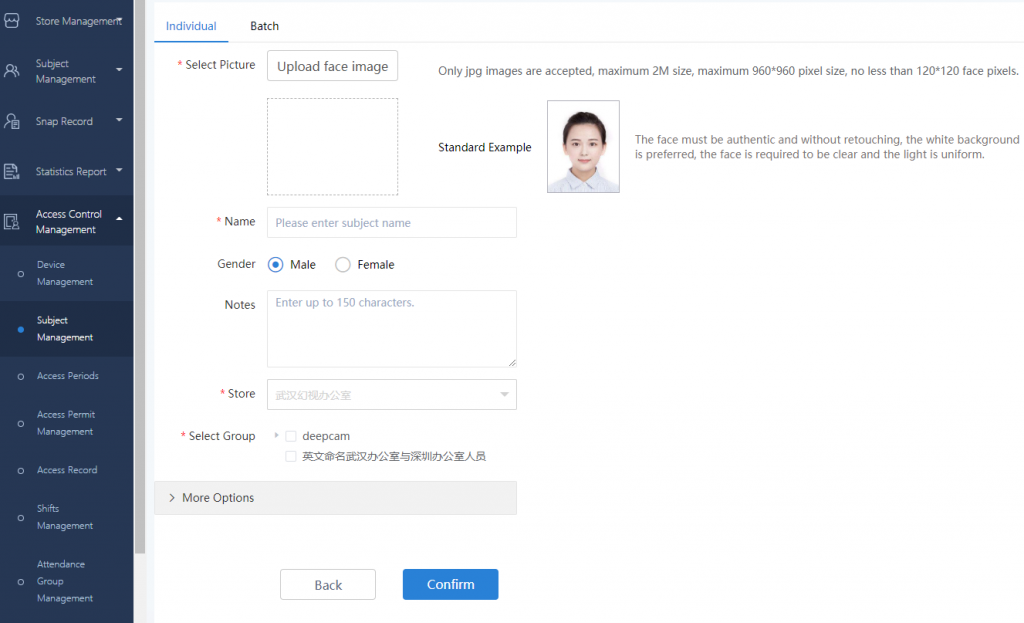
2. Add New Subject
Uploading the subject’s face picture first, and then input the information of the subject in turn according to the prompts next to the boxes.
Note: Do not forget to select the corresponding group of subject, one subject only can be associated with one of subject groups
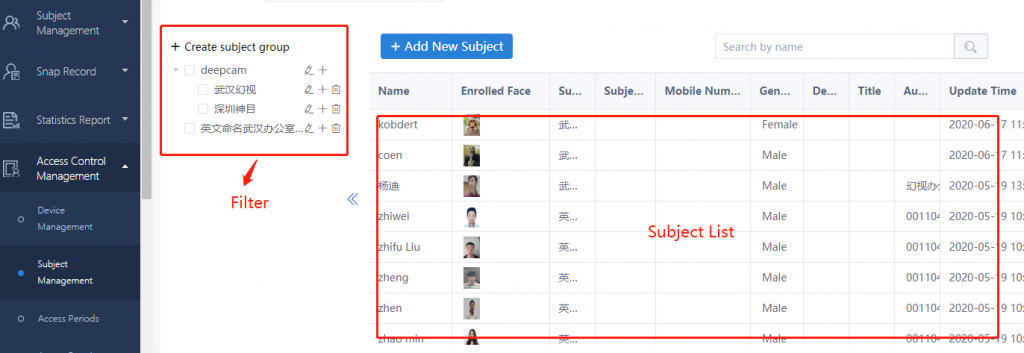
3. View Subject List
After the subject is added, it can be viewed in the right page of “Subject Management”. You can also filter queries by selecting the subject group on the left side of the page.
3.4 Access Period
Click the menu “Access Control Management” – “Access Period” on the left navigation bar, and click “+ Create Access Period” to set it. The access period can be set by day or by weekly cycle. Beside of that, each day also can be set to a single period or a number of periods.
Single Period: There is only one beginning and end time in a day, which means only one access period in a day. The subjects only allowed to access within this specified period. The access control tablet will only conduct face verification within this period of time, and will not conduct face verification at other times. For example, 05:00–14:00.
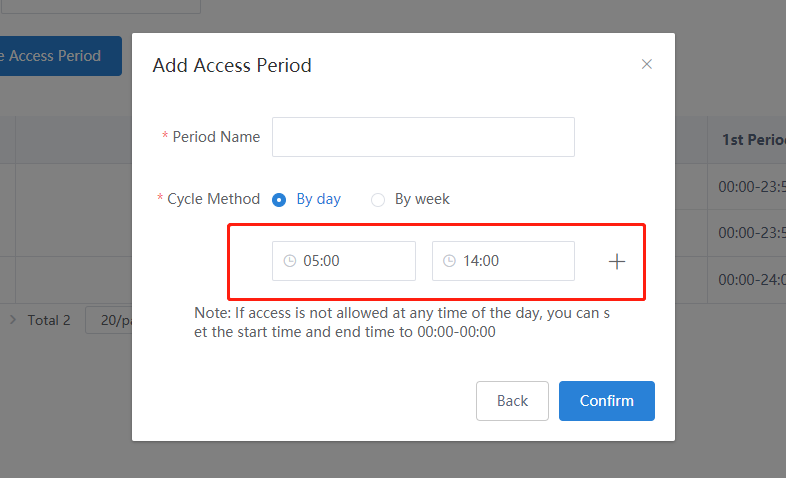
Multiple Periods: There are multiple start and end times in a day, which means multiple access periods in a day. The access control tablet will only conduct face verification within those periods, so that the subjects can get access to. Devices do not conduct face verification at other times, which means the subjects cannot enter and exit at other times. For example, Period 1: 00:00–11:00,Period 2:14:00–15:00, Period 3: 18:00-20:00.
Note: Please pay attention to its rationality if setting up multiple periods.
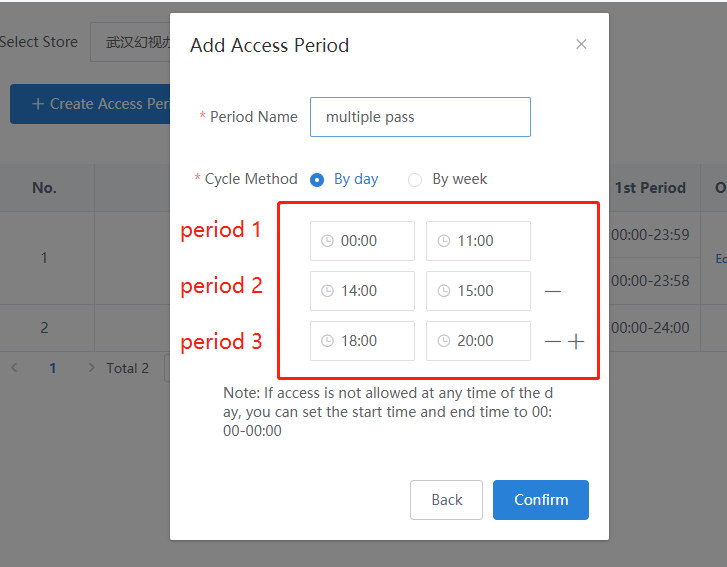
Note: If access is not allowed at any time of the day, you can set the start time and end time to 00:00–00:00.
3.5 Access Permit Management
Click the menu “Access Control Management” – “Access Permit Management” on the left navigation bar, and bind the device(s), subject(s) and access rules on the right page “Access Authorization” to complete the authorization. Please refer to next picture:
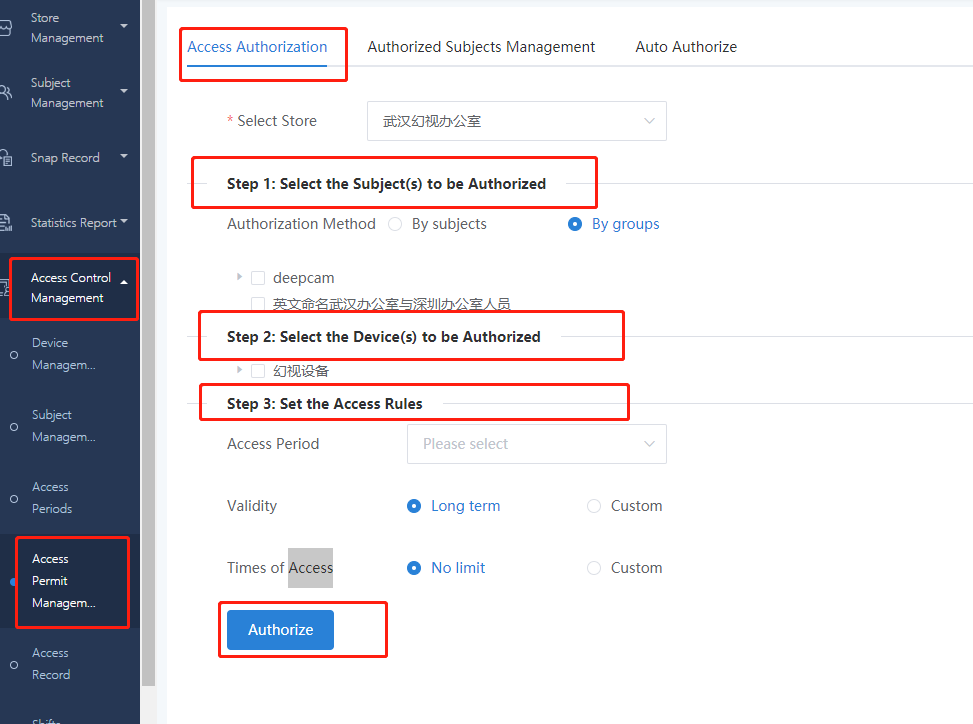
- There are two ways to select authorized subjects: by subjects and by groups. The difference between the two is that only the groups of subjects can be selected if by groups, which means the platform will automatically authorizes all the subjects under group by default if by groups. It is applied especially for large numbers of people under group. However, users are allowed to select all or part of the subjects under the group by subjects for authorization.
Note: when the number of subjects under the group are more than 300, please select by groups.
2) Selecting devices for authorization allow users to select all or part of the devices under the device group.
3) Selecting “Validity” is the expiration dates of access, and the access period is only valid within the specified term range.
4) “Time of Access” is the cumulative times of access permit within the access period.
5) For the already authorized group, the group or new subjects need to be authorized again if new subjects are added under the authorized group, .
After completing the authorization, users can query and edit on the page of “Authorized Subjects Management”.
3.6 Authorized Subjects Management
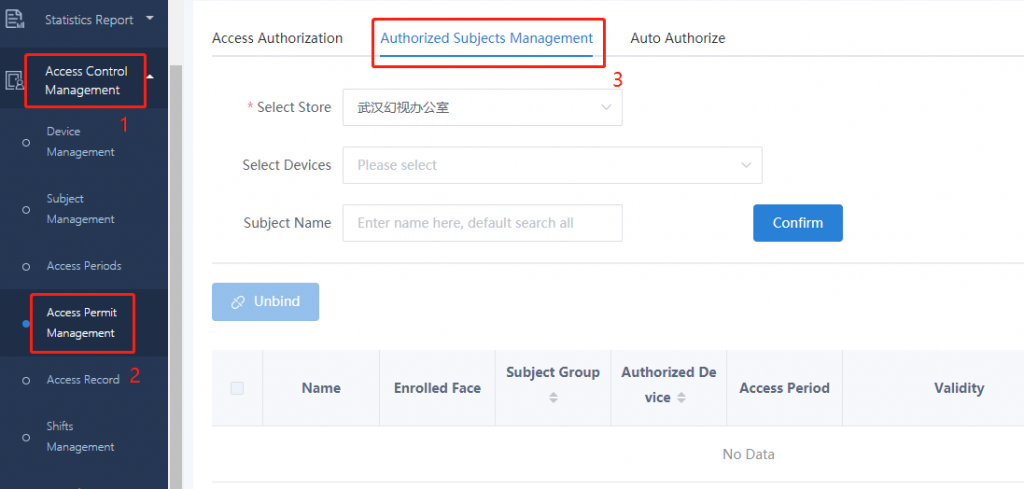
Click the menu “Access Control Management” – “Access Permit Management” on the left navigation bar, and then click “Authorized Subjects Management” on the right page, you can query the authorized subjects on the specified device under the store, as well as the corresponding access rules (including access period, validity and access times). As shown in the following figure:
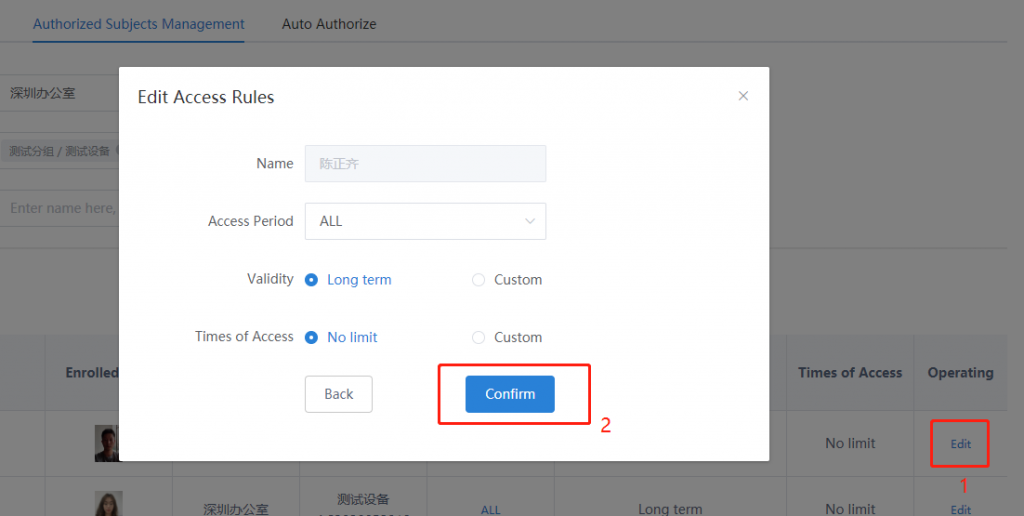
Click [edit] in the authorized subjects list to modify the general rules of a single subject. After successful modification, the platform will immediately issue the change information to the access control device. As shown in the following figure:
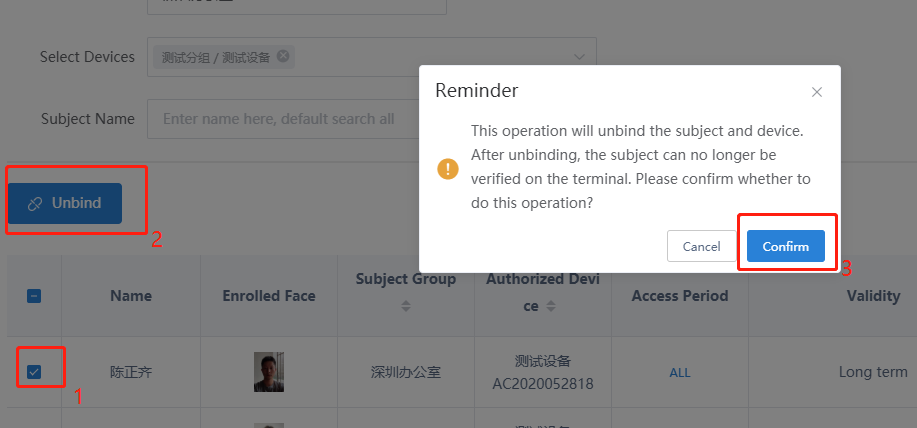
If someone is no longer authorized to access, the association between that subject and the device needs to be unbound. Unbinding support single or multiple mode. Check the subject who needs to be unbound, and then click [Unbind] on the top left of the list to confirm. After that, the subject will no longer conduct face verification on the access control device and cannot be authorized to access. If you need to restore, please re-authorize on the page of “Access Permit Management”. As shown in the following figure:
3.6 Inquring Access Record
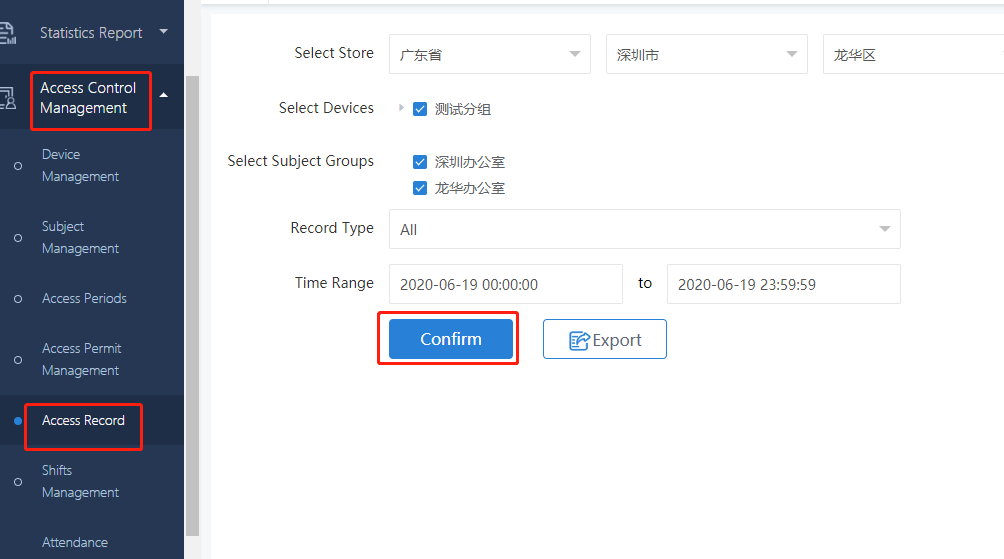
If you choose to upload records when adding the device, you can query access records in the page of “Access Control Management” – “Access Record”. When querying, please make sure there is an association between the device and the subject, otherwise the identification history cannot be queried.

Leave a Reply
You must be logged in to post a comment.