Step 1: Connect your camera to power supply and Ethernet
This is a camera embedded with gun detection algorithm. It can be managed by the DeepCloud platform with a web or mobile app. Once a gun is detected, the camera will push a notification in real time to the mobile app.
Below is how the camera is connected to power supply and Ethernet. A 12V/2A DC power supply is recommended. This camera supports POE. If you Ethernet cable is connected to a POE, then the DC power supply is not needed.

Step 2: Register a user account
If you use a PC, go to https://deepcloud.linksprite.com in your browser. Click on “Free Registration”, input the required information, and then click on “Register”, a window pops up and reminds that the registration is pending an administrator’s review,. After the review is passed, you will receive an SMS message or email notification, then you can log in to the platform.
In addition, the main account can invite others to register as a sub account by sending a link to the sub account’s email address.

If you use a mobile phone, find and download the app “Percepcam” in Google and IOS. Then open the app, follow similar instructions to register your account.

Step 3: Create a store
After you log in, you should see a window with a navigation menu on the left, and a workspace on the right. If you do not see the navigation menu, click on the sign

on the upper left corner.
The first thing you need to do is to create a store. We are sorry for using the name store if your deployment is not a store.
Click on “Store Management/Store List”, then click on “ + Create New Store”, and type in all your preferred information. Click on “Confirm”, your new store is now created. Please make sure to choose the correct time zone since this will make the time shown in your data correct.

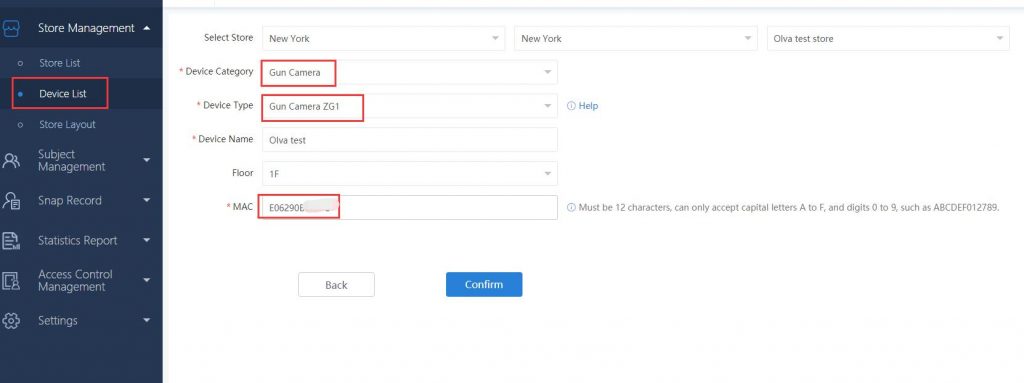
Step 4: Add new device
Click on “Store Management/Device List”, then click on “ + Create New Store”, and type in all your preferred information. The “Device Category” must be “Gun Camera”, and “Device Type” must be “Gun Camera ZG1”. For gun detection cameras, set the “Traffic Statistics” to OFF. The MAC address can be found at a sticker on the body of the camera.


After the camera is added successfully, the list of devices can be seen in “Device List”. If the camera display is offline, wait for a few minutes then check again. If the camera is still offline, restart the device by unplugging the power supply and Ethernet cable and plugging them back, then refresh the page. At this point the camera is displayed online, as shown below,

Step 5: Check your gun detection results
On PC, Click on “Snap Record/Warning Record”, Select your store and device, choose “Gun Detection” in “Search Type”, set the search data and time, then click on “Confirm”.

On the mobile app, click on “Mine” at the bottom menu, click on “Message Center”, choose your store, devices, choose “Gun Warning” in Type, then your gun detection results will be shown.

Step 6: Set and check your gun detection notifications
When a gun is detected in your camera, a notification is pushed to your cell phone. So first open your mobile app, and go to “Mine/Manage Notification” to turn on “Warning Notification”. You will see there are “APP push” and “Email Push”. If you want to receive an email notification, turn on the “Email Push”. Other types of APP Push are for face detection applications.


Comments are closed.