BrainFrame is a smart vision platform that is built to be easy to scale, highly configurable, and deployable on-premises or to the cloud. Powered by automatic algorithm fusion and optimization engine, BrainFrame enables plug and play integration of VisionCapsules. This platform turns any connected camera into a smart sensor for sophisticated monitoring and inspection tasks, serving a variety of vertical markets.
The BrainFrame ecosystem includes a server for the video processing and a client to view the live results and configure the server. The server requires a Jovision AI box, and the client can run on either the Jovision AI Box or Windows 10 machine.

BrainFrame CLI
For this guide, you need to use the brainframe-cli (Command Line Interface) to download and install BrainFrame. This tool requires Ubuntu 18.04 or above. First, install pip, and then use pip to install the brainframe-cli: For command line interface, open terminal by pressing Alt+Ctrl+T Key or press Alt+F2 and run the command gnome-terminal. Click button on the left bottom of the screen and click Utilities. Click to Terminal icon to open it. Once open the Terminal, run the below commands one by one followed by the Enter key. sudo apt update && sudo apt upgrade sudo apt install -y python3-pip pip3 install –upgrade pip sudo -H pip3 install –upgrade brainframe-cli Note: Each command execution takes some time. Wait until each execution completed.
Starting the Server
With the tool installed, now you can use the brainframe command.
i. Install Server
Now, install BrainFrame by running the below command and following the directions: sudo brainframe install Once BrainFrame is downloaded, the BrainFrame CLI will ask you if you want to start BrainFrame server now or not. You can either start BrainFrame server now, or with the following command later: sudo brainframe compose up -d If you want to stop the server, then run sudo brainframe compose down For updating the server sudo brainframe update
Install BrainFrame Client
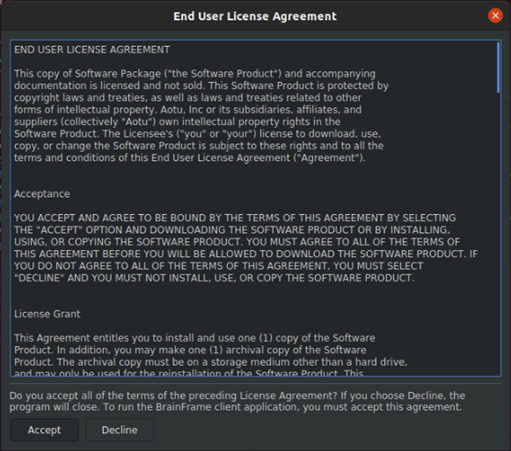
The BrainFrame Client is available for both Linux and Windows Operating System. For all Linux distributions, the client is available on the Snap Store. To install the client, run below command in the terminal sudo snap install brainframe-client –channel=0.28/stable To run the Client, brainframe-client BrainFrame Client required license. You can download the demo license from https://dilililabs.com/en/ Register an account with your email address. You will get a 2-channel demo key. After Sign In, on the Account Page, under the “License Key” section, click “Create a New Key”. Then, click “Download Key” once the option appears. When the client started running, first you need to accept the “End User License Agreement”.
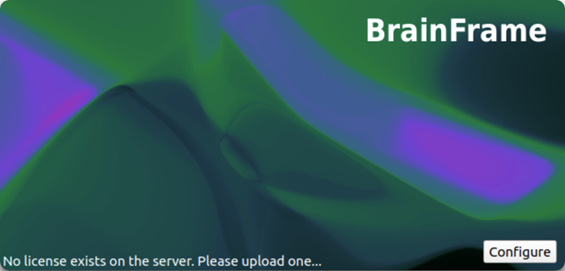
The client will now request a license be uploaded to the server, like such:
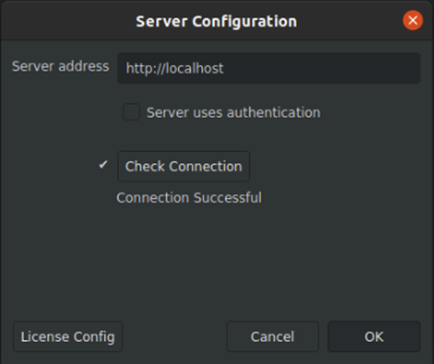
Now on the client, select “Configure” and then “License Config”.
Drag in the downloaded license_file into the window, then select “Update License”. It should complete looking like this:
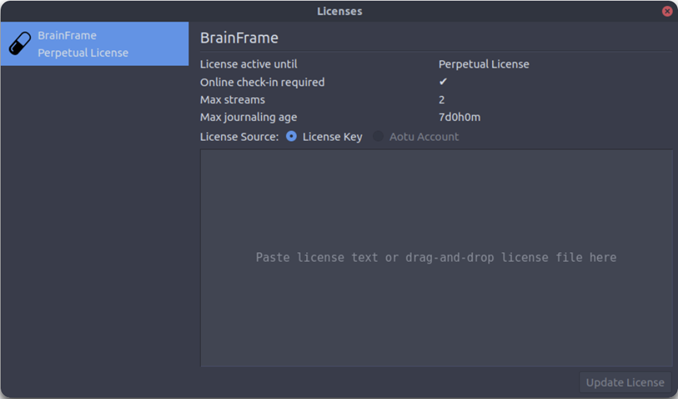
Close the license config and the server config windows, and the client will open!
Add Video Stream
BrainFrame runs analysis primarily on video streams. Streams can come from many sources, like an IP camera, webcam, or video file. BrainFrame supports all major video formats and is expected to support any IP camera that provides an RTSP, HTTP, or MJPEG stream. This guide assumes that the server, client, and any IP cameras are on the same local network. BrainFrame supports analyzing streams on other private networks using ‘Premises’ stream proxying system.
Adding a Stream
Click the

button at the bottom right of the window to add a stream. The Add Stream dialog will appear on right. BrainFrame supports three types of video streams: File, webcam, and IP camera. For this example, we will use a rtsp. rtsp://{username}:{password}@{ip address}:{port}/{path}. For Jovision camera, please refer to: https://learn.linksprite.com/project/how-to-access-jovision-camera-rtsp-stream/. For Hikvision NVR, please refer to: https://learn.linksprite.com/project/how-to-add-jovision-security-camera-to-hikvision-ds-7600-nvr-and-access-rtsp-video-stream-from-hikvision-nvr/.
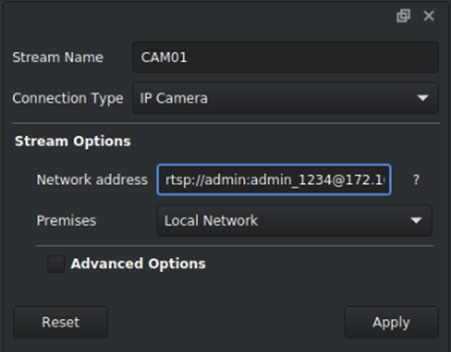
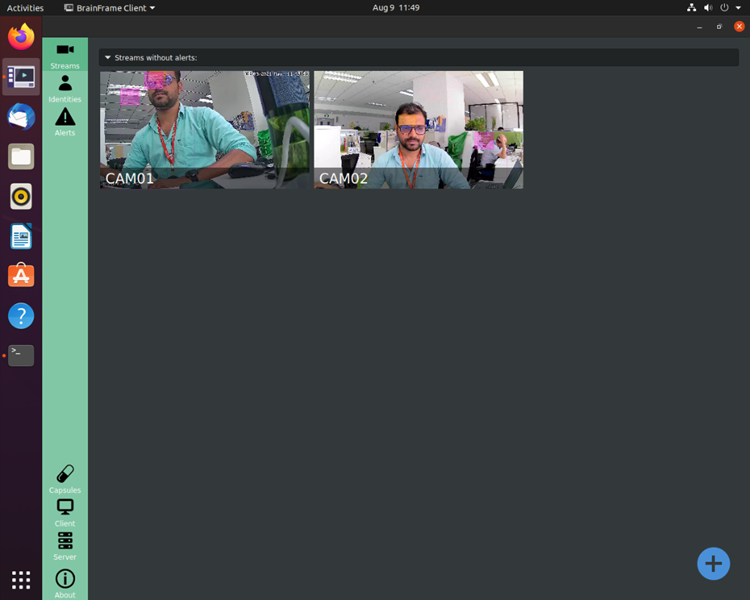
Once a stream is added, you will see a video thumbnail of the stream, live, on the top left. As you add streams, they will fill this screen in a grid. If you add more video streams, the view will look something like this.
ii. Stream Types
Different stream types take different parameters. The following is a quick introduction to what each parameter means.
a. IP Cameras
IP camera streams take a URL as their main parameter. This URL should point to an RTSP, HTTP, or HTTPS video stream. BrainFrame supports many videos encoding formats, including H264, VP8/9, and MJPEG.
b. Web Camera
Webcam streams take a webcam device ID as their only parameter. Webcam device IDs start at zero and increment for each webcam that is connected. For a computer with a single connected webcam, the ID will generally be “0”.
c. File
File streams simply take a file path. Most common video file types are supported by BrainFrame. When the source video ends, BrainFrame will automatically loop it back to the beginning.
Install a Capsule
This tutorial will guide you through the process of downloading one of the freely available OpenVisionCapsule capsules and adding it to BrainFrame. This is one of the simple face detector capsule that works on all platforms, even those without a GPU.
i. Downloading the Capsule
On the computer that is hosting the BrainFrame server, navigate to the downloads page https://dilililabs.com/docs/downloads/ and under Capsules, locate the Detector Face Fast entry. Click the link to download the capsule.
ii. Adding the Capsule to BrainFrame
In the server’s data directory (/var/local/brainframe by default), there should be a directory called capsules/. If the capsules/ directory does not exist, create it. Place the capsule file that you just downloaded (detector_face_fast.cap) within this directory. Note: If you do not know the location of BrainFrame’s data directory, you can get it directly using the BrainFrame CLI. mv PATH/TO/detector_face_fast.cap $(brainframe info data_path)/capsules/ An alternative is to download the capsule directly to the capsules/ directory wget -P $(brainframe info data_path)/capsules {DOWNLOAD_URL}
iii. Verifying That the Capsule Works
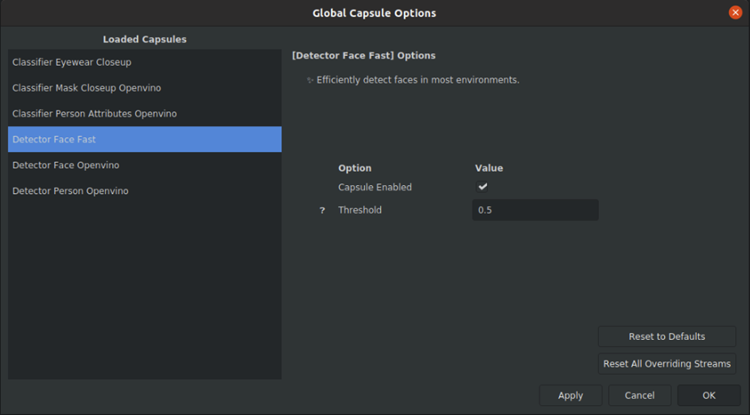
The capsule should now be ready for use by BrainFrame. Let’s open the client and make sure everything is working properly. Open the BrainFrame client and then open the Global Capsule Configuration dialog. You should see an entry for the Detector Face Fast capsule, with configuration options.
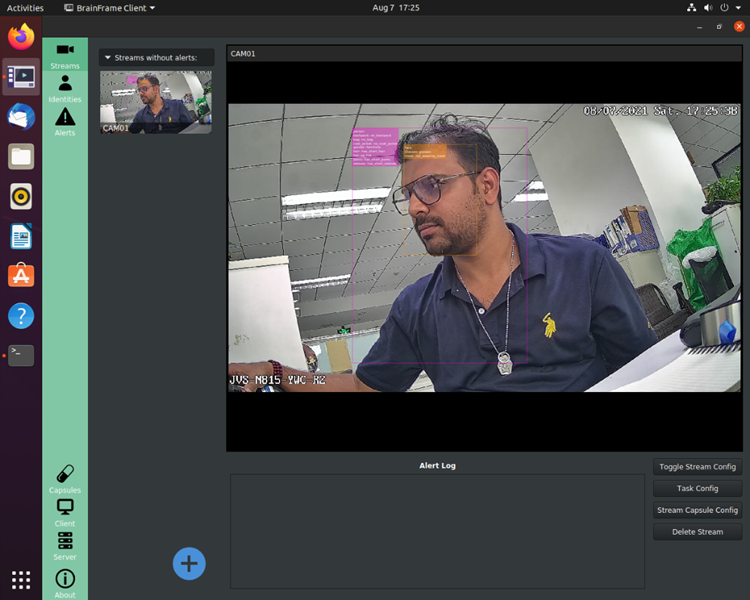
Once you load a stream, you will be able to see the inference results on the Streams view.
Add Alarm
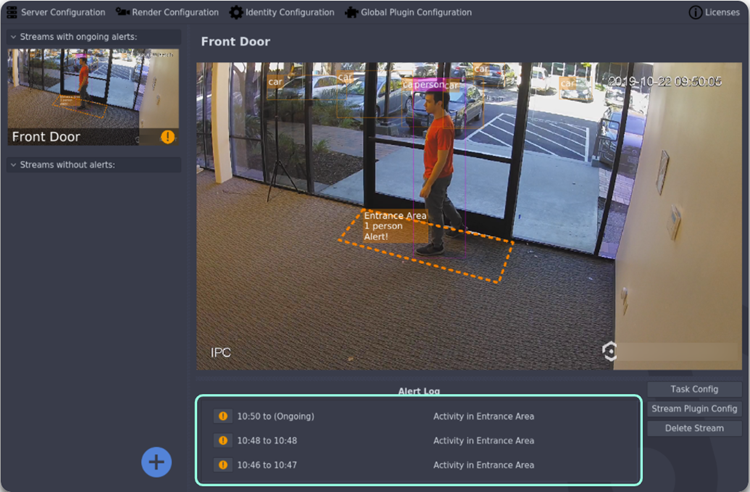
Alarms allow BrainFrame to notify you when a specified condition happens within a zone. Alarms generate alerts when their condition is met. Alerts are made available through the REST API, and a stream with an active alert is brought to the top of the grid view in the client. All alarms have an “Active Time”, a period during the day where the alarm is allowed to trigger. This can be useful if, for example, you want to be notified if a person is in an area after business hours.
i. Alarm Conditions
There are two main types of alarm conditions: count-based conditions, and rate-based conditions.
a. Count-Based Conditions
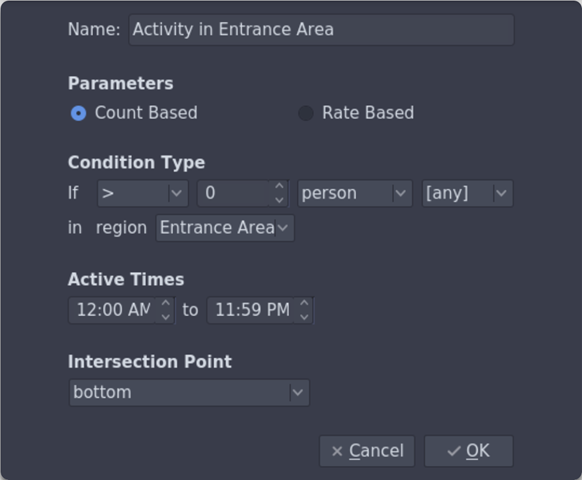
Count-based conditions are triggered based on the number of objects in a zone. The condition may trigger if the number of a certain object class is greater than, less than, equal to, or not equal to a given value. The condition may also specify an attribute value to filter objects by. The following are examples of count-based conditions: · If less than 3 people in uniform are in region “Entrance”, raise an alarm · If there is not 1 person in region “Cash Register”, raise an alarm · If there is greater than 0 cars in region “Restricted Parking”, raise an alarm
b. Rate-Based Conditions
Rate-based conditions are triggered based on a change in the number of objects in a zone over time. The following are examples of rate-based conditions: · If greater than 10 people enter region “Main Entrance” within 5 seconds, raise an alarm · If fewer than 1 car exits region “Parking Lot” within 120 seconds, raise an alarm
ii. Creating an Alarm
To create an alarm, open the Task Configuration window for the stream of interest and under the “Add New” section, click the “Alarm” button.
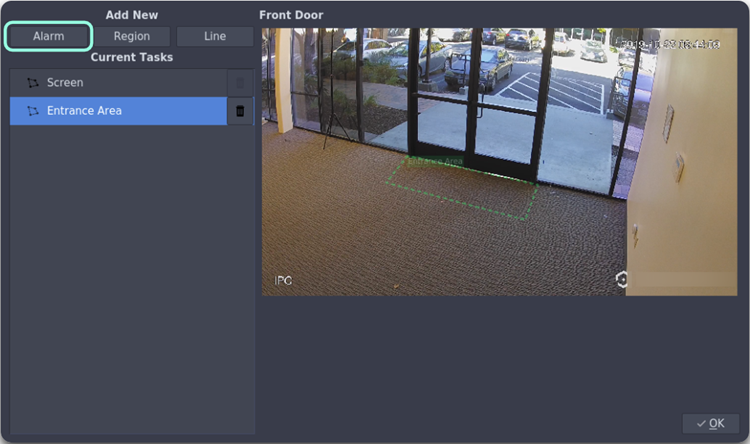
This will bring up the “Alarm Configuration” window. Here you may choose which condition type to use and specify each parameter. The “Condition Type” section is meant to be read like a sentence. Note: If you don’t see any class names available in the second drop-down, make sure that you have at least one plugin loaded that is able to detect objects.
When an alarm is triggered, the alert will appear in that stream’s alert log and the stream will be moved to the “Streams with ongoing alerts” section.
Intersection Points
By default, a detection is said to be inside a zone if the bottom center point of the detection is in the zone. This bottom center point is referred to as the detection’s “intersection point”. This default works well for most overhead camera angles, but can be changed to the top, left, right, or center of the detection by changing the “Intersection Point” drop-down in the alarm configuration dialog.
Add Zone
BrainFrame allows you to specify areas of interest within a video stream and gain specific insights about that area. These come in two forms, regions and lines, which are collectively referred to as “zones”. Region zones are often used for counting objects inside of a region. Line zones are for counting objects that have crossed the line.
i. Creating a Zone
To create a zone, start by clicking on the video stream that you want to add the zone to in the grid view, then click the “Task Config” button in the bottom-right.
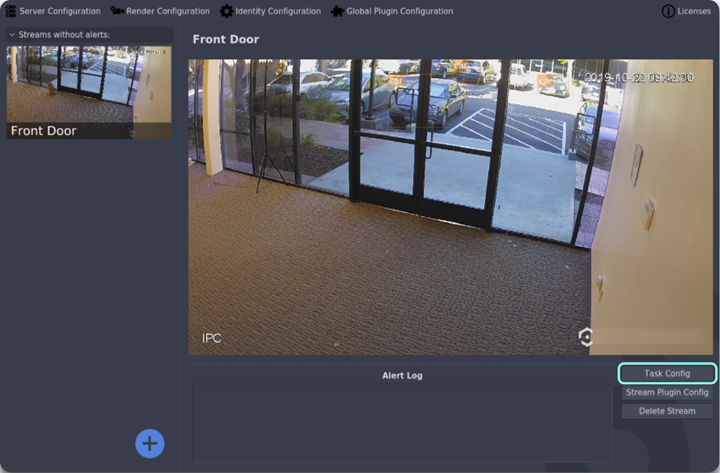
You will see the Task Configuration window. This window allows us to create zones and add alarms to these zones, which will be discussed in the next section. For now, click on the “Region” or “Line” button to start creating a zone of that type.
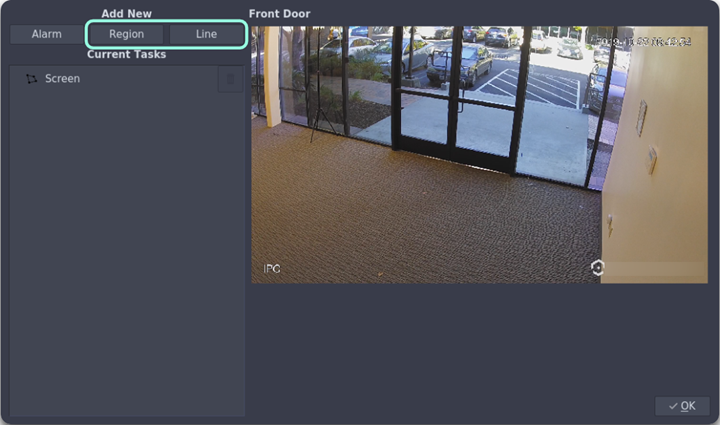
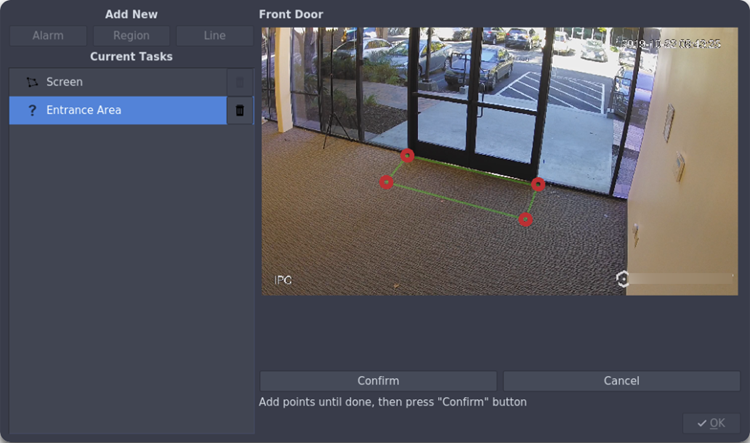
To specify where a region is located, click to create the region’s vertices one-by-one. When the region is complete, click the “Confirm” button. For lines, click to specify where the line starts, then click again to specify where it ends.
Now that we know how to create zones in a stream, we will discuss how to get information from these zones with alarms.

Comments are closed.