[vc_row][vc_column width=”1/1″][vc_tour][vc_tab title=”Introduction” tab_id=”1395587935-1-2″][vc_column_text]74HC595 simply is an 8-bit shift register with tri-state output.
In the case where Arduino doesn’t have enough I/Os, we can use 74HC595 to expand the number of I/Os. In this project, we will use 74HC595 to control 8 LEDs.
[/vc_column_text][/vc_tab][vc_tab title=”Parts List” tab_id=”1395587935-2-4″][vc_column_text]
- 1 x 74HC595 DIP chips
- 4 x Red LED
- 4 x Green LED
- 8 x 220Ω resistors
- 1 x [bigcommerce link=”/mini-breadboard-mini-self-adhesive-for-arduino-black/” target=”_blank”]Breadboard[/bigcommerce]
- Several jumper wires
[/vc_column_text][/vc_tab][vc_tab title=”Wiring Diagram” tab_id=”1395588536349-2-5″][vc_column_text]We hook up the parts according to the following diagram:
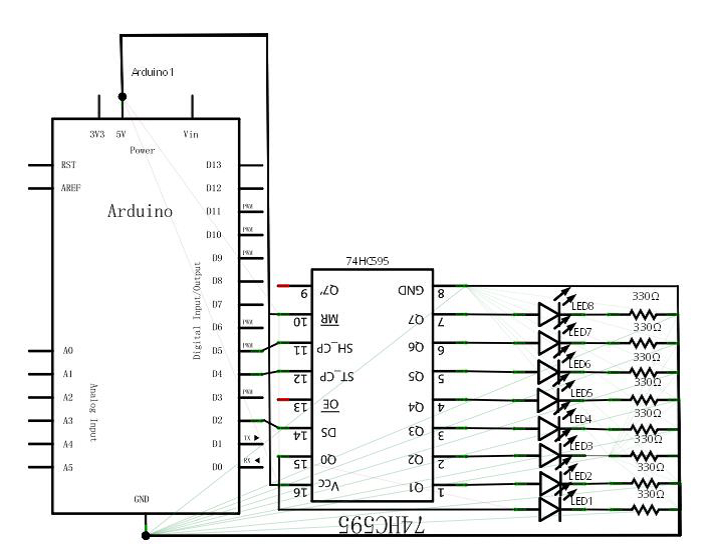
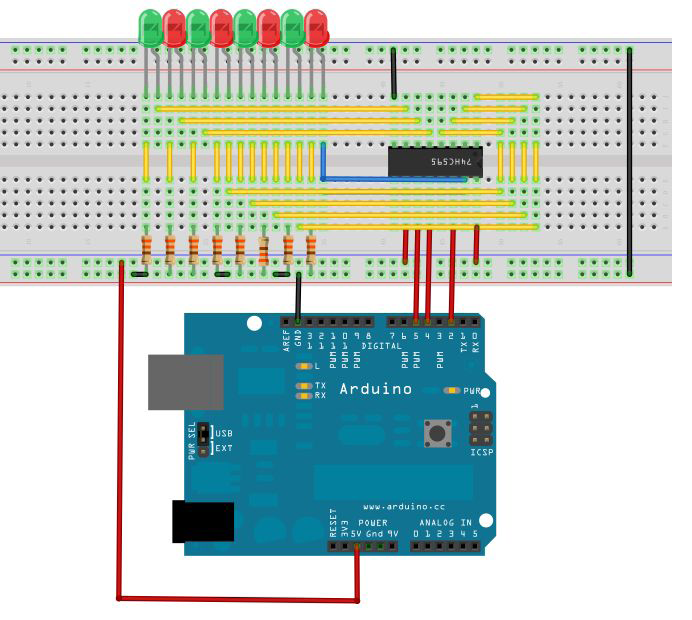
This circuit may at first seems complicated. But after we carefully analyze it, it is indeed simple.
[/vc_column_text][/vc_tab][vc_tab title=”Code” tab_id=”1395588746286-3-3″][vc_column_text]
int data = 2;
int clock = 4;
int latch = 5;
int ledState = 0;
const int ON = HIGH;
const int OFF = LOW;
void setup()
{
pinMode(data, OUTPUT);
pinMode(clock, OUTPUT);
pinMode(latch, OUTPUT);
}
void loop()
{
int delayTime = 100;
for(int i = 0; i < 256; i++)
{
updateLEDs(i);
delay(delayTime);
}
}
void updateLEDs(int value)
{
digitalWrite(latch, LOW);
shiftOut(data, clock, MSBFIRST, value);
digitalWrite(latch, HIGH);
}
void updateLEDsLong(int value)
{
digitalWrite(latch, LOW);
for(int i = 0; i < 8; i++)
{
int bit = value & B10000000;
value = value << 1;
if(bit == 128){digitalWrite(data, HIGH);}
else{digitalWrite(data, LOW);}
digitalWrite(clock, HIGH);
delay(1);
digitalWrite(clock, LOW);
}
digitalWrite(latch, HIGH);
}
int bits[]={B00000001, B00000010, B00000100, B00001000, B00010000, B00100000,
B01000000, B10000000};
int masks[] ={B11111110, B11111101, B11111011, B11110111, B11101111, B11011111,
B10111111, B01111111};
void changeLED(int led, int state)
{
ledState = ledState & masks[led];
if(state == ON){ledState = ledState | bits[led];}
updateLEDs(ledState);
}
After downloading the program we can see eight LEDs flashing in an impressive pattern.
[/vc_column_text][/vc_tab][/vc_tour][/vc_column][/vc_row]
Leave a Reply
You must be logged in to post a comment.