[vc_row][vc_column width=”1/1″][vc_column_text]The components used in this experiment are shown below:
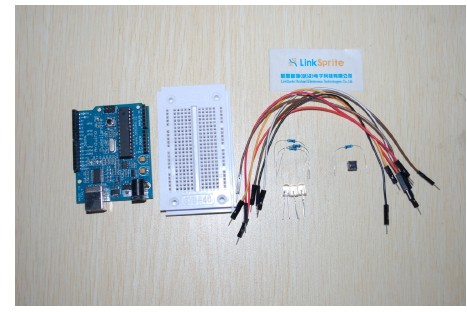
The components aer one red LED, one green LED, one YELLOW LED, and three 470 ohm resister, one 10k ohm resistor,one button ,six jumper wires, and one breadboard.[/vc_column_text][/vc_column][/vc_row][vc_row][vc_column width=”1/1″][vc_tour][vc_tab title=”Schematics” tab_id=”1392618950-1-45″][vc_column_text]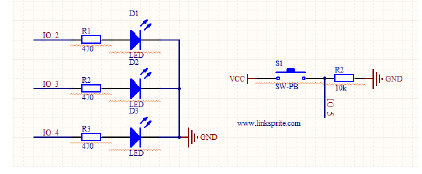 [/vc_column_text][/vc_tab][vc_tab title=”Wiring Diagram” tab_id=”1392618950-2-5″][vc_column_text]
3LEDs will blink, and when the button is pressed, they will stop blinking.[/vc_column_text][/vc_tab][vc_tab title=”Arduino code” tab_id=”1392619593358-2-5″][vc_column_text]Arduino code:
int redPin = 2;
int yellowPin = 3;
int greenPin = 4;
int buttonPin = 5;
int state = 0;
void setup()
{
pinMode(redPin, OUTPUT);
pinMode(yellowPin, OUTPUT);
pinMode(greenPin, OUTPUT);
pinMode(buttonPin, INPUT);
}
void loop()
{
if (digitalRead(buttonPin))
{
if (state == 0) {
setLights(HIGH, LOW, LOW);
state = 1;
}
else if (state == 1) {
setLights(HIGH, HIGH, LOW);
state = 2;
}
else if (state == 2) {
setLights(LOW, LOW, HIGH);
state = 3;
}
else if (state == 3) {
setLights(LOW, HIGH, LOW);
state = 0;
}
delay(1000);
}
}
void setLights(int red, int yellow, int green)
{
digitalWrite(redPin, red);
digitalWrite(yellowPin, yellow);
digitalWrite(greenPin, green);
}[/vc_column_text][/vc_tab][/vc_tour][/vc_column][/vc_row]
Leave a Reply
You must be logged in to post a comment.