[vc_row][vc_column width=”1/1″][/vc_column][/vc_row][vc_row][vc_column width=”1/1″][vc_tour][vc_tab title=”Introduction ” tab_id=”1395132164-1-39″][vc_column_text]This 128×128 mini color LCD is a perfect match for the portable application. It was designed to replace a broken screen in a cell phone. So the connector was not designed for excessive attachment/detachment. Please be gentle and handle with care.
This inexpensive LCD comes with a powerful white LED backlight and a relatively simple serial interface. It’s a 9-bit interface, so beware. But we were able to get the LCD up and running on a LPC2138 with a few hours worth of work.
 [/vc_column_text][/vc_tab][vc_tab title=”Wiring diagram” tab_id=”1395132164-2-90″][vc_column_text]
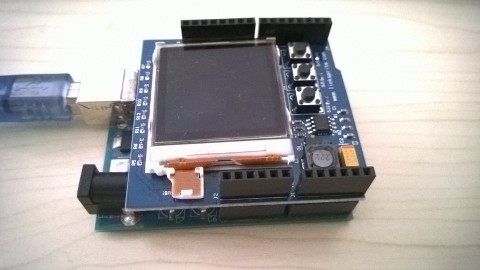
Directly install this LCD shield onto Arduino.[/vc_column_text][/vc_tab][vc_tab title=”Test code” tab_id=”1395132864991-2-4″][vc_column_text]Library Download:https://github.com/jimblom/ColorLCDShield
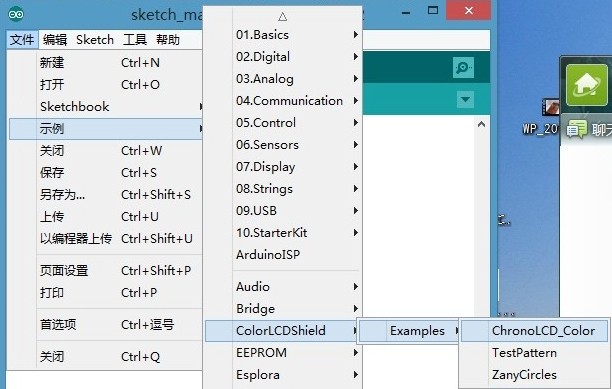
Download the zip file and extract it, rename this file as “ColorLCDShield”, put it to the “libraries” directory under arduino software installation directory.Then, start arduinoIDE software, you can see this library as below.
As shown below:

/*
  ChronoLCD Color - An example sketch for the Color LCD Shield Library
  by: Jim Lindblom
  SparkFun Electronics
  date: 6/23/11
  license: CC-BY SA 3.0 - Creative commons share-alike 3.0
  use this code however you'd like, just keep this license and
  attribute. Let me know if you make hugely, awesome, great changes.

  This sketch draws an analog and digital clock on the Color LCD
  Shield. You can also use the on-board buttons to set the hours
  and minutes.

  Use the defines at the top of the code to set the initial time.
  You can also adjust the size and color of the clock.

  To set the time, first hit S3. Then use S1 and S2 to adjust the
  hours and minutes respsectively. Hit S3 to start the clock
  back up.

  This example code should give you a good idea of how to use
  the setCircle, setLine, and setStr functions of the Color LCD
  Shield Library.
*/
#include <ColorLCDShield.h>

// Enter the time below in 12-hr format
#define HOURS 10
#define MINUTES 21
#define SECONDS 00
#define AMPM 0  // enter 0 for AM, 1 for PM

#define CLOCK_RADIUS 45  // radius of clock face
#define CLOCK_CENTER 50  // If you adjust the radius, you'll probably want to adjust this
#define H_LENGTH  25  // length of hour hand
#define M_LENGTH  35  // length of minute hand
#define S_LENGTH  43  // length of second hand

#define BACKGROUND  BLACK  // room for growth, adjust the background color according to daylight
#define C_COLOR  RED  // This is the color of the clock face, and digital clock
#define H_COLOR  BLUE  // hour hand color
#define M_COLOR  GREEN  // minute hand color
#define S_COLOR  YELLOW  // second hand color

LCDShield lcd;

int hours, minutes, seconds, ampm;
int buttonPins[3] = {3, 4, 5};

void setup()
{
  /* Set up the button pins as inputs, set pull-up resistor */
  for (int i=0; i<3; i++)
  {
    pinMode(buttonPins[i], INPUT);
    digitalWrite(buttonPins[i], HIGH);
  }

  hours = HOURS;
  minutes = MINUTES;
  seconds = SECONDS;
  ampm = AMPM;

  /* Initialize the LCD, set the contrast, clear the screen */
  lcd.init(PHILIPS);
  lcd.contrast(-63);
  lcd.clear(BACKGROUND);

  drawClock();  // Draw the clock face, this includes 12, 3, 6, 9
  displayAnalogTime(hours, minutes, seconds);  // Draw the clock hands
  displayDigitalTime(hours, minutes, seconds, ampm);  // Draw the digital clock text
}

void loop()
{
  /* We'll run around checking for button presses,
     until it's been a second */
  while(millis() % 1000)
  {
    if (!digitalRead(buttonPins[2]))
      setTime();  // If S3 was pressed, go set the time
  }

  /* We'll get here if it's been a second. We need to increase
  seconds by 1 and then go from there */
  seconds++;
  if (seconds >= 60)
  {
    seconds = 0;  // If seconds is 60, set it back to 0
    minutes++;    // and increase minutes by 1
    if (minutes >= 60)
    {
      minutes = 0;  // If minutes is 60, set it back to 0
      hours++;      // and increase hours by 1
      if (hours == 12)
        ampm ^= 1;  // If it's 12 o'clock, flip ampm
      if (hours >= 13)
        hours = 1;  // If hours is 13, set it to 1. 12-hr clock.
    }
  }
  /* Once each second, we'll redraw the clock with new values */
  drawClock();
  displayAnalogTime(hours, minutes, seconds);
  displayDigitalTime(hours, minutes, seconds, ampm);
}
/*
  setTime uses on-shield switches S1, S2, and S3 to set the time
  pressing S3 will exit the function. S1 increases hours, S2
  increases seconds.
 */
void setTime()
{
  /* Reset the clock to midnight */
  seconds = 0;
  minutes = 0;
  hours = 12;
  ampm = 0;

  /* Draw the clock, so we can see the new time */
  drawClock();
  displayAnalogTime(hours, minutes, seconds);
  displayDigitalTime(hours, minutes, seconds, ampm);

  while (!digitalRead(buttonPins[2]))
    ;  // wait till they let go of S1

  /* We'll run around this loop until S3 is pressed again */
  while(digitalRead(buttonPins[2]))
  {
    /* If S1 is pressed, we'll update the hours */
    if (!digitalRead(buttonPins[0]))
    {
      hours++;  // Increase hours by 1
      if (hours == 12)
        ampm ^= 1;  // Flip am/pm if it's 12 o'clock
      if (hours >= 13)
        hours = 1;  // Set hours to 1 if it's 13. 12-hour clock.

      /* and update the clock, so we can see it */
      drawClock();
      displayAnalogTime(hours, minutes, seconds);
      displayDigitalTime(hours, minutes, seconds, ampm);
    }
    if (!digitalRead(buttonPins[1]))
    {
      minutes++;  // Increase minutes by 1
      if (minutes >= 60)
        minutes = 0;  // If minutes is 60, set it back to 0

      /* and update the clock, so we can see it */
      drawClock();
      displayAnalogTime(hours, minutes, seconds);
      displayDigitalTime(hours, minutes, seconds, ampm);
    }
  }
  /* Once S3 is pressed, we'll exit, but not until it's released */
  while(!digitalRead(buttonPins[2]))
    ;
}

/*
  displayDigitalTime() takes in values for hours, minutes, seconds
  and am/pm. It'll print the time, in digital format, on the
  bottom of the screen.
*/
void displayDigitalTime(int h, int m, int s, int ap)
{
  char timeChar[12];

  if (!ap)
  {
    sprintf(timeChar, "%.2d:%.2d:%.2d AM", h, m, s);
  }
  else
  {
    sprintf(timeChar, "%.2d:%.2d:%.2d PM", h, m, s);
  }
  /* Print the time on the clock */
  lcd.setStr(timeChar, CLOCK_CENTER + CLOCK_RADIUS + 4, 22,
              C_COLOR, BACKGROUND);
}

/*
  drawClock() simply draws the outer circle of the clock, and '12',
  '3', '6', and '9'. Room for growth here, if you want to customize
  your clock. Maybe add dashe marks, or even all 12 digits.
*/
void drawClock()
{
  /* Draw the circle */
  lcd.setCircle(CLOCK_CENTER, 66, CLOCK_RADIUS, C_COLOR);

  /* Print 12, 3, 6, 9, a lot of arbitrary values are used here
     for the coordinates. Just used trial and error to get them
     into a nice position. */
  lcd.setStr("12", CLOCK_CENTER - CLOCK_RADIUS, 66-9, C_COLOR, BACKGROUND);
  lcd.setStr("3", CLOCK_CENTER - 9, 66 + CLOCK_RADIUS - 12, C_COLOR, BACKGROUND);
  lcd.setStr("6", CLOCK_CENTER + CLOCK_RADIUS - 18, 66-4, C_COLOR, BACKGROUND);
  lcd.setStr("9", CLOCK_CENTER - 9, 66 - CLOCK_RADIUS + 4, C_COLOR, BACKGROUND);
}

/*
  displayAnalogTime() draws the three clock hands in their proper
  position. Room for growth here, I'd like to make the clock hands
  arrow shaped, or at least thicker and more visible.
*/
void displayAnalogTime(int h, int m, int s)
{
  double midHours;  // this will be used to slightly adjust the hour hand
  static int hx, hy, mx, my, sx, sy;

  /* Adjust time to shift display 90 degrees ccw
     this will turn the clock the same direction as text */
  h -= 3;
  m -= 15;
  s -= 15;
  if (h <= 0)
    h += 12;
  if (m < 0)
    m += 60;
  if (s < 0)
    s += 60;

  /* Delete old lines: */
  lcd.setLine(CLOCK_CENTER, 66, CLOCK_CENTER+sx, 66+sy, BACKGROUND);  // delete second hand
  lcd.setLine(CLOCK_CENTER, 66, CLOCK_CENTER+mx, 66+my, BACKGROUND);  // delete minute hand
  lcd.setLine(CLOCK_CENTER, 66, CLOCK_CENTER+hx, 66+hy, BACKGROUND);  // delete hour hand

  /* Calculate and draw new lines: */
  s = map(s, 0, 60, 0, 360);  // map the 0-60, to "360 degrees"
  sx = S_LENGTH * sin(3.14 * ((double) s)/180);  // woo trig!
  sy = S_LENGTH * cos(3.14 * ((double) s)/180);  // woo trig!
  lcd.setLine(CLOCK_CENTER, 66, CLOCK_CENTER+sx, 66+sy, S_COLOR);  // print second hand

  m = map(m, 0, 60, 0, 360);  // map the 0-60, to "360 degrees"
  mx = M_LENGTH * sin(3.14 * ((double) m)/180);  // woo trig!
  my = M_LENGTH * cos(3.14 * ((double) m)/180);  // woo trig!
  lcd.setLine(CLOCK_CENTER, 66, CLOCK_CENTER+mx, 66+my, M_COLOR);  // print minute hand

  midHours = minutes/12;  // midHours is used to set the hours hand to middling levels between whole hours
  h *= 5;  // Get hours and midhours to the same scale
  h += midHours;  // add hours and midhours
  h = map(h, 0, 60, 0, 360);  // map the 0-60, to "360 degrees"
  hx = H_LENGTH * sin(3.14 * ((double) h)/180);  // woo trig!
  hy = H_LENGTH * cos(3.14 * ((double) h)/180);  // woo trig!
  lcd.setLine(CLOCK_CENTER, 66, CLOCK_CENTER+hx, 66+hy, H_COLOR);  // print hour hand
}
[/vc_column_text][/vc_tab][vc_tab title=”Results” tab_id=”1395135702797-3-4″][vc_column_text]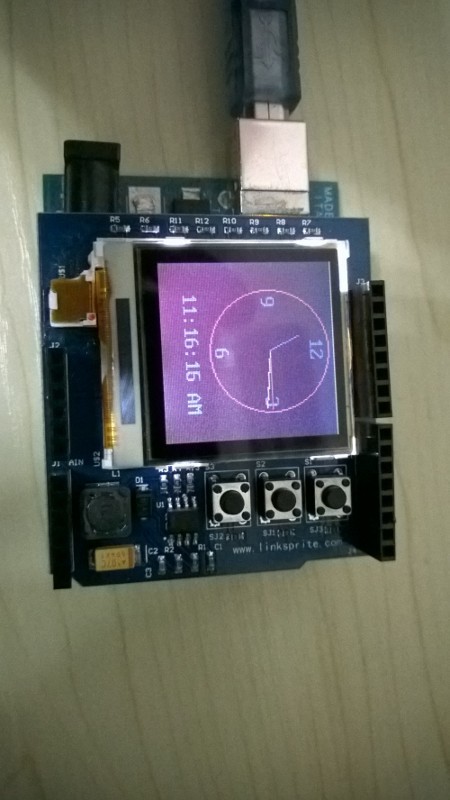 [/vc_column_text][/vc_tab][/vc_tour][/vc_column][/vc_row]
Leave a Reply
You must be logged in to post a comment.