[vc_row][vc_column width=”1/1″][vc_tour][vc_tab title=”Introduction” tab_id=”1395915647-1-74″][vc_column_text]RS485 shield adds a RS485 signal translation to TTL UART of Arduino Uno. RS485 signal uses a differential signal negative logic, whereas logic “0” is represented by a positive voltage difference of + (2~6) V between two lines, and logic “1” corresponds to a negative voltage difference of – (2~6) V between two lines. The maximum transmission data rate of RS-485 is 10Mbps.
In this tutorial, we will look at how to use LinkSprite RS485 Shield v2.
 [/vc_column_text][/vc_tab][vc_tab title=”Parts List” tab_id=”1395915647-2-58″][vc_column_text]
- 2 x [bigcommerce link=”/cityduino-arduino-uno-compatible-device/” target=”_blank”]Arduino UNO[/bigcommerce]
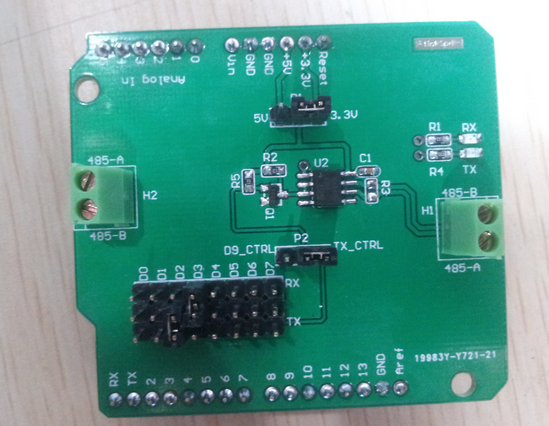
- 2 x RS485 Shield v2
- Several jumper wires
[/vc_column_text][/vc_tab][vc_tab title=”Wiring Diagram” tab_id=”1395921145096-2-2″][vc_column_text]
Left RS485 module H2 485-A -> Right RS485 module H2 485-A
Left RS485 module H2 485-B -> Right RS485 module H2 485-B
Left RS485 P1 -> 3.3V Right RS485 P1-> 3.3V
Left RS485 P2 -> TX_CTRL Right RS485 P2-> TX_CTRL
Left RS485 D2 -> TX Right RS485 D2 -> TX
Left RS485 D3-> RX Right RS485 D3-> RX
[/vc_column_text][/vc_tab][vc_tab title=”Sample Code” tab_id=”1395921147658-3-2″][vc_column_text]According to the wiring diagram, we flash transmitter code on the left Arduino, and flash receiver code on the right Arduino.
Code for the transmitter:
#include <SoftwareSerial.h>
SoftwareSerial mySerial(3,2);
void setup() {
  mySerial.begin (9600);
  Serial.begin(9600);
}

void loop() {
  mySerial.println ("hello Linksprite!");
  Serial.println ("hello Linksprite!");
  delay(1000);
}
Code for the receiver:
#include <SoftwareSerial.h>
SoftwareSerial mySerial(3,2);
void setup() {
  Serial.begin(9600);
  mySerial.begin(9600);
}

void loop() {
  while(mySerial.available() > 0){
    char c = mySerial.read();
    Serial.write(c);
  }
}
[/vc_column_text][/vc_tab][vc_tab title=”Project Results” tab_id=”1395921508487-4-1″][vc_column_text]In the above example, the transmitter sends “hello Linksprite!” and the receivers checks the received message against the “hello LinkSprite”.
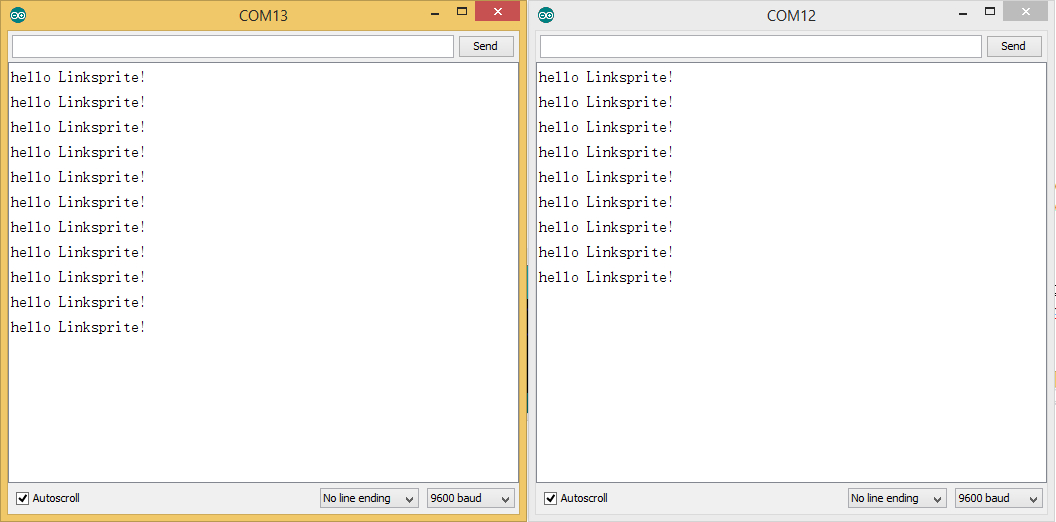
RS485 has obvious advantage compared with RS232, there is one less ground wires on RS485 than RS232. RS232 can only do point-to-point communication, while RS485 can do multi-point communication etc. Because RS485 Shield v2 can use any digitial pins as software serial port, we randomly select pins 2 and 3.[/vc_column_text][/vc_tab][/vc_tour][/vc_column][/vc_row]
Pingback: RS485 R-Pi to Arduino – Skippy's Random Ramblings