1. Introduction
DS18B20 is a 1-Wire digital temperature sensor which provides 9 bit or 12 bit temperature readings using the 1-Wire communication protocol. There are various models (as well as waterproof ones) with different temperature ranges, it supports alarm function using it own onboard nonvolatile RAM. Multiple sensors can be connected on the same bus minimising the wiring required to setup multiple measure spots.
For more information: http://www.maximintegrated.com/datasheet/index.mvp/id/2812
In this tutorial, let’s pick 2 waterproof sensors to be used:

Color codes:
| Wire | Name | Comments |
| Red | VCC | Power 3.3 – 5V |
| Yellow | Bus | 1-Wire bus, needs a 4k7 resistor to VCC |
| Black | Ground | Ground |
2. Wiring Diagram:
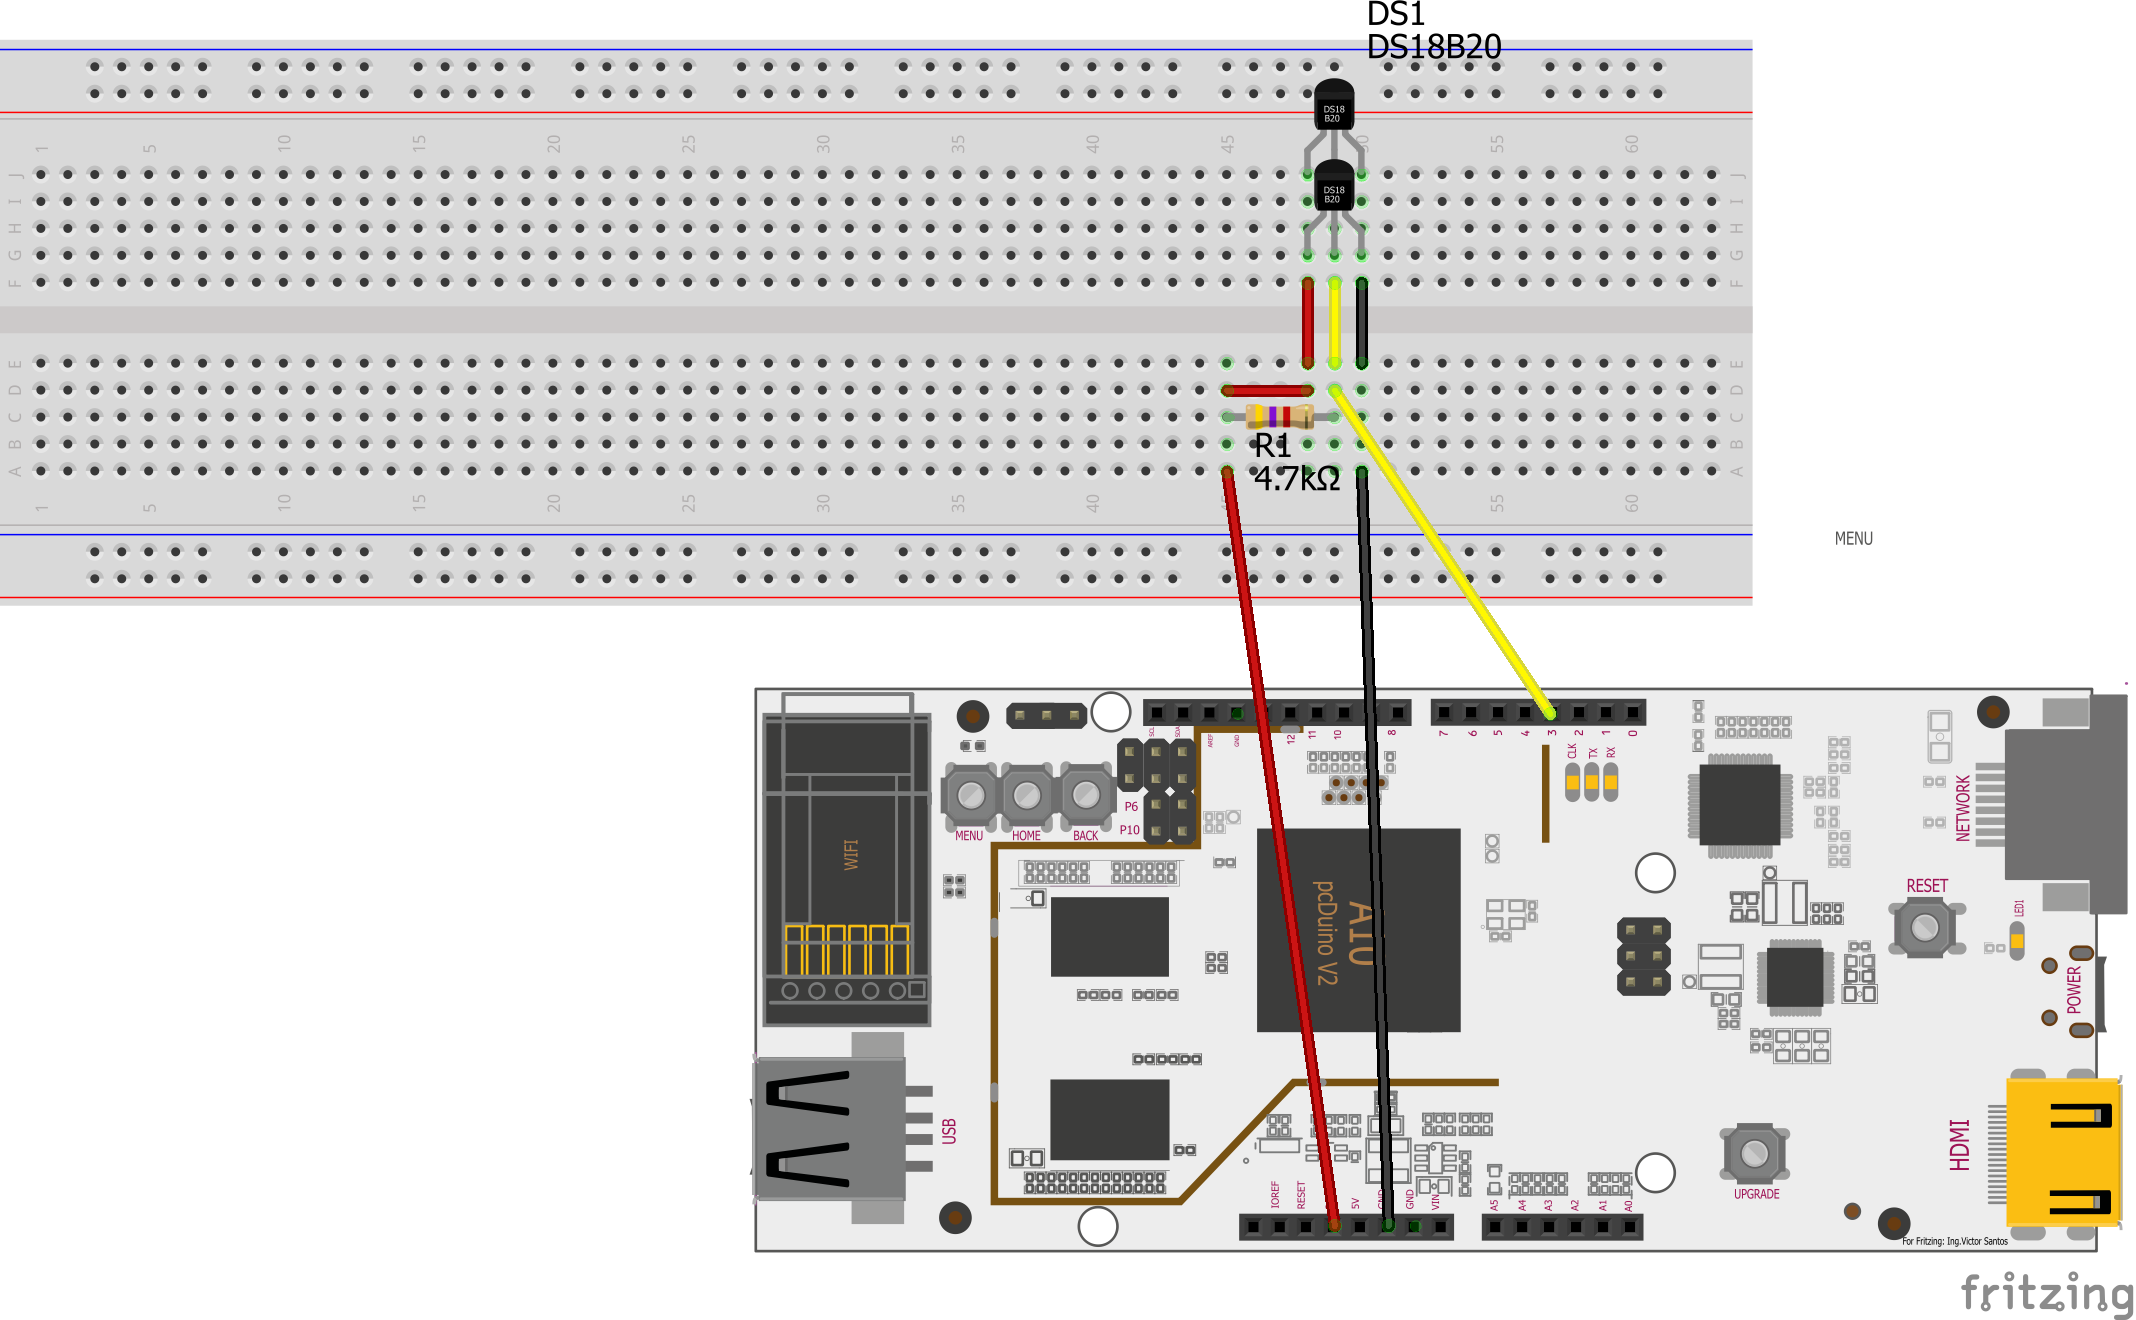
Even if the picture shows a pcDuino2, the PIN to be used on the board are identical to pcDuino3.
For the 1-Wire protocol to work, a 4k7 resistor needs to be connected between the bus wire and power (VCC). The 1-Wire bus is hooked to the GPIO3 pin of pcDuino3.
The sensor expects VCC to be between 3.3V and 5V. So for VCC you can either use the 5V pin of pcDuino3 as well as the 3.3V one.
3. Source code
You need the OneWire library from pcDuino3 which you can download from here: https://bitbucket.org/viulian/onewire-library-for-pcduino/overview
Installation:
Step 1)
Create a OneWire folder within your c_environment/libraries folder: /home/ubuntu/c_environment/libraries/OneWire
Step 2)
Unpack the files you downloaded into the folder above, so that at the end you have them like this:
ubuntu@ubuntu:~/c_environment/libraries/OneWire$ ls -l
total 48
-rw-r--r-- 1 ubuntu ubuntu 19909 May 11 19:50 OneWire.cpp
-rw-r--r-- 1 ubuntu ubuntu 9862 May 9 20:34 OneWire.h
-rw-rw-r-- 1 ubuntu ubuntu 5278 May 11 19:51 README.md
drwxr-xr-x 2 ubuntu ubuntu 4096 May 11 18:28 examples
-rw-r--r-- 1 ubuntu ubuntu 819 Jan 17 2013 keywords.txt
Step 3)
Modify c_environment/Makefile and add the reference to the library to the INCLUDES as well as to the SRCS defines, as this:
INCLUDES = \
           ... \
           -I$(DIR)/libraries/OneWire
SRCS = \
       ... \
       libraries/OneWire/OneWire.cpp
Step 4)
Put the example provided into the c_environment/sample folder so that at the end you have it like this:
ubuntu@ubuntu:~/c_environment/sample$ ls -l DS18x20_Temperature.c
-rw-r--r-- 1 ubuntu ubuntu 3627 May 11 10:18 DS18x20_Temperature.c
Step 5)
Modify c_environment/sample/Makefile so that the example is built:
INCS = \
       ... \
       -I$(DIR)/libraries/OneWire
Add the lib runtime dependency by adding -lrt argument to LIBS define:
LIBS=../libarduino.a -lrt
Append the file name to the OBJS define:
OBJS = ...
OBJS += ...
OBJS += ... DS18x20_Temperature
Step 5)
Within c_environment folder, execute make command.
It should build correctly and the executable is found in c_environment/output/test:
ubuntu@ubuntu:~/c_environment/output/test$ ls -l DS18x20_Temperature
-rwxrwxr-x 1 ubuntu ubuntu 19349 May 18 05:25 DS18x20_Temperature
4. Results
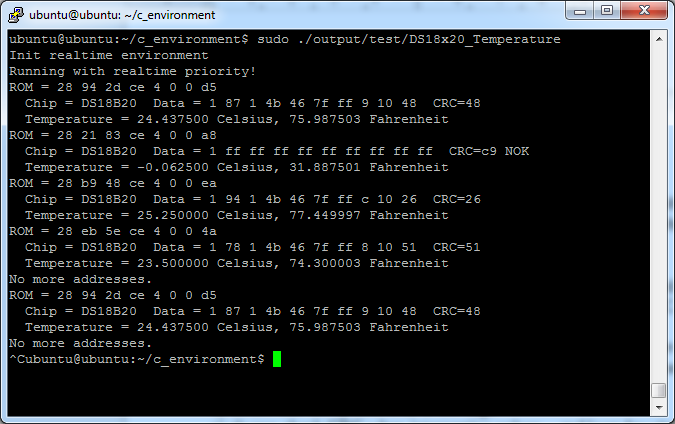
Because the 1-Wire protocol implemented within the OneWire library requires exact timings, better results are obtained if the executed code as real time priority. Switching to RT priority requires root access, so you can either invoke the example by using sudo (or, by setting the ownership to the executable to root as well as setting the suid flag on it). For now, let’s use sudo:
ubuntu@ubuntu:~/c_environment$ sudo ./output/test/DS18x20_Temperature
Init realtime environment
Running with realtime priority!
ROM = 28 94 2d ce 4 0 0 d5
Chip = DS18B20 Data = 1 87 1 4b 46 7f ff 9 10 48 CRC=48
Temperature = 24.437500 Celsius, 75.987503 Fahrenheit
ROM = 28 b9 48 ce 4 0 0 ea
Chip = DS18B20 Data = 1 94 1 4b 46 7f ff c 10 26 CRC=26
Temperature = 25.250000 Celsius, 77.449997 Fahrenheit
No more addresses.
The output will continue to loop by reporting the sensors detected on the wire (ROM, chip type), as well as the DATA requested from the each sensor (including CRC and decoded temperature).
There will be failed CRCs or communication problems due to the other processes hogging the CPU and interfering with the strict delays required by the 1-Wire protocol. To minimize these:
- try to always run the code as root (sudo, or suid bit)
- insure that the system load is not high
- always check CRC when interpreting values – and loop few times to get at least one correct value from the sensor.
Output example for a setup where 5 are connected:
Leave a Reply
You must be logged in to post a comment.