[vc_row][vc_column][vc_column_text]
A keypad is one of the indispensable components for human-computer interface. When the IO resources are rare, we would prefer to use a matrix keypad. In this post, we will show how to use a 4 x4 keypad with pcDuino.
[/vc_column_text][/vc_column][/vc_row][vc_row][vc_column width=”1/1″][vc_tour][vc_tab title=”Parts List” tab_id=”1395722802-1-45″][vc_column_text]
- 1 x pcDuino V2
- 1 x 4×4 keypad
- Jumper wires
[/vc_column_text][/vc_tab][vc_tab title=”Wiring Diagram” tab_id=”1395722802-2-29″][vc_column_text]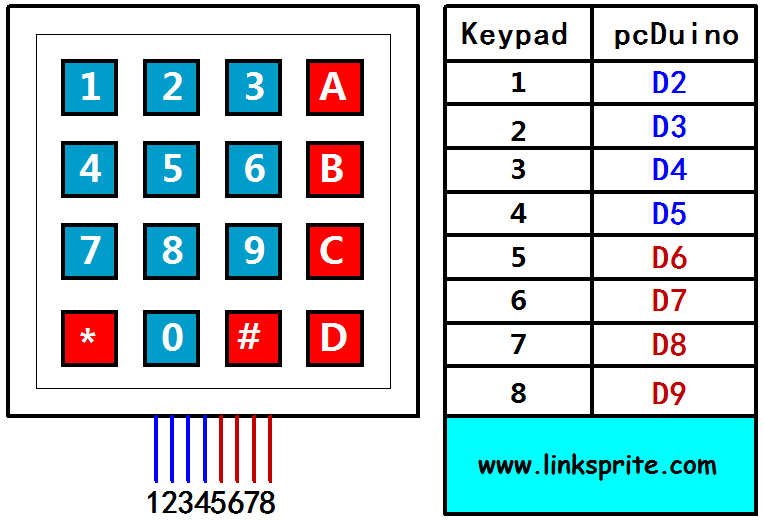 [/vc_column_text][/vc_tab][vc_tab title=”Test Code” tab_id=”1395725035643-2-10″][vc_column_text]
#include "core.h"

int rowpins[4] = {2,3,4,5};
int colpins[4] = {6,7,8,9};

int key_value=0x00;
int row_value=0,col_value=0;

void clean_pins(int p[])
{
  for(int i=0;i<4;i++)
  {
    pinMode(p[i],OUTPUT);
    digitalWrite(p[i],HIGH);
  }
}

void SetPinMode(int p[],int mode)
{
  for(int i=0;i<4;i++)
  {
    pinMode(p[i],mode);
    if(mode==OUTPUT)
    {
      digitalWrite(p[i],LOW);
    }
  }
}

int ReadPin(int p[])
{
  int value=0;
  int pin=0;
  for(int i=0;i<4;i++)
  {
    pin = digitalRead(p[i]);
    if(pin == 0)
    {
      delay(50);
      pin = digitalRead(p[i]);
      if(pin == 0)
      {
        if(i==0) value = 0x01;
        if(i==1) value = 0x02;
        if(i==2) value = 0x04;
        if(i==3) value = 0x08;
      }
    }
  }
  return value;
}

void ReadRow()
{
  row_value = 0;
  SetPinMode(rowpins,OUTPUT);
  clean_pins(colpins);
  SetPinMode(colpins,INPUT);
  row_value = ReadPin(colpins);
}

void ReadCol()
{
  col_value = 0;
  SetPinMode(colpins,OUTPUT);
  clean_pins(rowpins);
  SetPinMode(rowpins,INPUT);
  col_value = ReadPin(rowpins);
}

void setup()
{
    printf("4x4 keypad test:\n");
}

void loop()
{
   char key;
   ReadRow();
   if(row_value!=0)
   {
     delay(20);
     ReadCol();
     key_value = (row_value<<4) + col_value;
     switch(key_value)
     {
       case 0x11: key = '1' ; break;
       case 0x21: key = '2' ; break;
       case 0x41: key = '3' ; break;
       case 0x81: key = 'A' ; break;

       case 0x12: key = '4' ; break;
       case 0x22: key = '5' ; break;
       case 0x42: key = '6' ; break;
       case 0x82: key = 'B' ; break;

       case 0x14: key = '7' ; break;
       case 0x24: key = '8' ; break;
       case 0x44: key = '9' ; break;
       case 0x84: key = 'C' ; break;

       case 0x18: key = '*' ; break;
       case 0x28: key = '0' ; break;
       case 0x48: key = '#' ; break;
       case 0x88: key = 'D' ; break;

       default : 0x00;
     }
     if(key!=0x00)
       printf("key value = %c\n+++++++++\n",key);
       //delay(100);
   }
}
[/vc_column_text][/vc_tab][vc_tab title=”Test Run” tab_id=”1395725097674-3-5″][vc_column_text](1) Whole Setup:

(2) Open built-in Arduino style IDE for pcDuino,input test code:
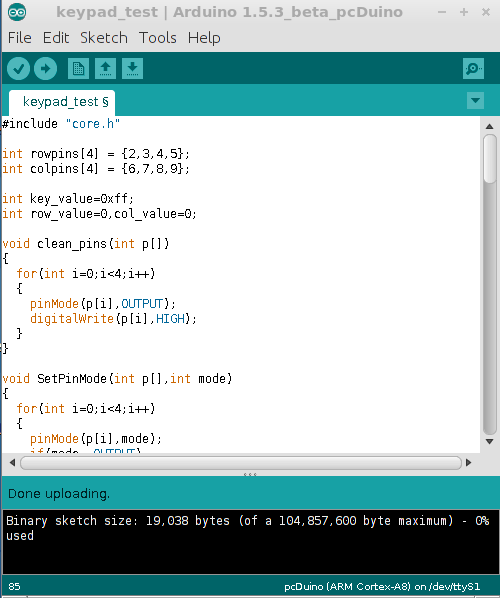
(3) Compile and run the code, a terminal will pop up. When we press any key of the keypad, we will see the key value be displayed on the terminal.
 [/vc_column_text][/vc_tab][/vc_tour][/vc_column][/vc_row]
Leave a Reply
You must be logged in to post a comment.