[vc_row][vc_column][vc_column_text]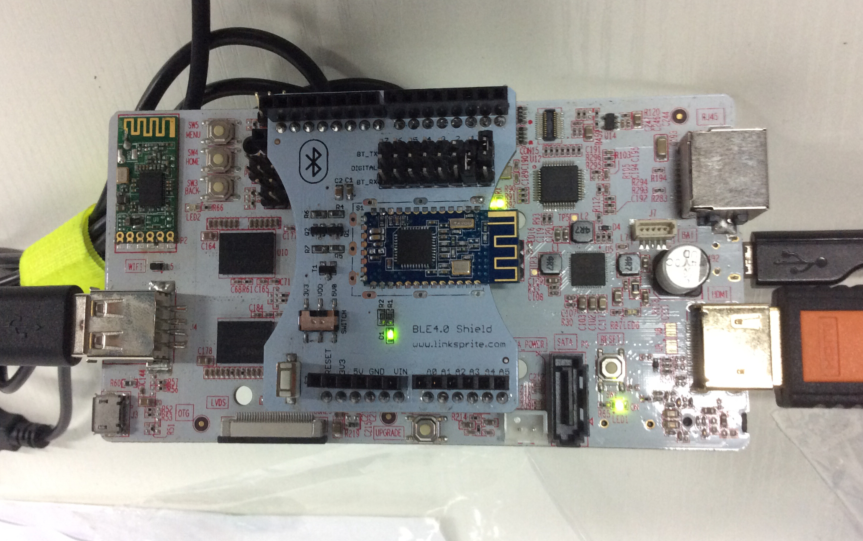
Before this article, there is post about DIY Smart home connecting through Wifi. Nowadays, the wearable devices such as smartbands and smart watch are extremely popular. So it’s time to talk about Bluetooth4.0, this article is all about how to DIY your own smart home using BLE4.0 Shield and BLE4.0 Bee as connection devices, pcduino as openhab server, Arduino as device.[/vc_column_text][/vc_column][/vc_row][vc_row][vc_column width=”1/1″][vc_tour][vc_tab title=”Install openhab” tab_id=”1438653662-1-46″][vc_column_text]Install openHAB server software on pcDuino, get more detail form linksprite learn center:
http://learn.linksprite.com/?s=openhab
or, download the image file below, then update ( install openh under “/opt/openhab” folder):
http://pan.baidu.com/s/1ntHtCyX?qq-pf-to=pcqq.c2c code: fh6c
For more detail about how to use BLE4.0 shield ( the usage of BLE4.0 Bee is the same as BLE4.0 Shield )
http://learn.linksprite.com/arduino/shields/how-to-use-ble4-0-shield/[/vc_column_text][/vc_tab][vc_tab title=”Test code” tab_id=”1438653662-2-2″][vc_column_text]We need to install python serial first before we can use serial from pcDuino3B by doing:
$sudo apt-get install python-serial
(1) test code of python-mqtt:
import socket
import sys
import paho.mqtt.publish as publish
import paho.mqtt.client as mqtt
import serial
myport=serial.Serial('/dev/ttyS1',9600,timeout=1)
myport.write('test')
###
client_connect=0
##
def on_connect(mqttc, obj, flags, rc):
print("rc: "+str(rc))
def on_message(mqttc, obj, msg):
if client_connect==1:
myport.write('S')
print(msg.topic+" "+str(msg.qos)+" "+str(msg.payload))
connection.send(msg.topic+" "+str(msg.payload))
def on_publish(mqttc, obj, mid):
print("mid: "+str(mid))
def on_subscribe(mqttc, obj, mid, granted_qos):
print("Subscribed: "+str(mid)+" "+str(granted_qos))
def on_log(mqttc, obj, level, string):
print(string)
#### The following for TCP/IP from Arduino-style part #############
# Create a TCP/IP socket
sock = socket.socket(socket.AF_INET, socket.SOCK_STREAM)
sock.setsockopt( socket.SOL_SOCKET, socket.SO_REUSEADDR, 1)
# Bind the socket to the port
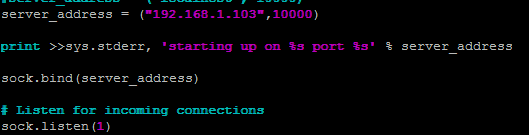
#server_address = ('localhost', 10000)
server_address = ("192.168.1.134", 10000)
print >>sys.stderr, 'starting up on %s port %s' % server_address
sock.bind(server_address)
# Listen for incoming connections
sock.listen(1)
################ The following for subscribing to MQTT ##############
mqttc = mqtt.Client()
mqttc.on_message = on_message
mqttc.on_connect = on_connect
mqttc.on_publish = on_publish
mqttc.on_subscribe = on_subscribe
mqttc.connect("localhost", 1883, 60)
### Subscribe to topic '4033', which is the ID of the relay of garage
mqttc.subscribe("4033", 0)
mqttc.loop_start()
while True:
# Wait for a connection
print >>sys.stderr, 'waiting for a connection'
connection, client_address = sock.accept()
client_connect=1
try:
print >>sys.stderr, 'connection from', client_address
# Receive the data in small chunks and retransmit it
while True:
# debug
#connection.send('Hello world')
ble_data = myport.readline()
if len(ble_data)>0:
print(ble_data)
#data = connection.recv(3)
#print(data)
#if len(data)==0:
#connection.close()
#break
if "test" in ble_data :
print('okay')
if "321" in ble_data:
print >>sys.stderr, 'publish 0'
publish.single("3032", "0",hostname="localhost")
if "123" in ble_data:
print >>sys.stderr, 'publish 1'
publish.single("3032", "1",hostname="localhost")
except KeyboardInterrupt:
# Clean up the connection
connection.close()
sys.exit(1)
(2) test code of Socket:
#include "core.h"
#include "stdio.h"
#include "stdlib.h"
#include "string.h"
#include <sys/socket.h>
#include <netinet/in.h>
#include <arpa/inet.h>

int sockfd,n, flags;
socklen_t addr_len;
struct sockaddr_in servaddr,cliaddr;
char sendline[1000];
char recvline[1000];
int rc;

void setup()
{
  sockfd=socket(AF_INET,SOCK_STREAM,0);
  bzero(&servaddr,sizeof(servaddr));
  servaddr.sin_family = AF_INET;
  servaddr.sin_addr.s_addr=inet_addr("192.168.1.134");
  servaddr.sin_port=htons(10000);
   Serial.begin(9600);
  if((rc = connect(sockfd, (struct sockaddr *)&servaddr, sizeof(servaddr)))<0)
    {
      perror("Client-connect () error");
      exit(-1);
    }

  flags=fcntl(sockfd,F_GETFL);
  flags|=O_NONBLOCK;
  fcntl(sockfd,F_SETFL,flags);
}
void loop()
{

}
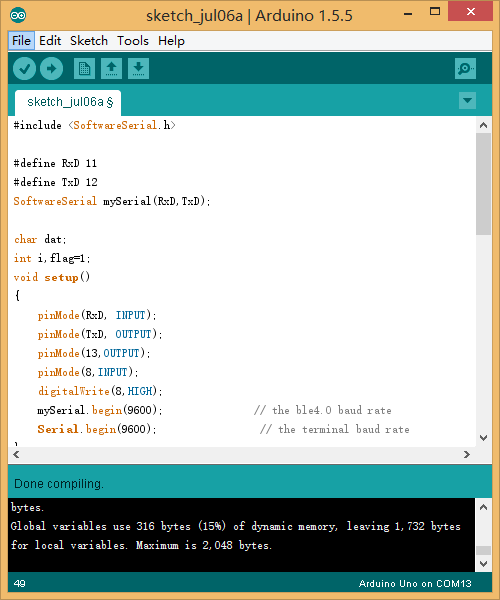
(3) test code of Arduino
#include <SoftwareSerial.h>

#define RxD 11
#define TxD 12
SoftwareSerial mySerial(RxD,TxD);

char dat;
int i,flag=1;
void setup()
{
    pinMode(RxD, INPUT);
    pinMode(TxD, OUTPUT);
    pinMode(13,OUTPUT);
    pinMode(8,INPUT);
    digitalWrite(8,HIGH);
    mySerial.begin(9600);               // the ble4.0 baud rate
    Serial.begin(9600);                 // the terminal baud rate
}

void loop()
{
    if(Serial.available())
    {
       mySerial.print((char)Serial.read());
    }

    if(mySerial.available())
    {
       dat = char(mySerial.read());
       Serial.print(dat);
       if(dat == 'S') i++;
       if(i%2) digitalWrite(13,LOW);
       else digitalWrite(13,HIGH);
    }

    if( (digitalRead(8)==1)&&(flag==1))
    {
      flag = 0 ;
      mySerial.write("123\r\n");
      Serial.write("123\r\n");
    }
    if( (digitalRead(8)==0)&&(flag==0))
    {
      flag =1 ;
      mySerial.write("321\r\n");
      Serial.write("321\r\n");
    }
}
[/vc_column_text][/vc_tab][vc_tab title=”Hardware perparation” tab_id=”1438656681100-2-3″][vc_column_text]pcduino3 x1
ArduinoUNO x1
BLE4.0 Bee x1
BLE4.0 Shield x1
Xbee Shield x1
Door Sensor x1
Linker LED x1
pcDuino3 x1[/vc_column_text][/vc_tab][vc_tab title=”Test execution” tab_id=”1438656723397-3-8″][vc_column_text](1) install openhab on pcDuino and APP on mobile device:
(2) build a file “mqtt-BLE.py”, copy the code of python-mqtt in it, remember to edit IP address to the IP address that read now:
*edit IP address based on distribution by pcDuino ( check by $ifconfig ), following is the location:
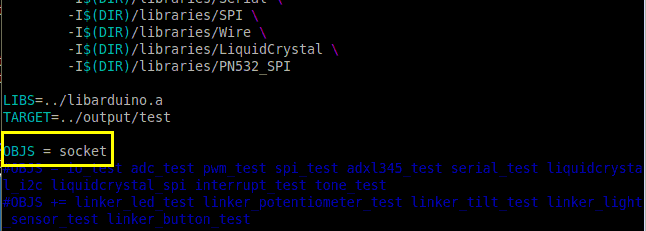
(3) open “/home/ubuntu/c_environment/sample”, add a c file, copy the test code in it (need to add socket in Makefile of current directory, besides, edit IP address into ( the same as (2) ) ;
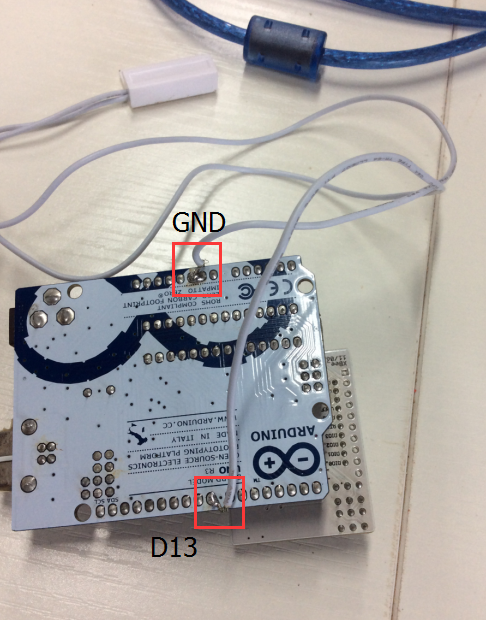
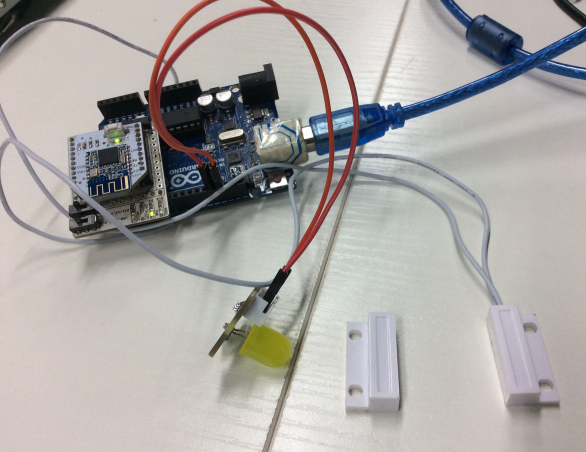
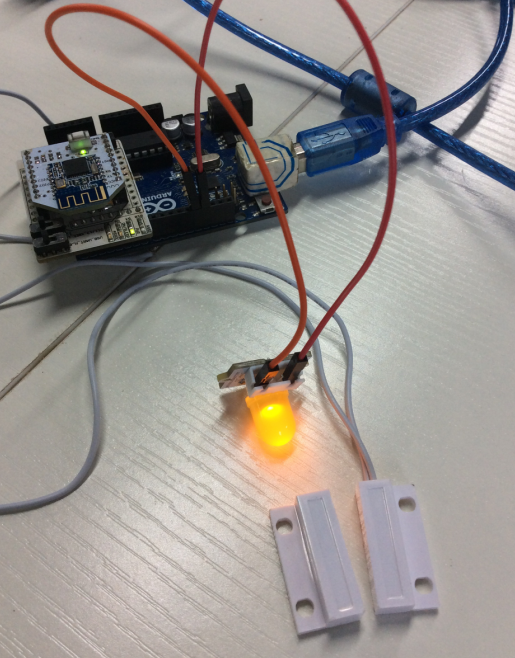
(4) Connect the door sensor to D8 and GND of Arduino (set D8 as pull-up input, when the magnet of the door sensor approached, the IO level will drop ) , then connect linker LED to D13 and GND of Arduino, and install BLE4.0 Xbee on Arduino, and then download the test code of Arduino ( both switches of Xbee Shield should on the left side) :
(5) turn on pcDuino, run openhab, python MQTT, socket:
#turn on openhab:
$cd/opt/openhab
$sudo ./start.sh
(if openhab mirror image has been build, add a self-start in it : sudo /opt/openhab/start.sh )
#run MQTT :
$cd/ home/ ubutu
$sudo python ./mqtt_publish.py
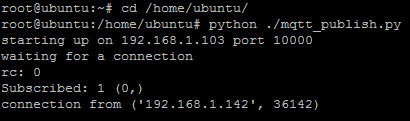
#run socket ( this program should be run after python mqtt ):
$cd /home/ubuntu/c_enviroment/sample
$sudo ./socket
(6) the socket connection was build, after the program above start up.
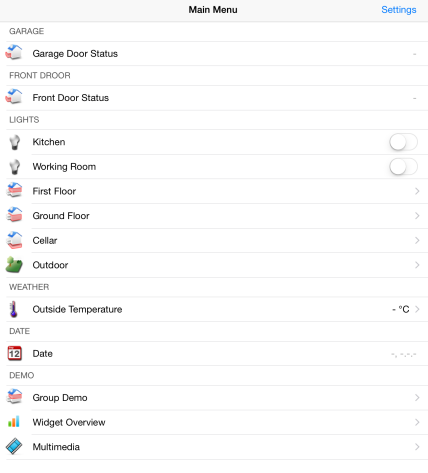
(7) Now we can open the APP of mobile device, click settings, edit setting below :
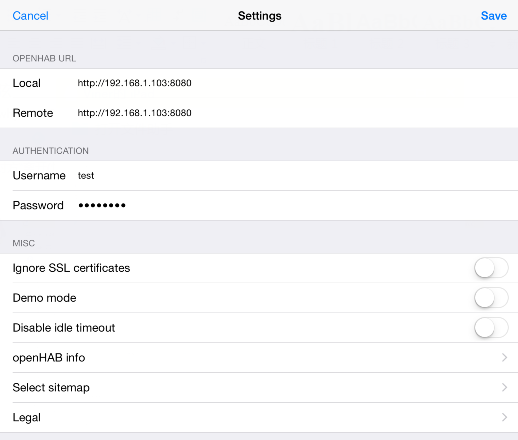
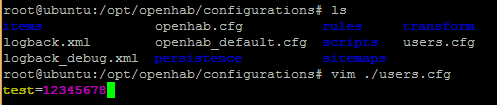
Edit IP address based on pcDuino, set up user name and code as following:
$cd /opt/openhab/configurations
$vim ./users.cfg
“test” is user name, “12345678” is code.
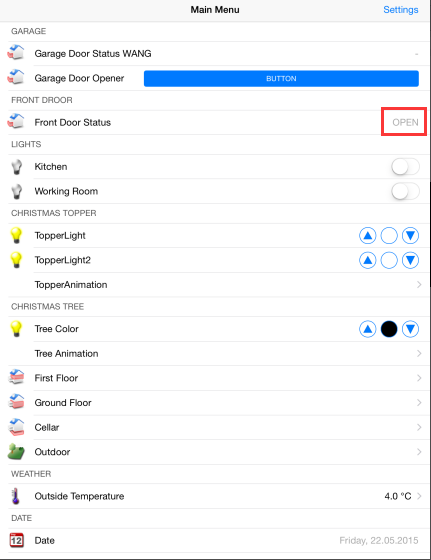
(8) after setting, click “save” at right side, then it will be return to the main interface ( click button can control light) :
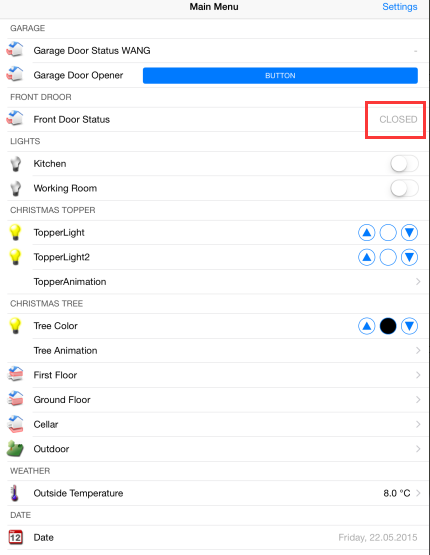
#when door is open, LED turn off :
#when door is close, LED will open :
 [/vc_column_text][/vc_tab][/vc_tour][/vc_column][/vc_row]
Leave a Reply
You must be logged in to post a comment.