
Ruby on Rails, often simply referred to as Rails, is an open source web application framework which runs via the Ruby programming language. It is a full-stack framework: it allows creating pages and applications that gather information from the web server, talk to or query the database, and render templates out of the box. As a result, Rails features a routing system that is independent of the web server.
Ruby on Rails emphasizes the use of well-known software engineering patterns and principles, such as active record pattern, convention over configuration (CoC), don’t repeat yourself (DRY), and model–view–controller (MVC).
What is Rails?
Ruby on Rails is an open source full-stack web application framework written in the Ruby Programming Language. Rails is capable of gathering information using pages and applications from the web server and can interact with a database and can retrieve information from the database. Rails works as routing system that works independently from the underlying web server. Rails is designed to make building web applications simpler by utilizing convention over configuration. In doing so Rails greatly simplifies the creation of certain applications while complicating the creation of others.
Step 1 — Install Ruby with RVM
Before we do anything else, we should run a quick update to make sure that all of the packages we download are up to date: sudo apt-get update
Once that’s done, we can start installing RVM, Ruby Version Manager. This is a great program that lets you use several versions of Ruby on one system; however, in this case, we will just use it to install the latest version of Ruby on the droplet.
If you do not have curl on your system, you can start by installing it:
$ sudo apt-get install curl
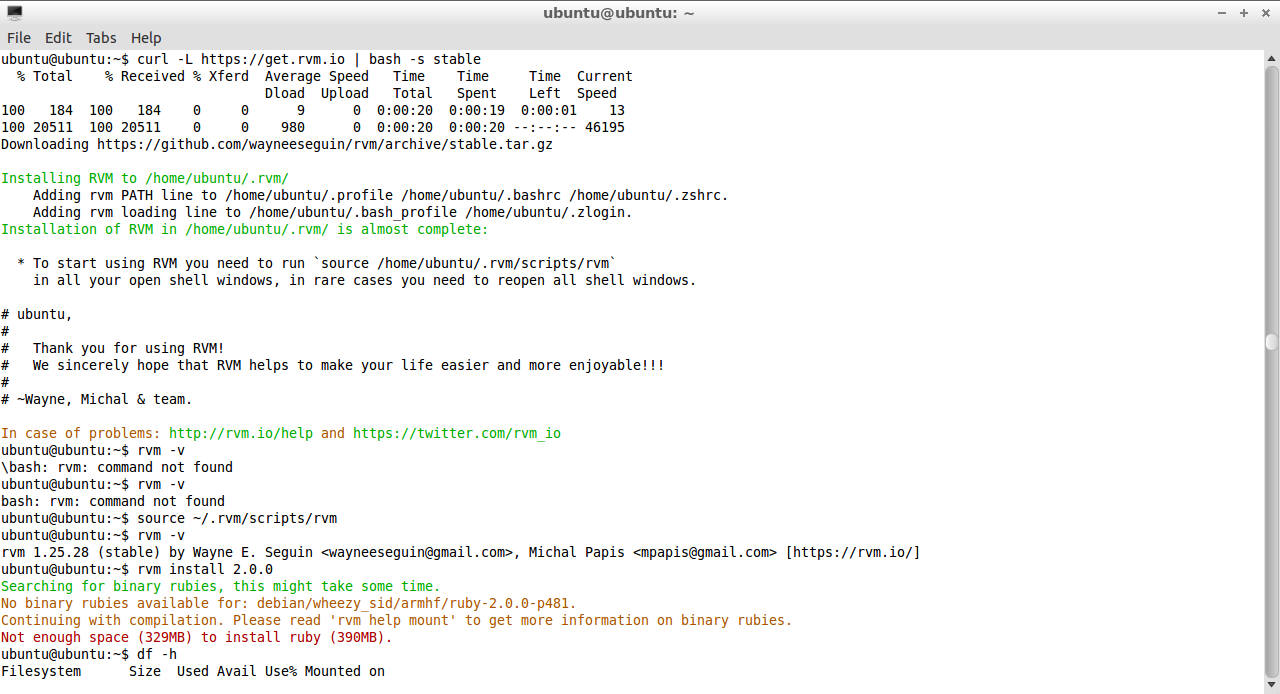
To install RVM, open terminal and type in this command:
$ curl -L get.rvm.io | bash -s stable

  % Total    % Received % Xferd  Average Speed   Time    Time     Time  Current
                                 Dload  Upload   Total   Spent    Left  Speed
100   184  100   184    0     0      9      0  0:00:20  0:00:19  0:00:01    13
100 20511  100 20511    0     0    980      0  0:00:20  0:00:20 --:--:-- 46195
Downloading https://github.com/wayneeseguin/rvm/archive/stable.tar.gz

Installing RVM to /home/ubuntu/.rvm/
    Adding rvm PATH line to /home/ubuntu/.profile /home/ubuntu/.bashrc /home/ubuntu/.zshrc.
    Adding rvm loading line to /home/ubuntu/.bash_profile /home/ubuntu/.zlogin.
Installation of RVM in /home/ubuntu/.rvm/ is almost complete:

  * To start using RVM you need to run `source /home/ubuntu/.rvm/scripts/rvm`
    in all your open shell windows, in rare cases you need to reopen all shell windows.

# ubuntu,
#
#   Thank you for using RVM!
#   We sincerely hope that RVM helps to make your life easier and more enjoyable!!!
#
# ~Wayne, Michal & team.

In case of problems: http://rvm.io/help and https://twitter.com/rvm_io
After it is done installing, load RVM.
$ source ~/.rvm/scripts/rvm
check rvm version
$ rvm -v
rvm 1.25.28 (stable) by Wayne E. Seguin <wayneeseguin@gmail.com>, Michal Papis <mpapis@gmail.com> [https://rvm.io/]
Step 2 —Install Ruby
Once you are using RVM, installing Ruby is easy.
$ rvm install 2.0.0
Searching for binary rubies, this might take some time.
No binary rubies available for: debian/wheezy_sid/armhf/ruby-2.0.0-p481.
Continuing with compilation. Please read 'rvm help mount' to get more information on binary rubies.
Checking requirements for debian.
Installing requirements for debian.
Updating system.......
Installing required packages: gawk, libreadline6-dev, libyaml-dev, libsqlite3-dev, sqlite3, autoconf, libgdbm-dev, libncurses5-dev, automake, libtool, bison, pkg-config, libffi-dev..............
Requirements installation successful.
Installing Ruby from source to: /home/ubuntu/.rvm/rubies/ruby-2.0.0-p481, this may take a while depending on your cpu(s)...
ruby-2.0.0-p481 - #downloading ruby-2.0.0-p481, this may take a while depending on your connection...
  % Total    % Received % Xferd  Average Speed   Time    Time     Time  Current
                                 Dload  Upload   Total   Spent    Left  Speed
100 10.2M  100 10.2M    0     0   354k      0  0:00:29  0:00:29 --:--:--  478k
ruby-2.0.0-p481 - #extracting ruby-2.0.0-p481 to /home/ubuntu/.rvm/src/ruby-2.0.0-p481....
ruby-2.0.0-p481 - #configuring..................................................
ruby-2.0.0-p481 - #post-configuration.
ruby-2.0.0-p481 - #compiling.............................................................................
ruby-2.0.0-p481 - #installing.............................
ruby-2.0.0-p481 - #making binaries executable..
ruby-2.0.0-p481 - #downloading rubygems-2.2.2
  % Total    % Received % Xferd  Average Speed   Time    Time     Time  Current
                                 Dload  Upload   Total   Spent    Left  Speed
100  404k  100  404k    0     0  35728      0  0:00:11  0:00:11 --:--:-- 55057
No checksum for downloaded archive, recording checksum in user configuration.
ruby-2.0.0-p481 - #extracting rubygems-2.2.2....
ruby-2.0.0-p481 - #removing old rubygems.........
ruby-2.0.0-p481 - #installing rubygems-2.2.2...............
ruby-2.0.0-p481 - #gemset created /home/ubuntu/.rvm/gems/ruby-2.0.0-p481@global
ruby-2.0.0-p481 - #importing gemset /home/ubuntu/.rvm/gemsets/global.gems.............................................................
ruby-2.0.0-p481 - #generating global wrappers..............
ruby-2.0.0-p481 - #gemset created /home/ubuntu/.rvm/gems/ruby-2.0.0-p481
ruby-2.0.0-p481 - #importing gemsetfile /home/ubuntu/.rvm/gemsets/default.gems evaluated to empty gem list
ruby-2.0.0-p481 - #generating default wrappers.............
ruby-2.0.0-p481 - #adjusting #shebangs for (gem irb erb ri rdoc testrb rake).
Install of ruby-2.0.0-p481 - #complete
Ruby was built without documentation, to build it run: rvm docs generate-ri

Ruby is now installed. However, since we accessed it through a program that has a variety of Ruby versions, we need to tell the system to use 2.0.0 by default.
$ rvm use 2.0.0 --default
$ ruby -v
ruby 2.0.0p481 (2014-05-08 revision 45883) [armv7l-linux-eabihf]
$ gem -v
2.2.2
$ gem source -r https://rubygems.org/
https://rubygems.org/ removed from sources
$ gem source -a https://ruby.taobao.org
https://ruby.taobao.org added to sources
Step 3 —Install RubyGems
The next step makes sure that we have all the required components of Ruby on Rails. We can continue to use RVM to install gems; type this line into terminal.
$ rvm rubygems current
Step 4—Install Rails
Once everything is set up, it is time to install Rails.
To start, open terminal and type in:
$ gem install rails
$ rails -v
Rails 4.1.4
This process may take a while, be patient with it. Once it finishes you will have Ruby on Rails installed on your droplet.
Leave a Reply
You must be logged in to post a comment.