Today’s project, as always based on the enc28j60 ethernet controller, allows to toggle relays (or, generally, digital PINs) using a responsive web page, that is a page that automatically adapts its layout to devices with different screen sizes (for example your smartphone and your PC).
Video presentation
Web site
The web site, stored on an SD card and served by Arduino (like in my previous example, SDWebServer), was developed using the following libraries:
- jQyery, for AJAX calls
- jQuery Mobile, to have a responsive layout
and it’s made by a single page, with two switches to activate/deactivate two outputs (in a following paragraph you’ll learn how to change the number of switches and PINs):

The page and its external resources (javascript and CSS files) are available on Github and must be saved in the root folder of the SD card.
Sketch
The sketch – this too available in my repository – is very similar to the one of the SDWebServer project.
Witin the loop(), the sketch receives the requests coming from the browser:
char* request = (char *)Ethernet::buffer + pos;
A request can be for a static resource (HTML page, javascript file…): if so the sketch looks for it in theroot folder of the SD card and, if found, sends it back to the browser.
If instead the request is for the switch.ino page, the sketch parses the subsequent parameters in the request:
else if(strncmp("GET /switch.ino?", request, 16) == 0) {
  int relayId = request[16] - '0';
  int relayStatus = request[18] - '0';
and changes the PIN status accordingly:
if(relayStatus == 0) digitalWrite(relayId, LOW);
else digitalWrite(relayId, HIGH);
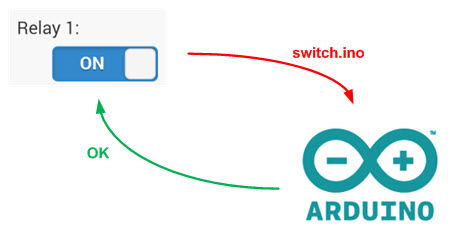
A request has indeed the following syntax: switch.ino?relayId|relayStatus. If, for example, I want to activate the relay connected to PIN 4, I have to send to the Arduino the request switch.ino?4|1
In the end, the sketch sends back a confirmation (OK) message to the browser:
BufferFiller bfill = ether.tcpOffset();
bfill.emit_p(PSTR("HTTP/1.0 200 OK\r\nContent-Type: text/html\r\n
  Pragma: no-cache\r\n\r\n" "OK"));
AJAX
All the requests for changing a PIN are sent to the Arduino with AJAX calls thanks to the jQuery library. When you click a button, an event is triggered that creates and sends the request:

The javascript code in the HTML page looks for all the select controls (the “buttons”) and adds to them an event handler:
$(document).ready(function() {

  // search for all the select elements and associate the event handler
  $("select").each(function(index) {
    // event handler, call the page to change the relay status
    $(this).change(function() {
      var selectElement = $(this);
      var relayNumber = selectElement.attr("name");
      var relayStatus = selectElement.val();
      var parameters = relayNumber + "|" + relayStatus;

      $.get("switch.ino?" + parameters, function() { console.log("Call OK :)"); })
      .fail(function() console.log("Call KO :("); );
    });
  });
});
Hei, I need more relays!
I tried to make it simple to change the project to have a different number of relays or to change the corresponding Arduino PINs…
In the HTML page (index.htm), each button is created with the following code:
<div class="ui-field-contain">
  <label for="2">Relay 1:</label>
  <select name="2" id="2" data-role="flipswitch">
     <option value="0">OFF</option>
     <option value="1">ON</option>
  </select>
</div>
The value 2, used both in the label and in the select tags, represents the Arduino PIN that is controlled by this button, while the value of the label tag (in the example Relay 1:) is the text that is displayed next to the button.
It’s therefore easy to change the value for changing the PIN this button controls and/or to add new blocks of code to draw new buttons.
Just remember to also change the sketch, in the setup() method where the PINs are configured:
// configure the relay PINs
  pinMode(2, OUTPUT);
  pinMode(3, OUTPUT)
For more details,please refer to original post
http://www.lucadentella.it/en/2015/05/12/mobilerelays-enc28j60-e-arduino-21/

Leave a Reply
You must be logged in to post a comment.