[vc_row][vc_column width=”1/1″][vc_column_text]Long Range UHF RFID Reader is an important way to read information and input information. Automatic identification technology has been developed in recent years. Now it is a new high technology which includes barcode technology, magnetic strip (card) technology, RF technology, optical character recognition technology, and biological recognition, distance Card Reader and etc.
In normal case, UHF RFID tags need less power than the reader which needs to have high receiving sensitivity. In certain system, the transmit path and receive path are independent of each other in the reader, especially when the uplink and downlink have different frequency.
Technically, different applications can choose different transmit power. However, there are regulations that need to be met. Usually the RF power 100mW~500mW is suitable for all kinds of RFID distance reader system. In different regions and areas, the reader has to follow different regulations.
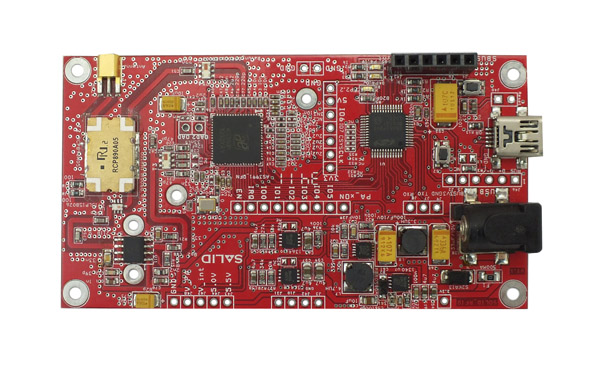
Cottonwood distance reader has many advantages such as: compatibility with different protocols, high reading speed multi-tags reading, linearly polarized antenna, waterproof appearance designing and etc. It can be widely used in RFID systems, and is very friendly to further development based on it. Cottonwood UHF RFID reader has two interfaces to choose from: UART and USB.
 [/vc_column_text][vc_tour][vc_tab title=”1. TTL UART Interface” tab_id=”1392409643-1-2″][vc_column_text]1.1 Hardware
- 1 x TTL-UART UHF RFID Reader Module
- 1 x RFID Antenna
- 1 x UHF RFID Tag
- 1 x TTL to USB Module (UART-USB)
- 5V/2A DC Power Adapter
1.2 Wire Diagram
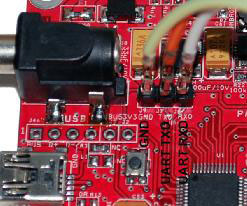
- UHF RFID (UART-TXD) connected to UART-USB (RX)
- UHF RFID (UART-RXD) connected to UART-USB (TX)
We need to swap TX and RX if the serial port has no output for 115200/9600. This is because different TTL UART to USB may name differently RX and TX.
- UHF RFID (GND) connected to UART-USB (GND)
- UHF RFID connected to RFID Antenna
- Connected to 5 V /2 A DC output power supply
- Connect to PC through UART-USB breakout
- Install FT232 Driver
[/vc_column_text][/vc_tab][vc_tab title=”2. USB Interface” tab_id=”1392409643-2-42″][vc_column_text]2.1 Hardware
- UHF RFID Reader Module with USB port
- RFID Antenna
- UHF RFID Tag
- Mini USB Cable
- 5V/2A DC power adapter
2.2 Connect things up
Use mini USB cable, connect UHF RFID reader to computer[/vc_column_text][/vc_tab][vc_tab title=”3. Read Tag” tab_id=”1392410623625-2-3″][vc_column_text]3.1 Test model with TTL UART Interface
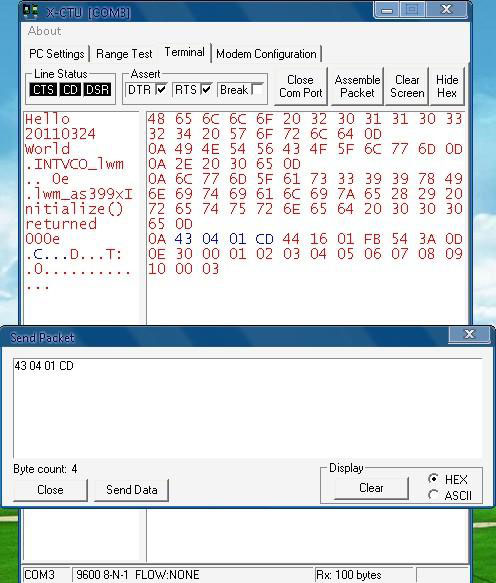
3.1.1 Use a serial port debug tool to test
- Click
 X-CTU, and set PC Setting:
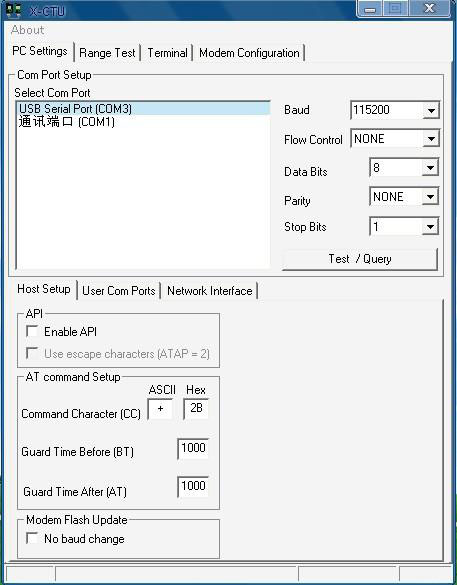
- Choose the correct port: Select Com Port
- Set Baud: 115200 or 9600
- UHF RFID module connected to the power, Terminal display
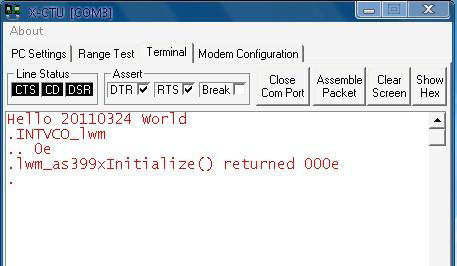
- In Send Packet type the command – Read Tag command
Send Data: 43 04 01 cd (HEX)
Return: 44 16 01 F8 54 3A 0D 0E 30 00 01 02 03 04 05 06 07 08 09 10 00 03
The Tag numbers: 01 02 03 04 05 06 07 08 09 10 00 03
3.1.2 Use GUI software testing
Download Link:
Demo GUI (Windows 7)
Demo GUI (Windows XP)
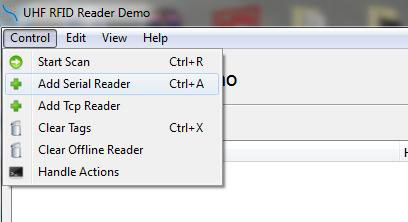
Start GUI, and add serial reader
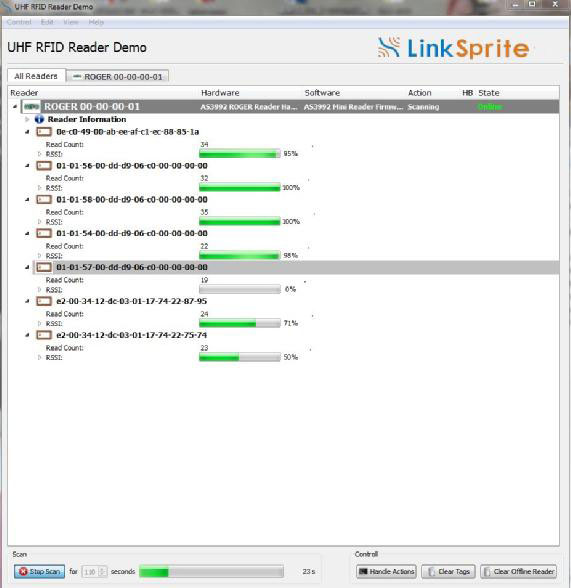
Put down the Tag, and click scan:
3.2 Test the model with Interface USB
After USB interface initialization is completed, click Find device, and click Open Port:
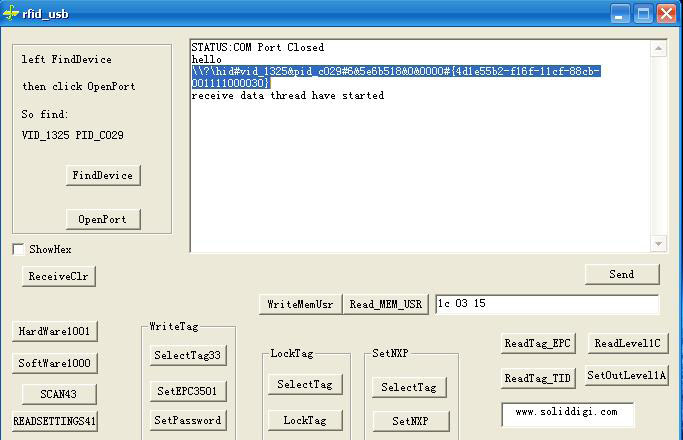
Click SCAN43, and scan Tag:
Note:
- To Test USB and TTL is different, because USB connected to computer, the computer don’t show the port com. The computer don’t need to install the driver. And you can directly use the USB cable.
- USB scanning to tag data that is 40 bytes, and the reader can remember tag numbers at last time. If the reader don’t scan to tag numbers at this time, the debug software will be show tag numbers at last time. And if the reader scanning to tag numbers, the numbers will be carpeted with the last data.
- TTL scanning to tag data that is 22 bytes. And if the reader don’t scan to tag numbers, it will be return 44 05 00 00 00 (5 bytes).
[/vc_column_text][/vc_tab][/vc_tour][/vc_column][/vc_row]
Leave a Reply
You must be logged in to post a comment.