- Installation Video
How to Connect 7/8 Inch Fever Screening Access Control Tablet to Deepcloud
Part I: Set up in the access control tablet
Step 1: Prepare a Windows PC and power up your tablet.
Your tablet must be connected to Ethernet. Make sure the tablet and the PC are in the same internal IP segment. For example, if your home or office network has IP 192.168.x.y, then the x should be same for the tablet and the PC.
Step 2: Login the web management panel.
Open a browser (Internet Explorer Only) and type in the IP address of the access control tablet in the browser address bar. For example, if the IP address of the tablet is 192.168.1.88, then type in 192.168.1.88 in the IE address bar. For the first time you login, enter a username and a password (default username: admin, password: admin), as shown in Fig. 1.

Step 3: Set up the Deepcloud address
After logging in, the main interface looks like

3. Connecting Cloud Settings
Click on “Config” – “System Parameters” – “HTTP upload settings”. Set the parameters as shown below.
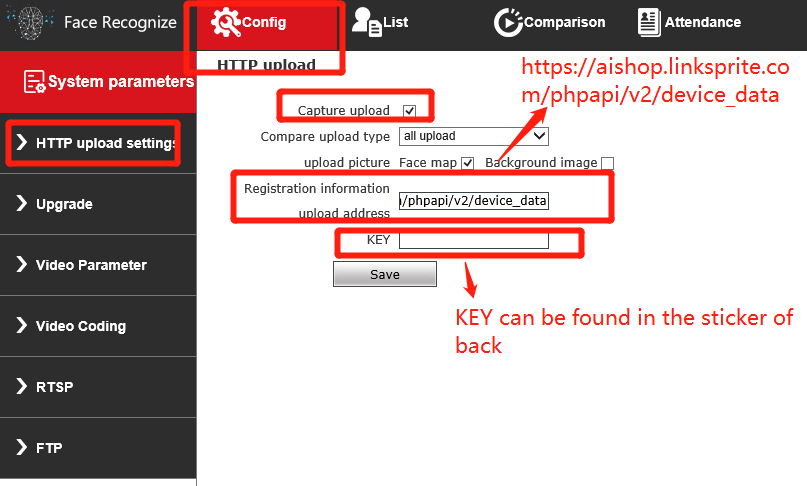
NOTE: The Registration information upload address is https://aishop.linksprite.com/phpapi/v2/device_data
When a KEY is required, the KEY can be found in the sticker on the back of device .

Part 2: Set up in the Deepcloud platform
Step 1: Register a user account
Go to https://aishop.linksprite.com in your browser. Click on “Free Registration”, input the required information, and then click “Register”, a window pops up and reminds that the registration is pending an administrator’s review,. After the review is passed, you will receive a SMS message or email notification, then you can log in to the platform.
In addition, the main account can invite others to register as a sub account by sending a link to the sub account’s email address.

Step 2: Create a store
After you log in, you should see a window with a navigation menu on the left, and a workspace on the right. If you do not see the navigation menu,click on the sign on the upper left corner.
The first thing you need to do is to create a store. We are sorry for using the name store if your deployment is not a store.
Click on “Store Management”, then click on “ + Create New Store”, and type in all your preferred information. Click on “Confirm”, your new store is now created. Please make sure to choose the correct time zone since this will make the time shown in your data correct.

Step 3: Add new device
Step 3.1 Create a device group
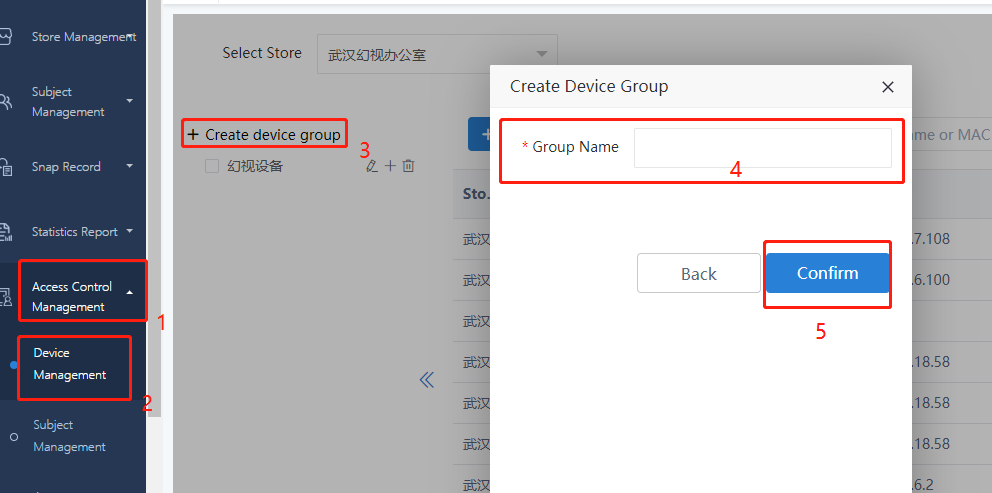
First create a device group. Any device must be in one and only in a device group.
Click “Access Control Management” / “Device Management” on the left navigation bar, and then click on “+Create Device Group] on the right panel. Type in a Group Name, then click on “Confirm”, as shown below.
Step 3.2 Add New Device
Next click on “+Add New Device”. Choose the correct device type. You can click on “help” to get more information on which device type you should choose. For the anti-robbery tablet, please choose “Access Control Tablet D1”.

The most important information you need is the MAC address of the device in order to add the device to the cloud. For most devices, you can find the MAC address on a sticker on the back of device . If not, you can use a router or other tool to find it. For the anti-robbery tablet, please refer to Part I:A to find the MAC address.
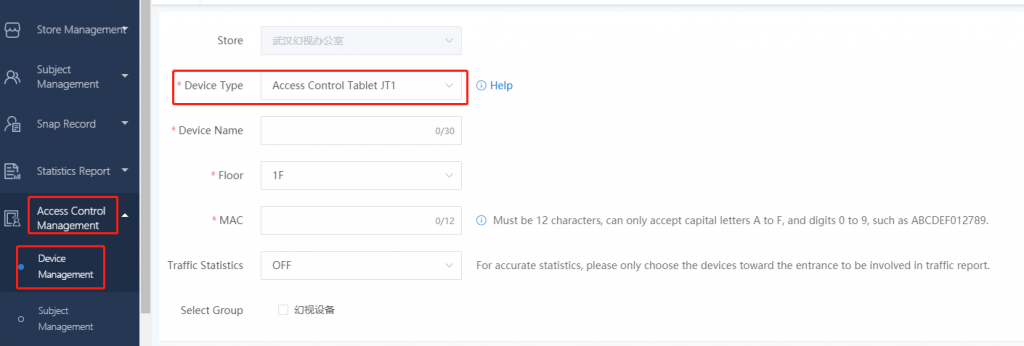

The basic settings are mostly self-explained.

The advanced setting are for advanced users. One parameter you may want to touch is the Liveness Detection. When you concerned with anti-spoofing attack (using paper photo, cell phone photo, statue to fool the device as a real person), you should turn it on and set the “Strictness level” to High.

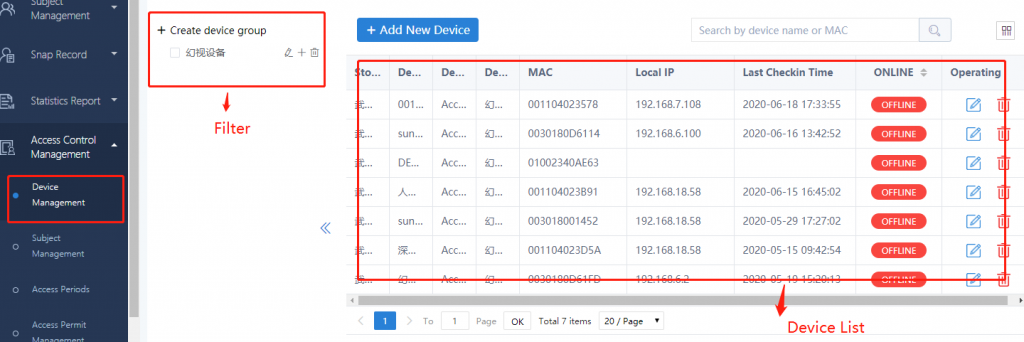
Step 3.3 View Device List
After the device is added, it can be viewed in the right panel of the “Device Management”. You can also filter devices by selecting the device group on the left side of the page. Please note that the device may shown “OFFLINE” after it was added. It takes the system a few minutes or longer to sync with the device. If the device is still shown “OFFLINE” after that, you may need to restart the device once or more times.
Step 4: Add Subjects
Step 4.1 Add subject group
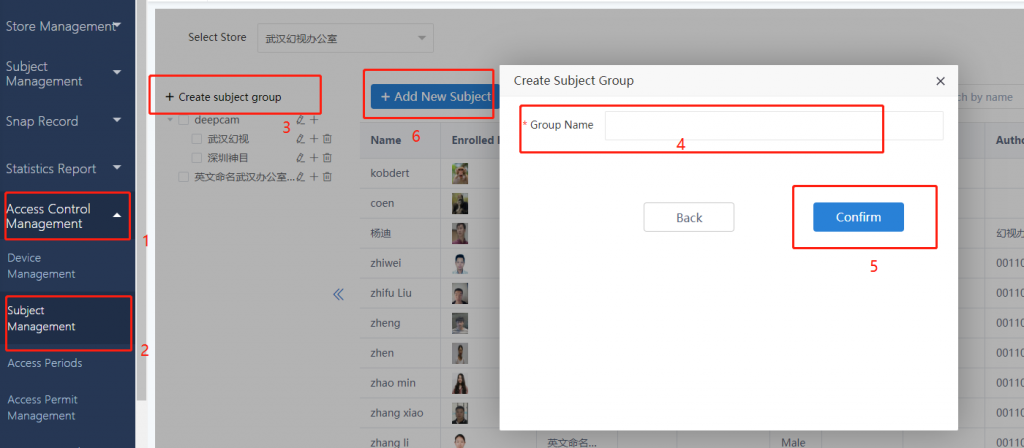
In Deepcoud cloud platform, a person is called a subject. A subject must belong to a subject group. So first we must create a subject group.
Click “Access Control Management”/ “Subject Management” on the left navigation bar, and then click on “+ Create subject group”. Type in a Group Name and Click on “Confirm”
Step 4.2 Add New Subject
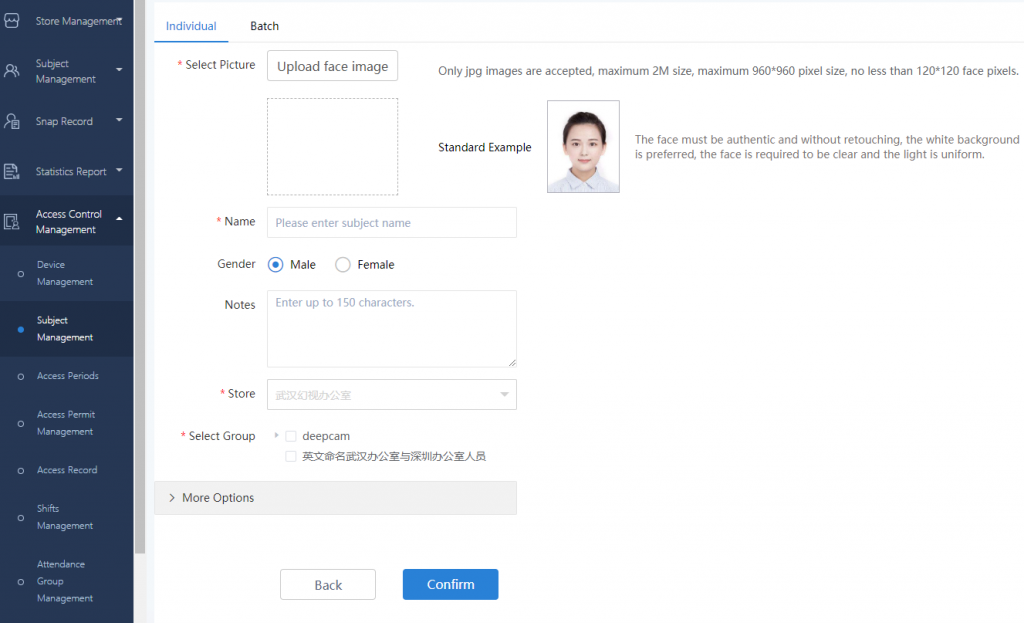
Next click on “Add New Subject”. Upload the subject’s face image first, and then input the information of the subject. Please note that a clear and frontal face image is required for the subject enrollment. Do not forget to assign the subject to a subject group. Any subject can only be assigned to one subject group.
Step 4.3 View Subject List
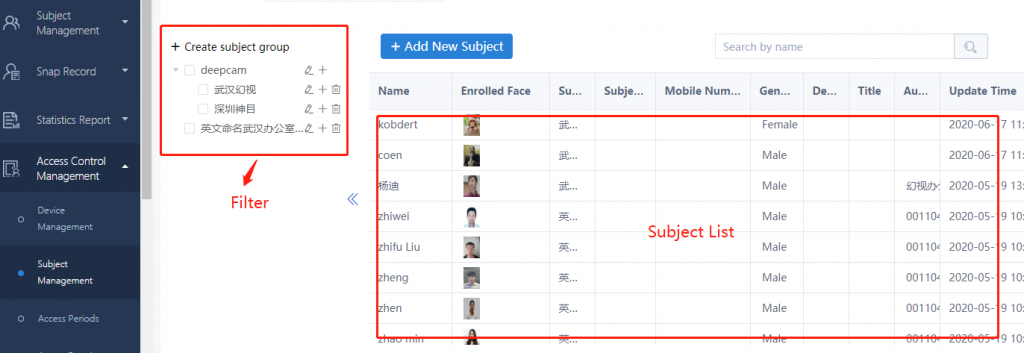
After the subject is added, it can be viewed in the right panel of “Subject Management”. You can also filter the subjects by selecting the subject group on the left side of the panel.
Step 5: Add Access Period
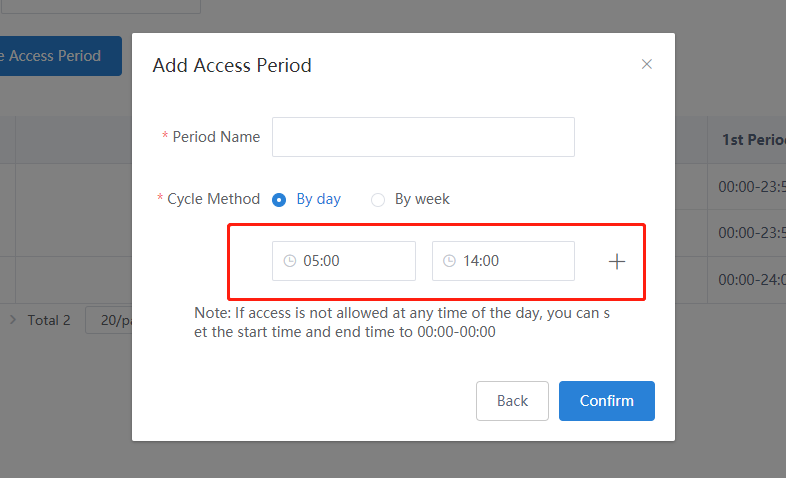
Click on menu “Access Control Management” / “Access Period” on the left navigation bar, and then click on “+ Create Access Period”. The access period can be set by day or by week. Besides, a day can be set to a single period or multiple periods.
Single Period: There is only one beginning and end time in a day. The subjects are only allowed to access within this specified period. The access control tablet will only conduct face verification within this period of time, and subjects can have access during this period of time. For example, if the period is set to 05:00–14:00, then access control is enabled for this time period, and disabled otherwise.
Multiple Periods: There are multiple starting and end times in a day. The access control tablet will only conduct face verification within these periods, and the subjects can get access during these periods. Devices do not conduct face verification at other times, and the subjects cannot access at other times. For example, when the periods are set to Period 1: 00:00–11:00, Period 2:14:00–15:00, Period 3: 18:00-20:00, then the access control is enabled for these periods and disabled otherwise.
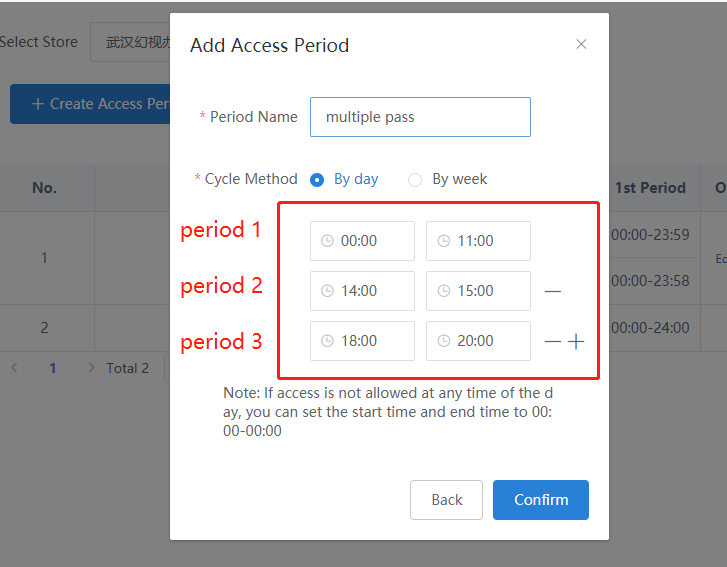
Note: Please pay attention to its rationality if setting up multiple periods.
Note: If access is not allowed at any time of the day, you can set the starting time and end time to 00:00–00:00.
Step 6: Set Access Permit Management
Click the menu “Access Control Management” – “Access Permit Management” on the left navigation bar, and bind the device(s), subject(s) and access rules on the right panel.
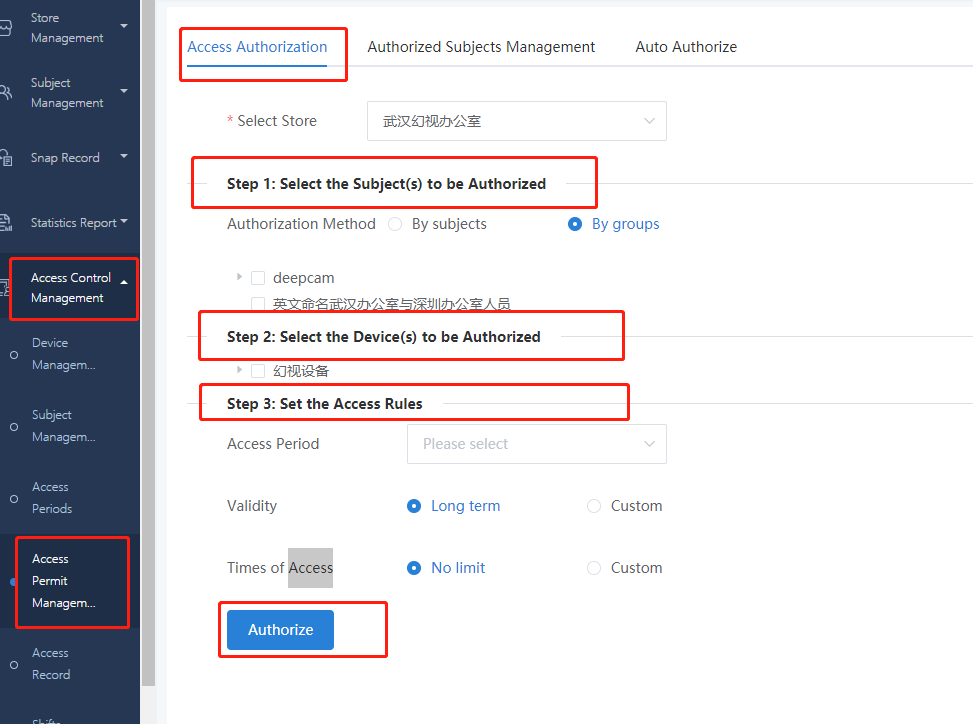
Step 6.1 Set Access Authorization
Click on the tab “Access Authorization” on the right panel. Choose your store.
Step 6.1.1 Select subject
There are two ways to select authorized subjects: by subjects and by groups.
- If by groups, then all subjects in the groups are selected, which means the platform will automatically authorizes all the subjects under group by default.
- If by subject, you can select all or part of the subjects under the group for authorization.
Note: when the number of subjects under the group are more than 300, please select by groups.
Step 6.1.2 Select devices for authorization
This allows you to select all or part of the devices under the device group.
Step 6.1.3 Set the access rules
The Validity is the expiration dates of the access control, and the access period is only valid within the specified date range.
The Time of Access is the cumulative times of access permit within the access period.
After a group is authorized, if new subjects are added to the group, then the group needs to be reauthorized.
After the authorization is set, you can look up and edit the authorization on the page of “Authorized Subjects Management”.
Step 6.2 Set Authorized Subjects Management
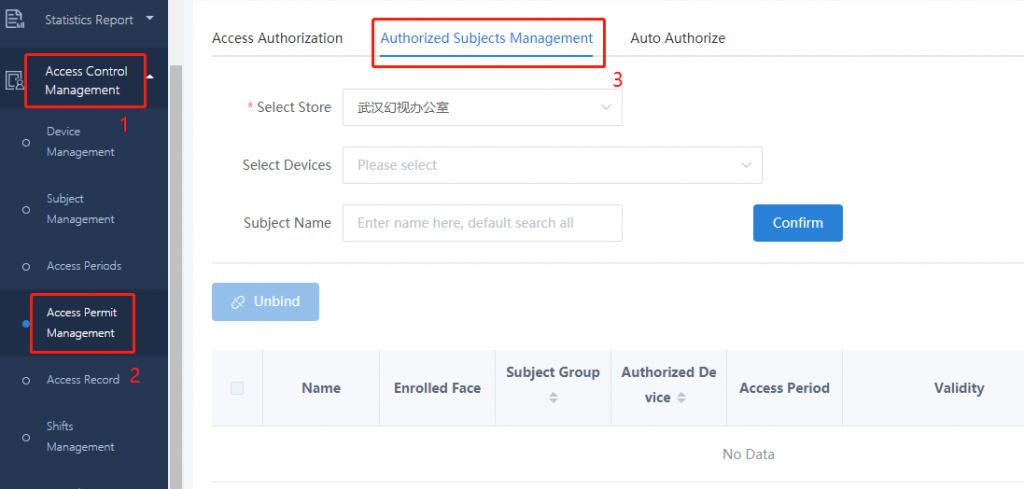
Click on the menu “Access Control Management” / “Access Permit Management” on the left navigation bar, and then click on “Authorized Subjects Management” on the right panel.
Select your Store, then select Devices, then click on “Confirm”, you will see all authorized subjects on the specified device in the selected store, as well as the corresponding access rules (including access period, validity and access times). You can type in the Subject name to display the specified subject. Otherwise all relevant subjects will be shown.
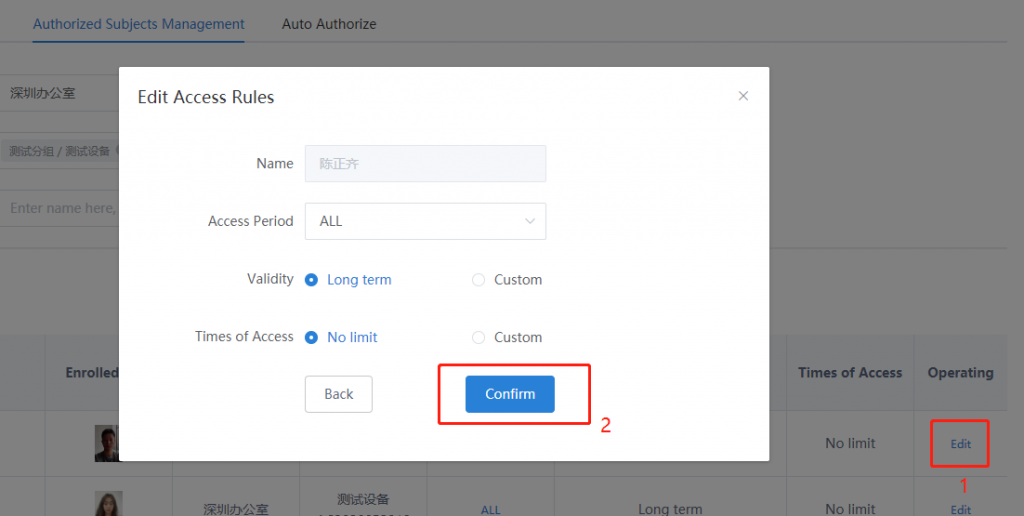
After the subjects and corresponding rules are shown, you can click on the “Edit” on the right side of a record to edit it. After successful editing, the platform will immediately push the change information to the access control device.
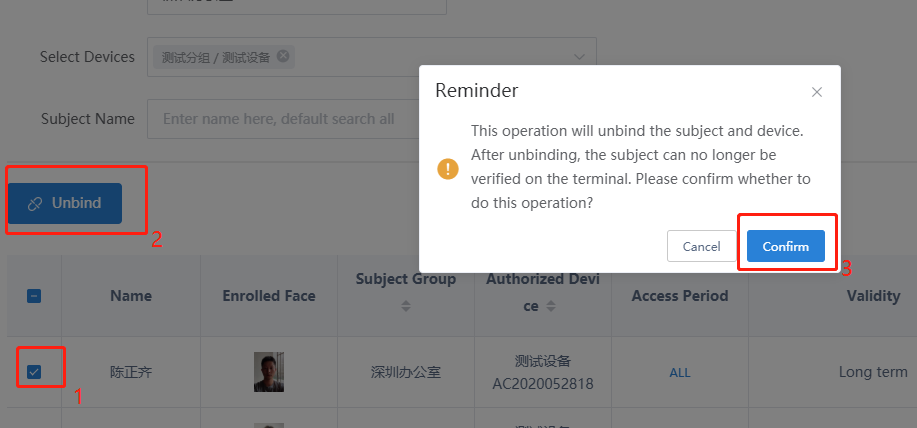
If a subject is no longer authorized to access, the association between that subject and the device needs to be unbinded. You can unbind single or multiple subjects at a time. Check the subjects who need to be unbinded, and then click on “Unbind” on the top left corner of the list to confirm. After that, the subjects will no longer valid on the access control device and their accesses will be denied. If you want to reauthorize the subject, follow the instructions in Section 6.1.
Step 6.3 Display Access Record
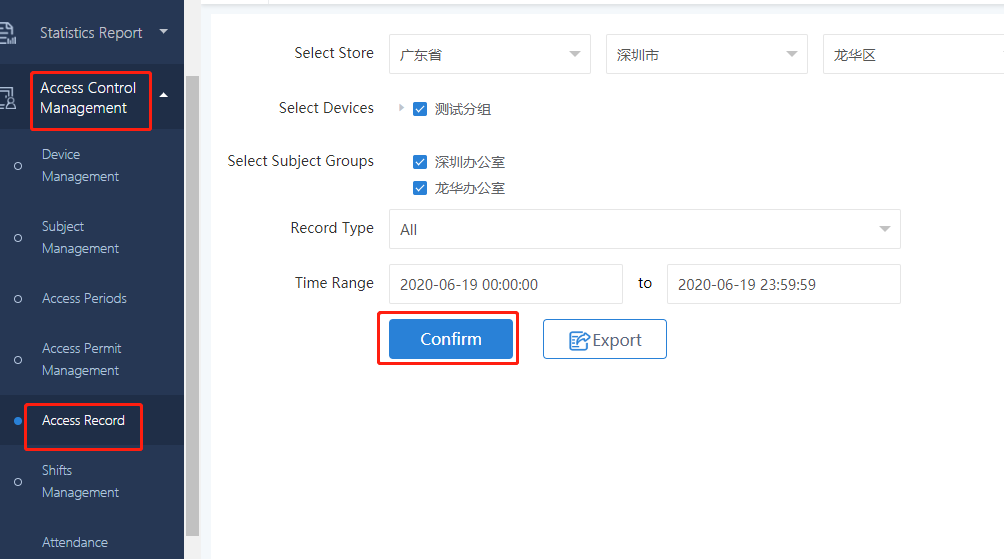
If you want to view the access records click on f “Access Control Management” / “Access Record”. You need to select Store, Devices, Subject Groups and Record type, and set the time range before you click on “Confirm”.

Leave a Reply
You must be logged in to post a comment.