Things used in this project
|
× | 1 | ||||
 |
|
× | 1 | |||
 |
|
× | 1 |
 |
|
|||
|
Story
Our goal was to create an Esp8266 AT command library (based on the ITEAD library), that would work well on software serial on most ESP8266 devices, provided they have firmware that responds to AT commands (which is usually the manufacturer default).
We are distributing this preliminary library for testing and would appreciate your feedback and improvements through the Github Repository.
1. Stuff you need:
- Arduino Uno (and Arduino IDE installed)
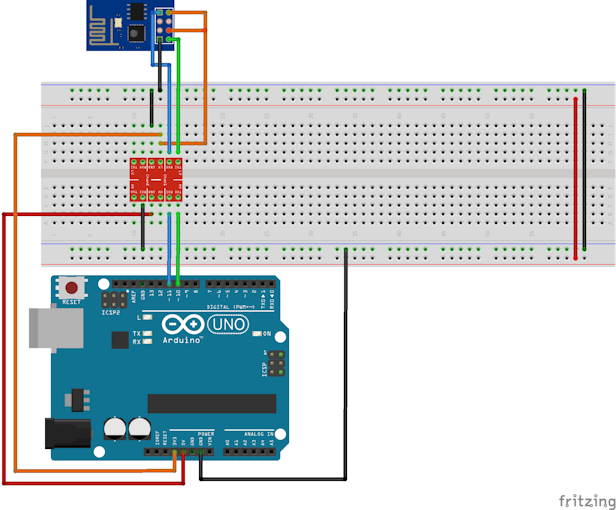
2. Wiring
connect the ESP8266 via Software Serial to your Arduino Uno board using a logic converter, as shown in the wiring figure attached.
3. Connect to your home Wi-Fi
Open the Firmware.ino library from Github and enter your SSID and the PASSWORD to your Wi-Fi :
<code><span class="hljs-keyword">const</span> <span class="hljs-keyword">char</span> *<span class="hljs-built_in">SSID</span>= <span class="hljs-string">"WIFI-SSID"</span>;
<span class="hljs-keyword">const</span> <span class="hljs-keyword">char</span> *PASSWORD=<span class="hljs-string">"WIFI-PASSWORD"</span>;
</code>
4. Upload the sketch to your Arduino – Connect the Arduino to your computer and upload the sketch.
5. Open serial monitor in Arduino IDE – Click on the Serial monitor button in the Arduino IDE (in the top-right corner).
If everything is OK, you should see the following output on the serial monitor:

6. Troubleshooting –
6.1 If you get no response, try updating the ESP firmware to the one provided below.
Use a 3.3v FTDI board like this one
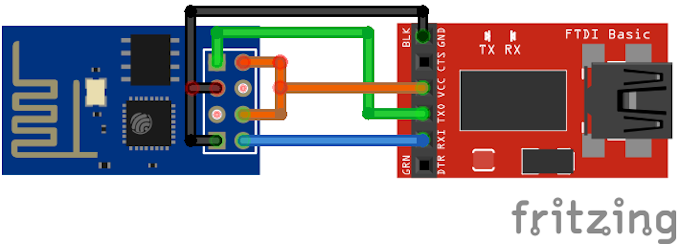
- Hookup the ESP to the FTDI Get the ESP8266Flasher
- Get the 1.1.1.1 Firmware
- Flash the ESP
6.2 If you receive partial response from the esp8266 when using software serial, go to: C:\Program Files (x86)\Arduino\hardware\arduino\avr\libraries\SoftwareSerial\src\SoftwareSerial.h
Change line 42: #define _SS_MAX_RX_BUFF 64 // RX buffer size
To: #define _SS_MAX_RX_BUFF 256 // RX buffer size. This will enlarge the software serial buffer.
6.3 Sometimes setting the baudrate on initialization fails, try resetting the Arduino, it should work fine.
If for some reason, you are still having trouble, please comment here so we will try to locate the problem. If you have any improvement suggestions, please do a pull request on Github.
Generally, this code should work for all Arduino Uno ESP8266-01 versions.
Your feedback is most welcome 🙂
Schematics

Leave a Reply
You must be logged in to post a comment.