[vc_row][vc_column width=”1/1″][vc_tour][vc_tab title=”Download Arduino IDE” tab_id=”1383859312-1-95″][vc_column_text]Arduino IDE can be downloaded from: http://arduino.cc/en/Main/Software.
Make sure you select the right version according to your operation system.
![]() [/vc_column_text][/vc_tab][vc_tab title=”USB driver installation” tab_id=”1383859312-2-92″][vc_column_text]The USB driver comes with the Arduino IDE. When Arduino Uno is plugged into the USB port of PC, it will install the USB driver automatically.[/vc_column_text][/vc_tab][vc_tab title=”Arduino IDE introduction” tab_id=”1383859567794-2-8″][vc_column_text]
[/vc_column_text][/vc_tab][vc_tab title=”USB driver installation” tab_id=”1383859312-2-92″][vc_column_text]The USB driver comes with the Arduino IDE. When Arduino Uno is plugged into the USB port of PC, it will install the USB driver automatically.[/vc_column_text][/vc_tab][vc_tab title=”Arduino IDE introduction” tab_id=”1383859567794-2-8″][vc_column_text]
 |
Verify Checks your code for errors. |
 |
Upload Compiles your code and uploads it to the Arduino I/O board. See uploading below for details.Note: If you are using an external programmer, you can hold down the “shift” key on your computer when using this icon. The text will change to “Upload using Programmer” |
 |
New Creates a new sketch. |
 |
Open Presents a menu of all the sketches in your sketchbook. Clicking one will open it within the current window.Note: due to a bug in Java, this menu doesn’t scroll; if you need to open a sketch late in the list, use the File | Sketchbookmenu instead. |
 |
Save Saves your sketch. |
 |
Serial Monitor Opens the serial monitor. |
Additional commands are found within the five menus: File, Edit, Sketch, Tools, Help. The menus are context sensitive which means only those items relevant to the work currently being carried out are available.
Edit
- Copy for Forum
Copies the code of your sketch to the clipboard in a form suitable for posting to the forum, complete with syntax coloring. - Copy as HTML
Copies the code of your sketch to the clipboard as HTML, suitable for embedding in web pages.
Sketch
- Verify/Compile
Checks your sketch for errors. - Show Sketch Folder
Opens the current sketch folder. - Add File…
Adds a source file to the sketch (it will be copied from its current location). The new file appears in a new tab in the sketch window. Files can be removed from the sketch using the tab menu. - Import Library
Adds a library to your sketch by inserting #include statements at the start of your code. For more details, see libraries below. Additionally, with version 1.0.5 and later of the IDE, you can import a library from a .zip file.
Tools
- Auto Format
This formats your code nicely: i.e. indents it so that opening and closing curly braces line up, and that the statements inside curly braces are indented more. - Archive Sketch
Archives a copy of the current sketch in .zip format. The archive is placed in the same directory as the sketch. - Board
Select the board that you’re using. See below for descriptions of the various boards. - Serial Port
This menu contains all the serial devices (real or virtual) on your machine. It should automatically refresh every time you open the top-level tools menu. - Programmer
For selecting a harware programmer when programming a board or chip and not using the onboard USB-serial connection. Normally you won’t need this, but if you’re burning a bootloader to a new microcontroller, you will use this. - Burn Bootloader
The items in this menu allow you to burn a bootloader onto the microcontroller on an Arduino board. This is not required for normal use of an Arduino board but is useful if you purchase a new ATmega microcontroller (which normally come without a bootloader). Ensure that you’ve selected the correct board from the Boards menu before burning the bootloader.
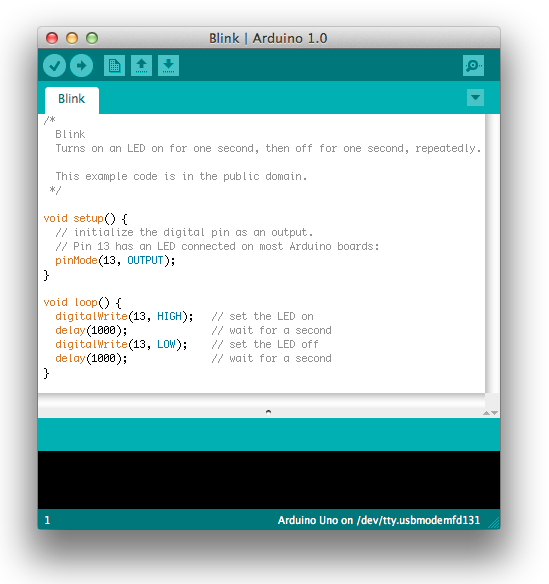
[/vc_column_text][/vc_tab][vc_tab title=” Open the blink example” tab_id=”1383859821517-3-2″][vc_column_text]Open the LED blink example sketch: File > Examples > 1.Basics > Blink.

7 | Select your board
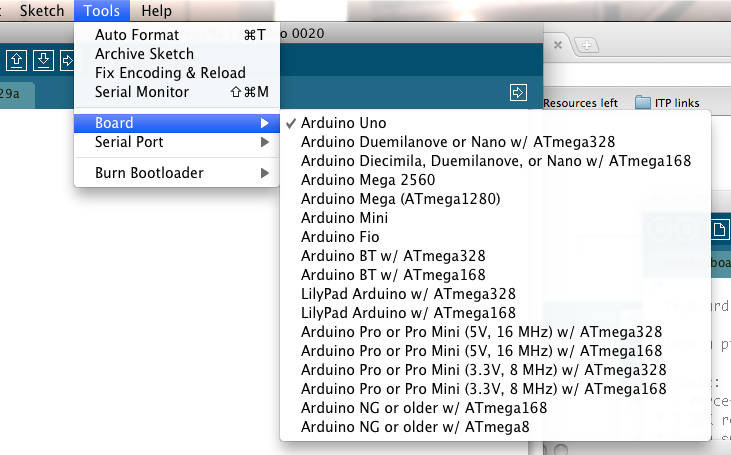
You’ll need to select the entry in the Tools > Board menu that corresponds to your Arduino.

Selecting an Arduino Uno
For Duemilanove Arduino boards with an ATmega328 (check the text on the chip on the board), select Arduino Duemilanove or Nano w/ ATmega328. Previously, Arduino boards came with an ATmega168; for those, select Arduino Diecimila, Duemilanove, or Nano w/ ATmega168. (Details of the board menu entries are available on the environment page.)
8 | Select your serial port
Select the serial device of the Arduino board from the Tools | Serial Port menu. This is likely to be COM3 or higher (COM1and COM2 are usually reserved for hardware serial ports). To find out, you can disconnect your Arduino board and re-open the menu; the entry that disappears should be the Arduino board. Reconnect the board and select that serial port.
9 | Upload the program
Now, simply click the “Upload” button in the environment. Wait a few seconds – you should see the RX and TX leds on the board flashing. If the upload is successful, the message “Done uploading.” will appear in the status bar. (Note: If you have an Arduino Mini, NG, or other board, you’ll need to physically present the reset button on the board immediately before pressing the upload button.)

A few seconds after the upload finishes, you should see the pin 13 (L) LED on the board start to blink (in orange). If it does, congratulations! You’ve gotten Arduino up-and-running.[/vc_column_text][/vc_tab][/vc_tour][/vc_column][/vc_row]

Leave a Reply
You must be logged in to post a comment.