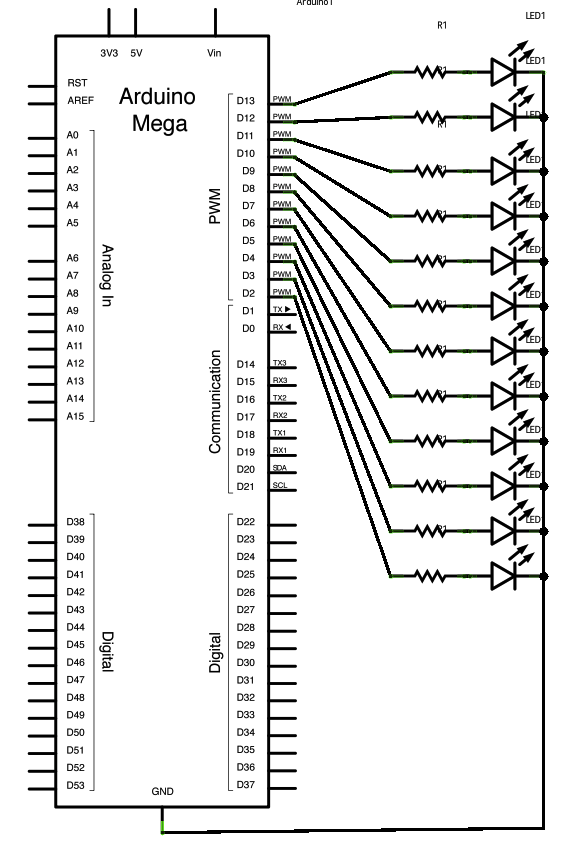
This example fades 12 LEDs up and the down, one by one, on an Arduino or Genuino Mega board, taking advantage of the increased number of PWM enabled digital pins of this board.
Hardware Required
- Arduino or Genuino Mega Board
- 12 Red LEDs
- 12 220 ohm resistors
- hook-up wires
- breadboard
Circuit
image developed using Fritzing. For more circuit examples, see the Fritzing project page
Connect the longer, positive legs (anodes) of 12 LEDs to digital pins 2-13 through 220 ohm current limiting resistors. Connect the shorter, negative legs (cathodes) to ground.
Schematic
Code
In the setup() function of the code below, a for() loop is used to assign digital pins 2-13 of the Mega as outputs.
Next, in the loop() function of the program below, a trio of nested for() loops are used.
The first of these loops,
for (int thisPin =lowestPin; thisPin <= highestPin; thisPin++)
moves through each of the LEDS one by one, from the lowest pin to the highest. Before this loop is allowed to move from one pin to the next, two things must be accomplished. First, you brighten the individual LED through these lines of code:
for (int brightness = 0; brightness < 255; brightness++) {
analogWrite(thisPin, brightness);
delay(2);
}
With each pass through the loop above, the variable brightness increases by one point, and that value is written to the pin currently selected to the main loop. One that pin reaches the maximum PWM value (255), the following loop kicks in:
for (int brightness = 255; brightness >= 0; brightness--) {
analogWrite(thisPin, brightness);
delay(2);
}
This loop subtracts a point from the brightness variable, dimming the LED back down to 0. Once zero is reached, the main for() loop kicks in, and the program moves on to the next LED pin, repeating all the steps mentioned above.
/*
Mega analogWrite() test
This sketch fades LEDs up and down one at a time on digital pins 2 through 13.
This sketch was written for the Arduino Mega, and will not work on previous boards.

The circuit:
* LEDs attached from pins 2 through 13 to ground.

created 8 Feb 2009
by Tom Igoe

This example code is in the public domain.

*/


// These constants won't change.  They're used to give names
// to the pins used:
const int lowestPin = 2;
const int highestPin = 13;
void setup() {
// set pins 2 through 13 as outputs:
for (int thisPin = lowestPin; thisPin <= highestPin; thisPin++) {
pinMode(thisPin, OUTPUT);
}
}

void loop() {
// iterate over the pins:
for (int thisPin = lowestPin; thisPin <= highestPin; thisPin++) {
// fade the LED on thisPin from off to brightest:
for (int brightness = 0; brightness < 255; brightness++) {
analogWrite(thisPin, brightness);
delay(2);
}
// fade the LED on thisPin from brithstest to off:
for (int brightness = 255; brightness >= 0; brightness--) {
analogWrite(thisPin, brightness);
delay(2);
}
// pause between LEDs:
delay(100);
}
}
See Also:
- for()
- analogWrite()
- delay()
- AnalogInOutSerial – Read an analog input pin, map the result, and then use that data to dim or brighten an LED.
- AnalogInput – Use a potentiometer to control the blinking of an LED.
- Calibration – Define a maximum and minimum for expected analog sensor values.
- Fading – Use an analog output (PWM pin) to fade an LED.
- Smoothing – Smooth multiple readings of an analog input.
The original link: https://www.arduino.cc/en/Tutorial/AnalogWriteMega


Leave a Reply
You must be logged in to post a comment.