[vc_row][vc_column][vc_column_text]In this project, we will use Arduino as a voltmeter to measure voltage.
Note: This design is an experimental circuit, and doesn’t have necessarily protection circuit. Please do not use more than two AA batteries.[/vc_column_text][/vc_column][/vc_row][vc_row][vc_column width=”1/1″][vc_tour][vc_tab title=”Parts List” tab_id=”1395019759-1-15″][vc_column_text]
- 1 x Arduino Uno
- 1 x Breadboard
- Several jumper wires
- 1 x resistor of 1KΩ ohm
- [bigcommerce link=”/ttl-uart-to-usb-cable-serial-usb-debug-cable/” target=”_blank”]USB cable[/bigcommerce]×1
[/vc_column_text][/vc_tab][vc_tab title=”Wiring Diagram” tab_id=”1395019759-2-58″][vc_column_text]Here we look at the design of the circuit:
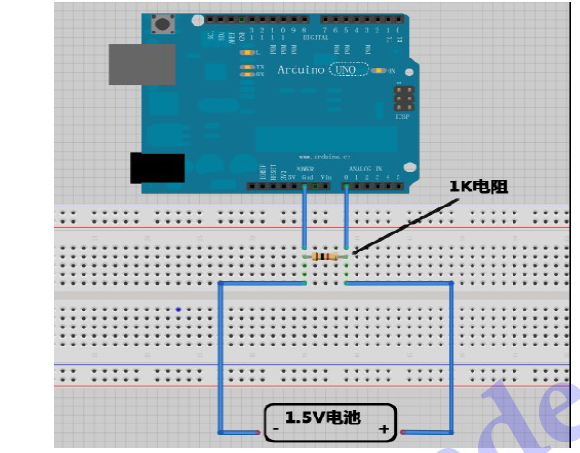
In accordance with the circuit connection diagram corresponds to the physical circuit structures[/vc_column_text][/vc_tab][vc_tab title=”Arduino Code” tab_id=”1395020313036-2-3″][vc_column_text]Program source code is as follows
float temp; / / create a float variable temp as a storage space to store data preparation
void setup ()
{
Serial.begin (9600); / / use 9600 baud rate serial communication
}
void loop ()
{

int V1 = analogRead (A0);
/ / Read voltage from A0 mouth integer type data into the newly created variable V1, analog port
voltage measurement range of 0-5V returns a value of 0-1024
float vol = V1 * (5.0 / 1023.0);
/ / We will be converted into the actual value of V1 voltage value into a float variable vol
if (vol == temp)
/ / This part of the judgment is used to filter duplicate data, only the second voltage value when the
output and the last mixed
{
temp = vol; / / After the completion of the comparison, the ratio of this value into a variable
temp for comparison

}
else
{
Serial.print (vol); / / serial output voltage value, and do not wrap
Serial.println ("V"); / / serial output character V, and line breaks
temp = vol;
delay (1000); / / Wait a second output is completed, the data used to control the refresh rate.
}
}
[/vc_column_text][/vc_tab][/vc_tour][vc_column_text]Click to open the serial monitor
Then the red wire measuring battery anode, black line in the measuring cell will be in the negative
serial monitor once a second refresh rate of the voltage value, the voltage value twice the normal
fluctuations, because, after all, the low precision of the test .[/vc_column_text][/vc_column][/vc_row]
Leave a Reply
You must be logged in to post a comment.