[vc_row][vc_column][vc_column_text]The TEA5767HN is a single-chip electronically tuned FM stereo radio for low-voltage applications with fully integrated Intermediate Frequency (IF) selectivity and demodulation. The radio is completely adjustment-free and only requires a minimum of small and low cost external components. The radio can be tuned to the European, US, and Japanese FM bands.
In this tutorial, we show how to use TEA5767 FM module to create an Arduono based FM radio.
 [/vc_column_text][vc_tour][vc_tab title=”Parts List” tab_id=”1393028824-1-18″][vc_column_text]We will need the following parts:
- 1 x TEA5767 FM Radio Breakout
- 1 x Arduino Uno
- 1 x Linker Base Shield
- 2 x Linker Button
- 2 x Linker cable
- several male to female jumper wires
[/vc_column_text][/vc_tab][vc_tab title=”Wiring Diagram” tab_id=”1393028824-2-72″][vc_column_text]
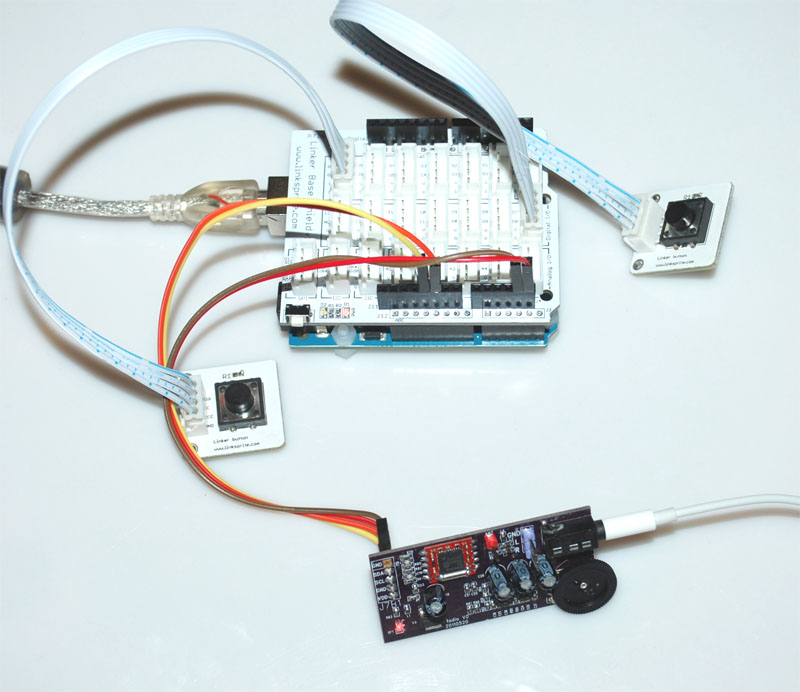
- We will first install the Linker base shield on top of Arduino Uno.
- Install one Linker button to GPIO 6, and the other Linker button to GPIO 7.
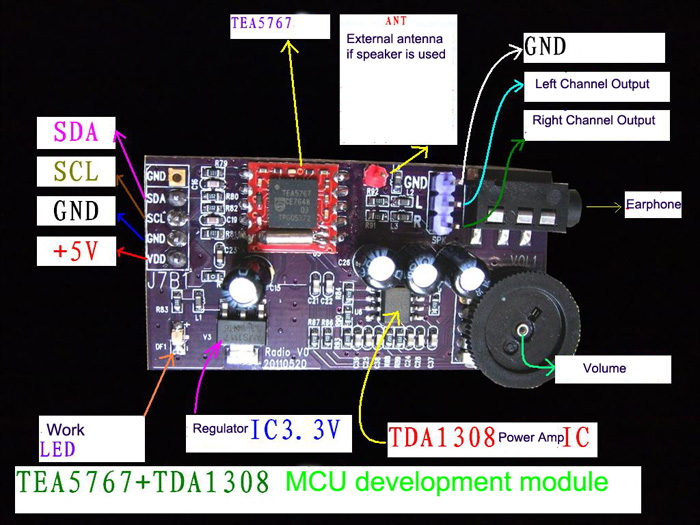
- Connect TEA 5767 to Arduino Uno in the following way:
- SDA of TEA5767 breakout board to A4 of Arduino.
- SCL of TEA5767 breakout board to A5 of Arduino.
- GND of TEA5767 breakout board to GND of Arduino
- VCC of TEA5767 breakout board to VCC of Arduino.
The following are the interfaces of TEA5767 breakout board and Arduino:

[/vc_column_text][/vc_tab][vc_tab title=”Sampe Code” tab_id=”1393029446733-2-1″][vc_column_text]The test code is hosted at: https://github.com/linksprite/tea5767
We also show it here:
/// Original from Arduino FM receiver with TEA5767 http://www.electronicsblog.net
// Modified by Jingfeng Liu
//  LinkSprite.com
//
#include <Wire.h>
#include <LiquidCrystal.h>

unsigned char search_mode=0;

int b=0;
int c=0;

#define Button_next 6
#define Button_prev 7

unsigned char frequencyH=0;
unsigned char frequencyL=0;

unsigned int frequencyB;
double frequency=0;

double freq_available=0;

LiquidCrystal lcd(12, 11, 5, 4, 3, 2);

void setup()   {

  Wire.begin();
  lcd.begin(16, 2);

  /// buttons

  pinMode(Button_next, INPUT);
  digitalWrite(Button_next, HIGH); //pull up resistor

  pinMode(Button_prev, INPUT);
  digitalWrite(Button_prev, HIGH); //pull up resistor

  frequency=87.5; //starting frequency

  frequencyB=4*(frequency*1000000+225000)/32768; //calculating PLL word

  frequencyH=frequencyB>>8;

  frequencyL=frequencyB&0XFF;

  delay(100);

  Wire.beginTransmission(0x60);   //writing TEA5767

  Wire.write(frequencyH);
  Wire.write(frequencyL);
  Wire.write(0xB0);
  Wire.write(0x10);
  Wire.write(0x00);
  Wire.endTransmission();

  delay(100);

}

void loop()
{

  unsigned char buffer[5];

  lcd.setCursor(0, 0);

  Wire.requestFrom(0x60,5); //reading TEA5767

  if (Wire.available())

  {
    for (int i=0; i<5; i++) {

      buffer[i]= Wire.read();
    }

    freq_available=(((buffer[0]&0x3F)<<8)+buffer[1])*32768/4-225000;

    lcd.print("FM ");

    lcd.print((freq_available/1000000));

    frequencyH=((buffer[0]&0x3F));

    frequencyL=buffer[1];

    if (search_mode) {

      if(buffer[0]&0x80) search_mode=0;

    }

    if (search_mode==1) lcd.print(" SCAN");
    else {
      lcd.print("       ");
    }

    lcd.setCursor(0, 1);

    lcd.print("Level: ");
    lcd.print((buffer[3]>>4));
    lcd.print("/16 ");

    if (buffer[2]&0x80) lcd.print("STEREO   ");
    else lcd.print("MONO   ");

  }

  ///// buttons read

  //////////// button_next//////////
  if (!digitalRead(Button_next)&&!b) {

    frequency=(freq_available/1000000)+0.05;

    frequencyB=4*(frequency*1000000+225000)/32768+1;

    frequencyH=frequencyB>>8;
    frequencyL=frequencyB&0XFF;

    Wire.beginTransmission(0x60);

    Wire.write(frequencyH);
    Wire.write(frequencyL);
    Wire.write(0xB0);
    Wire.write(0x1F);
    Wire.write(0x00);

    Wire.endTransmission();

    //////////////////////

    b=100;

  };

  if (!digitalRead(Button_next)&&b==1) {

    ///scannnn UP

    search_mode=1;

    Wire.beginTransmission(0x60);

    Wire.write(frequencyH+0x40);
    Wire.write(frequencyL);
    Wire.write(0xD0);
    Wire.write(0x1F);
    Wire.write(0x00);

    Wire.endTransmission();

    /////////////////

    b=100;

  };

  if (!b==0) b--;

  //////////// button_prev//////////
  if (!digitalRead(Button_prev)&&!c) {

    frequency=(freq_available/1000000)-0.05;

    frequencyB=4*(frequency*1000000+225000)/32768+1;

    frequencyH=frequencyB>>8;
    frequencyL=frequencyB&0XFF;

    Wire.beginTransmission(0x60);

    Wire.write(frequencyH);
    Wire.write(frequencyL);
    Wire.write(0xB0);
    Wire.write(0x1F);
    Wire.write(0x00);

    Wire.endTransmission();

    c=100;

  };

  if (!digitalRead(Button_prev)&&c==1) {

    ///scannnn DOWN

    search_mode=1;

    Wire.beginTransmission(0x60);

    Wire.write(frequencyH+0x40);
    Wire.write(frequencyL);

    Wire.write(0x50);
    Wire.write(0x1F);
    Wire.write(0x00);
    Wire.endTransmission();

    c=100;

  };

  if (!c==0) c--;

  ////////////////////

}
After we download the code to Arduino, we can press the two buttons to scan up and scan down the channels to search for stations.[/vc_column_text][/vc_tab][/vc_tour][/vc_column][/vc_row]
Leave a Reply
You must be logged in to post a comment.