[vc_row][vc_column width=”1/1″][vc_tour][vc_tab title=”pcDuino Ubuntu File Directory Structure” tab_id=”1389169721-1-51″][vc_column_text]Ubuntu adheres to the Filesystem Hierarchy Standard for directory and file naming. This standard allows users and software programs to predict the location of files and directories. The root level directory is represented simply by the slash /. At the root level, all Ubuntu systems include these directories:
|
Directory |
Content |
|
bin |
Essential command binaries |
|
boot |
Static files of the boot loader |
|
dev |
Device files |
|
etc |
Host-specific system configuration |
|
home |
User home directories |
|
lib |
Essential shared libraries and kernel modules |
|
media |
Contains mount points for replaceable media |
|
mnt |
Mount point for mounting a file system temporarily |
|
proc |
Virtual directory for system information (2.4 and 2.6 kernels) |
|
root |
Home directory for the root user |
|
sbin |
Essential system binaries |
|
sys |
Virtual directory for system information (2.6 kernels) |
|
tmp |
Temporary files |
|
usr |
Secondary hierarchy |
|
var |
Variable data |
|
srv |
Data for services provided by the system |
|
opt |
Add-on application software packages |
The following is a list of important considerations regarding directories and partitions. Note that disk usage varies widely given system configuration and specific usage patterns. The recommendations here are general guidelines and provide a starting point for partitioning.
- The root partition
/must always physically contain/etc,/bin,/sbin,/liband/dev, otherwise you won’t be able to boot. Typically 150–250MB is needed for the root partition. /usr: contains all user programs (/usr/bin), libraries (/usr/lib), documentation (/usr/share/doc), etc. This is the part of the file system that generally takes up most space. You should provide at least 500MB of disk space. This amount should be increased depending on the number and type of packages you plan to install. A standard Ubuntu desktop requires a minimum of 1.5GB here. A generous workstation or server installation should allow 4–6GB./var: variable data like news articles, e-mails, web sites, databases, the packaging system cache, etc. will be placed under this directory. The size of this directory depends greatly on the usage of your system, but for most people will be dictated by the package management tool’s overhead. If you are going to do a full installation of just about everything Ubuntu has to offer, all in one session, setting aside 2 or 3 GB of space for/varshould be sufficient. If you are going to install in pieces (that is to say, install services and utilities, followed by text stuff, then X, …), you can get away with 300–500 MB. If hard drive space is at a premium and you don’t plan on doing major system updates, you can get by with as little as 30 or 40 MB./tmp: temporary data created by programs will most likely go in this directory. 40–100MB should usually be enough. Some applications — including archive manipulators, CD/DVD authoring tools, and multimedia software — may use/tmpto temporarily store image files. If you plan to use such applications, you should adjust the space available in/tmpaccordingly./home: every user will put his personal data into a subdirectory of this directory. Its size depends on how many users will be using the system and what files are to be stored in their directories. Depending on your planned usage you should reserve about 100MB for each user, but adapt this value to your needs. Reserve a lot more space if you plan to save a lot of multimedia files (pictures, MP3, movies) in your home directory.
[/vc_column_text][/vc_tab][vc_tab title=”Linux Commands” tab_id=”1389169721-2-95″][vc_column_text]
We briefly discuss some of the frequently used commands used in Ubuntu.
Changing Directory
The command for changing directory is cd.
You can go to the top of your file system by typing cd /. Any directory change starting with / will be relative to the top directory in the file system. Typing cd folder/subfolder, etc. will change directory relative to were you are now in the filesystem (the working directory), so, for example, if you are in the home directory, and you type cd arduino you will go into the directory home/arduino, but if you had instead typed cd /arduino, Linux would have tried to put you in an arduino directory at the top level of the file system (similar to C:\arduino on windows), which on most systems won’t exist.
Listing Files in a directory:
To do this, type ls.
This function ‘lists’ all the files in a directory. Adding -a to the command (ls -a) will also show any hidden files in that directory. Adding -l (ls -l) will show the file’s permissions, type, owner and the date it was created/edited.
Change User
On the Ubuntu system, we can use command ‘su’ to switch to root user mode. As many commands require root privilege, we can add ‘su’ to the beginning of the command.
root is the super user (administrator) on Linux. Sudo is the command which allows other users to issue a command as the super user. sudo = “super user do”. Operations that a normal user aren’t normally allowed to do can be done using sudo. The word is just a mash of super-do and pseudo. USE SUDO WITH CAUTION! Sudo can be used to do a lot of damage to your system, and there is often a reason your normal account isn’t allowed to perform a certain action. suro rm -rf /* would completely delete everything in the filesystem, destroying the system.
Install Software Package
Apt-get is the package or software manager on Debian/Ubuntu linux. Install is the operation for apt-get to perform and the name of the package follows the keyword or action of install. Multiple package names can be put on the line following install.
Compress and Uncompress Install Software Package
Tar is a very popular file format in Linux to zipped files. The biggest advantage is that it can uses little CPU resources to zip files. It is only a packing utility, and it is not responsible for compression. The compression is done by gzip and bzip2. Now let’s use file format *.tar, *.tar.gz, and *.tar.bz2 as examples:
If we want to compress and pack the directory ‘test’ under /var/tmp to the current directory,
$ <strong>tar -cvf test.tar test </strong>
The above command only packs directories and files, and doesn’t do compression.
$ <strong>tar -zcvf test.tar.gz test</strong>
The above command packs directories and files, and then compresses the pack using gzip.
$ <strong>tar -jcvf test.tar.bz2 test</strong>
The above command packs directories and files, and then compresses the pack using bzip2.
The following command compares the size of different resulting files:
$<strong> ll         test.tar*                                   </strong>
-rw-r--r-- 1 Lee mock 10240 01-18 17:05 test.tar
-rw-r--r-- 1 Lee mock   357 01-18 17:06 test.tar.bz2
-rw-r--r-- 1 Lee mock   327 01-18 17:05 test.tar.gz

<strong>How to uncompress the files:</strong>
$ <strong>tar -xvf   test.tar</strong>
$ <strong>tar -xvf   test.tar.gz</strong>
$ <strong>tar -jxvf  test.tar.bz2</strong>
How to Uninstall / Delete / Remove Package
To uninstall package, we can use ‘dpkg –list’ to list all the installed software packages. Once found out the installed packages, we can use ‘sudo apt-get –purge remove” command followed by the package name to remove a certain package. For example:
$sudo apt-get –purge remove lighttpd
A recommended text editor
Nano is a handy text editor that is more handy to use compared to vi. To install it, run “$sudo apt-get install nano”.
How to check kernel version
The following command is used to find out the version of kernel:
ubuntu@ubuntu:~$ cat /proc/version
Find CPU Information /Speed
You use the following command to display all information about the CPU:
ubuntu@ubuntu:~$ cat /proc/cpuinfo
How to check storage space left
To check space left, type:
$df -h
[/vc_column_text][/vc_tab][vc_tab title=”Using USB WiFi Dongle” tab_id=”1389171061268-2-10″][vc_column_text]The recommended USB WiFi Dongle for pcDuino is RT5370.
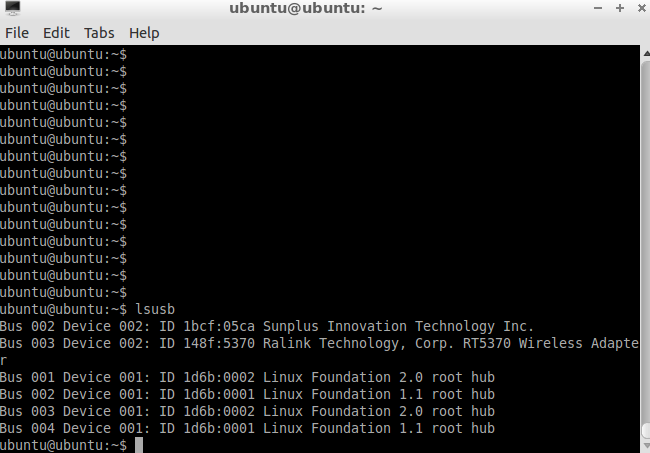
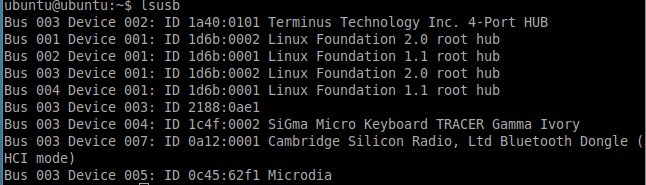
When the USB WiFi dongle is inserted, we can check if the hardware is working or not by using:
$lsusb
The following is what we get when the WiFi dongle is inserted.
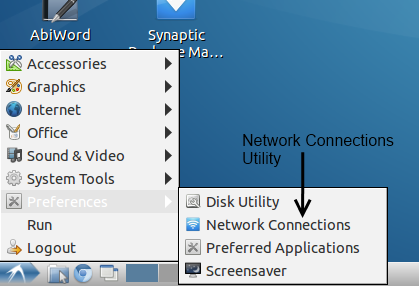
Open the “Network Connections” utility, under the “Preferences” submenu in the system menu.
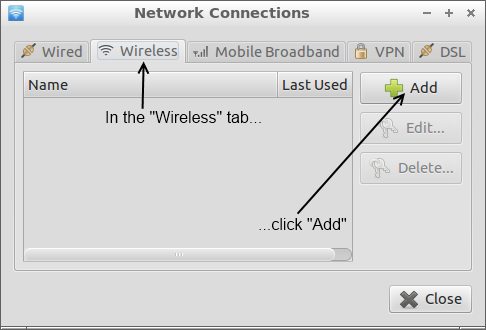
Under the “Wireless” tab, click the “Add” button.
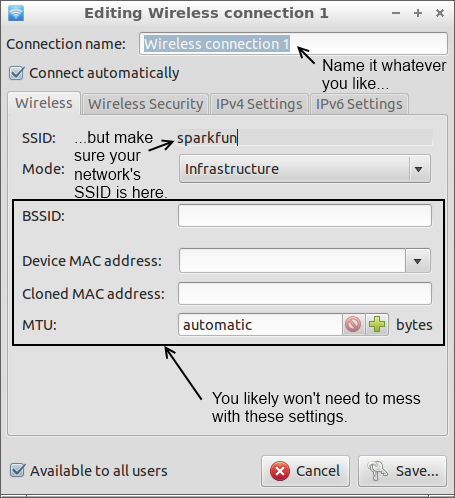
You can put whatever you like in the “Connection name” field, but you’ll need to have the SSID of the network you want to connect to in the SSID field. Mode should default to “Infrastructure”, which is correct for most networks, and the bottom four fields can be ignored.
In the “Wireless Security” tab, you can set the network security options for your network. We won’t attempt to cover this, because it’s too big a topic; the fields should be pretty similar to those on other devices, so copy the settings from something else if necessary.

The last two tabs, “IPV4 Settings” and “IPV6 Settings”, you can probably ignore. If you do need to use them, you likely know that you do, and you probably quit reading this page a while ago.
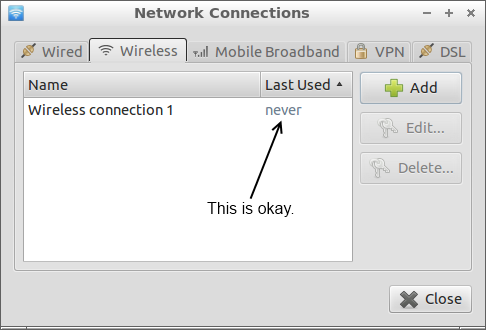
Hit the “Save” button to return to the “Network Connections” utility. You’ll see your new connection in the list; the “Last Used” column will say “never” next to this connection. That’s okay. Go ahead and close the window and your connection should be ready to go!
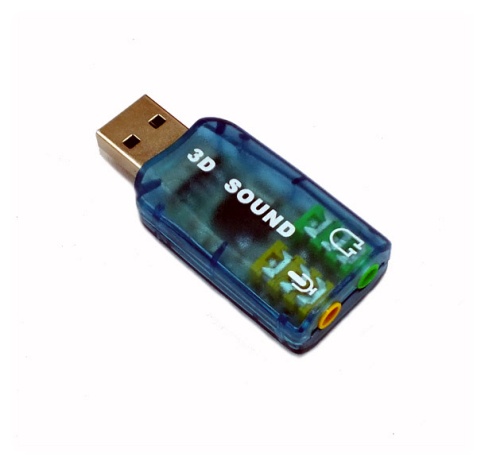
[/vc_column_text][/vc_tab][vc_tab title=”Using USB Sound Card with Audio Input/output” tab_id=”1389171366052-3-10″][vc_column_text]The USB sound card we are using can be found at:
http://linksprite.com/wiki/index.php5?title=USB_Sound_Card_with_Audio_Input/Output
The USB sound driver is included in pcDuino’s ubuntu kernel.
To install the applications, please use:
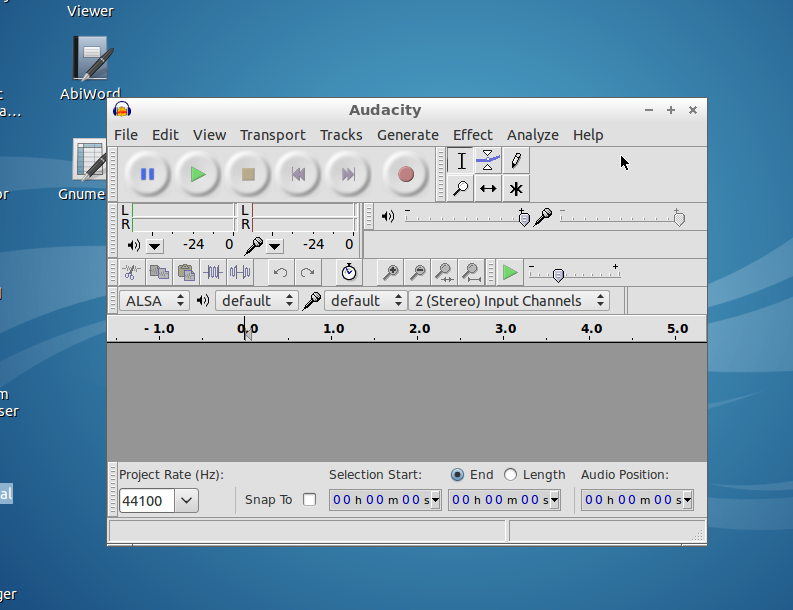
$sudo apt-get install audacity
$sudo apt-get install pulseaudio pavucontrol
The following is the screen shot of Audacity. We can record and listen to sound.
 [/vc_column_text][/vc_tab][vc_tab title=”Use 3G Cellular USB Dongle (Huawei E303s)” tab_id=”1389171495494-4-10″][vc_column_text]We go through the steps to use 3G cellular USB dongle (Huawei E303s) with pcDuino.
Install the necessary software modules:
usb_modeswitch libusb-compat libusb-1.0.0 usb-modeswitch-data
Libusb-1.0.0 can be installed using:
$sudo apt-get install libusb-1.0.0
We also need:
$sudo apt-get install libusb-dev
ubuntu@ubuntu:~/Downloads/usb-modeswitch-1.2.6$ sudo make install
sed ‘s_!/usr/bin/tclsh_!'”/usr/bin/tclsh”‘_’ < usb_modeswitch.tcl > usb_modeswitch_dispatcher
install -D –mode=755 usb_modeswitch /usr/sbin/usb_modeswitch
install -D –mode=755 usb_modeswitch.sh /lib/udev/usb_modeswitch
install -D –mode=644 usb_modeswitch.conf /etc/usb_modeswitch.conf
install -D –mode=644 usb_modeswitch.1 /usr/share/man/man1/usb_modeswitch.1
install -D –mode=755 usb_modeswitch_dispatcher /usr/sbin/usb_modeswitch_dispatcher
install -d /var/lib/usb_modeswitch
ubuntu@ubuntu:~/Downloads/usb-modeswitch-data-20130610$ sudo make install
install -d /usr/share/usb_modeswitch
install -d /etc/usb_modeswitch.d
install -D –mode=644 40-usb_modeswitch.rules /lib/udev/rules.d/40-usb_modeswitch.rules
install –mode=644 -t /usr/share/usb_modeswitch ./usb_modeswitch.d/*[/vc_column_text][/vc_tab][vc_tab title=”Use Bluetooth USB Dongle” tab_id=”1389171527420-5-3″][vc_column_text]We cover how to use Bluetooth USB dongle on pcDuino. In this tutorial, the Bluetooth USB dongle we used is the one from CuteDigi.
First, we need to install the following software module:
#sudo apt-get install gnome-bluetooth
Plug in Bluetooth USB dongle, and check the USB device:
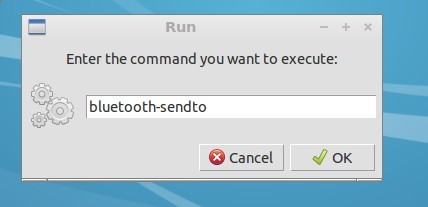
Run ‘bluetooth-sendto’ in the terminal:
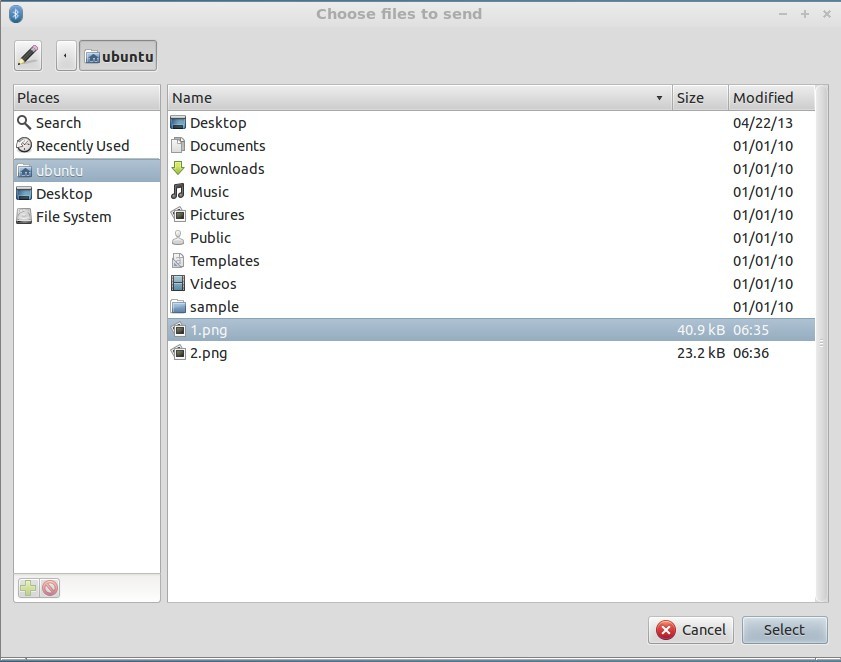
Select the file that needs to be sent:
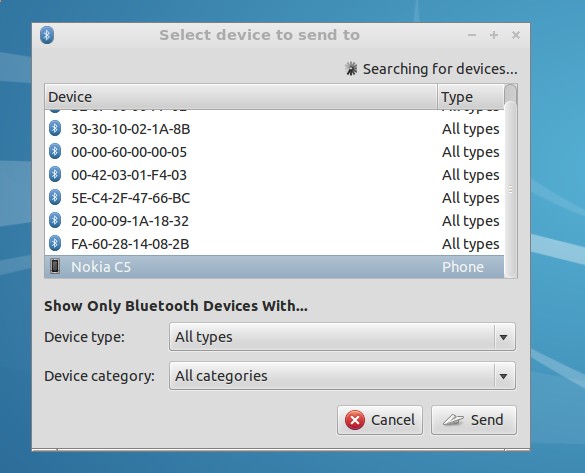
Scan for destination Bluetooth device, and select the device:
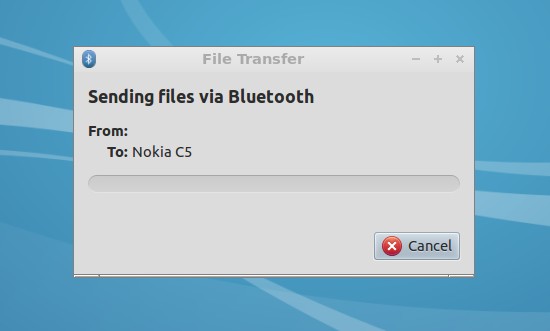
Now we can send file to the target device:
[/vc_column_text][/vc_tab][/vc_tour][/vc_column][/vc_row]
Leave a Reply
You must be logged in to post a comment.