The command line in Linux is probably one of the scariest experience for a newcomer there is. I remember spending hours back in the day trying to decode an error message in my terminal. However, it was completely worth it. If I had to pick only one reason for a newcomer to learn to deal with the command line properly today, it would probably be for the possibility to manage a music library entirely from the terminal. The software I prefer to do this is cmus, short for “C* MUsic Player” as it is written entirely in C.
cmus is a powerful music file manager with a built-in audio player. Using its ncurses based terminal interface, you can browse your music library, and play music from playlists or queues, all from the command line.
Install cmus on pcDuino Ubuntu
First, you will need to set up and install cmus as follows.
$ sudo apt-get install cmus
Import Music Files to cmus
The first thing to do is to import your music files into your library. This process will immediately reveal two things: that the shortcuts are inspired by vim‘s, and that cmus is incredibly fast. I have successfully imported over a thousand songs in less than twenty seconds! Try that with iTunes or any graphical music library software, and you will have time to make a peanut butter sandwich before it’s done.
To import music files on cmus, type the following vim-like command on cmus.
:a /path/to/your/music/folder
//such as
:a /home/ubuntu/music/
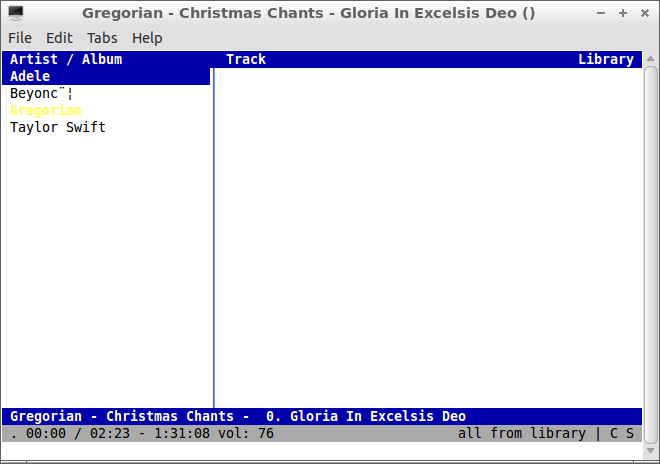
Then all the music files in that folder appeared sorted by artist and album instantly.
@h1 CONTENTS
Step 1: Starting Cmus
Step 2: Adding Music
Step 3: Playing Tracks From The Library
Step 4: Managing The Queue
Step 5: The Playlist
Step 6: Find that track
Step 7: Customization
Step 8: Quit
Step 9: Further Reading
@h1 Step 1: Starting Cmus
When you first launch cmus (just type `cmus` in a terminal and press Enter) it
will open to the album/artist view, which looks something like this:
@pre
+———————————————————————+
| Artist / Album Track Library |
| | |
| | |
| | |
| | |
| | |
| | |
| | |
| |
| . 00:00 – 00:00 vol: 100 all from library | C |
| |
+———————————————————————+
@endpre
This is the view where your artists and albums will be displayed.
@h1 Step 2: Adding Music
Press *5* to switch to the file-browser view so we can add some music. You
should see something like this:
@pre
+———————————————————————+
| Browser – /home/jasonwoof |
| ../ |
| Desktop/ |
| MySqueak/ |
| audio-projects/ |
| audio/ |
| bin/ |
| config/ |
| |
| . 00:00 – 00:00 vol: 100 all from library | C |
| |
+———————————————————————+
@endpre
Now, use the arrow keys, Enter and Backspace to navigate to where you have
audio files stored. To add music to your cmus library, use the arrow keys to
hilight a file or folder, and press *a*. When you press *a* cmus will move you
to the next line down (so that it is easy to add a bunch of files/folders in a
row) and start adding the file/folder you pressed *a* on to your library. This
can take a while if you added a folder with a lot in it. As files are added,
you will see the second time in the bottom right go up. This is the total
duration of all the music in the cmus library.
Note: cmus does not move, duplicate or change your files. It just remembers
where they are and caches the metadata (duration, artist, etc.)
Just to be on the safe side, lets save. Type *:save* and press Enter.
Note: Cmus automatically saves your settings and library and everything when
you quit, so you probably won’t use the save command much.
@h1 Step 3: Playing Tracks From The Library
Press *2* to go to the simple library view. You should see something like
this:
@pre
+———————————————————————+
| Library ~/.config/cmus/lib.pl – 31 tracks sorted by artist album di |
| Flying Lizards . Money (That’s What I Want) 02:31 |
| Jason Woofenden . VoR Theme 2009 01:20 |
| Keali’i Reichel 06. Wanting Memories 1994 04:28 |
| Molly Lewis . Tom Cruise Crazy 03:13 |
| NonMemory . pista1 2009 03:18 |
| NonMemory 01. pista1 2009-04-21 04:13 |
| Ray Charles 06. Halleluja I Love Her So 02:33 |
| |
| . 00:00 – 2:16:25 vol: 100 all from library | C |
| |
+———————————————————————+
@endpre
Use the up and down arrow keys to select a track you’d like to hear, and press
Enter to play it. Here’s some keys to control play:
Press *c* to pause/unpause
Press right/left to seek by 10 seconds
Press *<*/*>* seek by one minute
cmus has some great options to control what plays next (if anything) when the
track ends. The state of these settings are shown in the bottom right corner.
The first of these shows what collection of tracks (currently “all from
library”) we are playing. Press *m* to cycle through the different options for
this setting. To the right of that (past the “|”) cmus shows the state of three
toggles. Only toggles which are “on” are shown, so now we only see the *C*.
Here are the toggles:
[C]ontinue
When this is off, cmus will always stop at the end of the track. You can
toggle this setting by pressing *shift-C*.
[R]epeat
If this is on (and continue is on), when cmus reaches the end of the group
of tracks you’re playing (selected with the *m* key) it will start again from
the beginning. Press *r* to toggle this setting.
[S]huffle
When this is on, cmus will choose a random order to play all the tracks
once. Press *s* to toggle this option.
@h1 Step 4: Managing The Queue
Lets say you’re listening to a song, and you want to select which song will
play next, without interrupting the currently playing song. No problem! Just go
to the song you want to hear next (in any of the views) and press *e*. The
queue is FIFO, meaning if you queue up another track, it will play after the
one you already had queued up.
Note: The queue is not effected by the “shuffle” option described above.
Press *4* to view/edit the queue. This view works and looks a lot like the
simple library view. The main difference is that you can change the order of
the tracks with the *p* and *P* keys. You can press *shift-D* to remove a track
from the queue.
When cmus is ready to play another track (it’s reached the end of a track and
the “continue” setting is on) it will remove the top entry from the queue and
start playing it.
@h1 Step 5: The Playlist
The playlist works like another library (like view *2*) except that (like
the queue) you manually set the order of the tracks. This can be quite useful
if you want to create a mix of specific tracks or if you want to listen to an
audio book without having the chapters play when you’re playing “all from
library”.
The playlist is on view *3*. But before we go there, lets add some tracks.
Press *2* to go to the simple library view, go to a track you want and press
*y* to add it to the playlist. The only visual feedback you’ll get that
anything happened is that the hilight will move down one row. Add a few more so
you have something to work with.
Now press *3* to go to the playlist.
Just like the queue, you can use the *p*, *P* and *D* keys to move and delete
tracks from the playlist.
Note: Changing the view (e.g. by pressing *3*) does not affect what cmus will
play next. To put cmus into “play from the playlist” mode, press Enter on one
of the tracks in the playlist. To switch modes without interrupting the
currently-playing song, you can press *shift-M*.
@h1 Step 6: Find that track
This step shows various ways you can find track(s) you’re looking for.
Search: Press *2* to be sure you’re on the simple library view, then press */*
to start a search. Type a word or two from the track you’re looking for. cmus
will search for tracks that have all those words in them. Press enter to get
the keyboard out of the search command, and *n* to find the next match.
Tree View: Press *1* to select the tree view. Scroll to the artist, press
*space* to show their albums, scroll to the album you want, then press tab so
the keyboard controls the right column. Press tab again to get back to the left
column.
Filters: See the reference manual (see Further Reading below) for a detailed
description on how to quickly (and temporarily) hide most of your music.
@h1 Step 7: Customization
Cmus has some very cool settings you can tweak, like changing the way tracks
are displayed (e.g. to display disk numbers), enabling replaygain support or
changing the keybindings.
Press *7* for a quick overview of the current keybindings and settings.
To change a setting or keybind, just select it (up/down keys) and press enter.
This will put the command for the current setting in the command now (bottom
left of your screen), which you can edit to put in a new value/key.
Please see the reference manual (see Further Reading below) for a detailed
description of all the commands and settings available.
@h1 Step 8: Quit
When you’re done, type *:q* and press Enter to quit. This will save your
settings, library, playlist and queue.
@h1 Step 9: Further Reading
Cmus comes with a great reference manual. Now that you’ve got the basics down
it should be intelligible. Try *man cmus* in a terminal. If that’s not
installed, try opening up `cmus.txt` from the `Doc` directory, or read the latest
version online:
`https://github.com/cmus/cmus/blob/master/Doc/cmus.txt`
There are more commands and features not covered here like loading and saving
playlists, controlling cmus remotely with `cmus-remote`, etc.
cmus is very funny 🙂
Leave a Reply
You must be logged in to post a comment.