
Ext4 – Fourth Extended File System
- Ext4, the high-anticipated Ext3 successor.
- On October 2008, Ext4 as stable code were merged in the Kernel 2.6.28 which contains Ext4 file system.
- Backward compatibility.
- Max file size 16GB to 16TB.
- Ext4 file system have option to Turn Off journaling feature.
- Other features like Sub Directory Scalability, Multiblock Allocation, Delayed Allocation, Fast FSCK etc.
Ext3 – Third Extended File System
- Ext3 file system was introduced in 2001 and same was integrated in Kernel 2.4.15 with journaling feature, which is to improve reliability and eliminates need to check file system after unclean shutdown.
- Max file size 16GB – 2TB.
- Provide facility to upgrade from Ext2 to Ext3 file systems without having to back up and restore data.
As you know , The Extended File System is Ext3 on pcDuino 3.
Ext4 is better than Ext3. So
We want to upgrade upgrade from Ext3 To Ext4 without formatting Nand (Hard disk).
Here is a simple steps on the pcDuino Forum : http://pcduino.com/forum/index.php?topic=4475.msg7006#msg7006
Upgrade From Ext3 To Ext4 in detail :
Step 1: Display File System Ext3
Type “df -T ” to display file system with print type.
You’ll see currentaly file system type is ext3 on the first line of Type.
ubuntu@ubuntu:~$ df -T
Filesystem     Type     1K-blocks    Used Available Use% Mounted on
/dev/nandd     ext3       3749816 1360444   2202212  39% /
none           devtmpfs    447644       4    447640   1% /dev
none           tmpfs       448464       4    448460   1% /tmp
none           tmpfs        89696     252     89444   1% /run
none           tmpfs         5120       0      5120   0% /run/lock
none           tmpfs       448464     132    448332   1% /run/shm
none           tmpfs       448464      92    448372   1% /var/tmp
none           tmpfs       448464     624    447840   1% /var/log
Step 2: root user
OK. Let us change to root user.
ubuntu@ubuntu:~$ sudo passwd
Enter new UNIX password: (-type passwd,such as pcDuino )
Retype new UNIX password:(-type passwd again ,such as pcDuino )
passwd: password updated successfully
ubuntu@ubuntu:~$ su -
Password: (-type passwd again, such as pcDuino)
root@ubuntu:~#
Step 3:Converting Ext3 to Ext4
To enable the ext4 features on an existing ext3 filesystem, use the command.
root@ubuntu:~# tune2fs -O extents,uninit_bg,dir_index /dev/nandd
tune2fs 1.42 (29-Nov-2011)
WARNING: You cannot revert or mount back to ext3 filesystem once you run above command.
After running this command we MUST run fsck to fix up some on-disk structures that tune2fs has modified.
Step 4: e2fsck nand
root@ubuntu:~# e2fsck -pf /dev/nandd
/dev/nandd is mounted.

WARNING!!!  The filesystem is mounted.   If you continue you ***WILL***
cause ***SEVERE*** filesystem damage.

Do you really want to continue<n>? (type "y", hit [Enter] keyboard)

Do you really want to continue<n>? yes
/dev/nandd: recovering journal (Wait a minute) /dev/nandd: recovering journal /dev/nandd: One or more block group descriptor checksums are invalid.  FIXED. /dev/nandd: Group descriptor 10 checksum is invalid.  /dev/nandd: UNEXPECTED INCONSISTENCY; RUN fsck MANUALLY. (i.e., without -a or -p options) root@ubuntu:~#
Step 4: fsck nand
root@ubuntu:~# fsck -pf /dev/nandd -y
fsck from util-linux 2.20.1
e2fsck: Only one of the options -p/-a, -n or -y may be specified.
root@ubuntu:~#
Step 5: reboot
#reboot
Step 6: Be patient for waiting fsck inode
fscking on nand is slow, just be patient..
After reboot, you’ll see like this . It means fscking Indoe : )

Until finish about 5 minutes 🙂
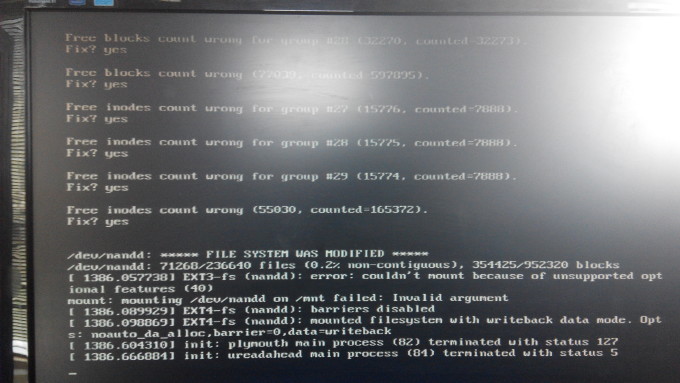
/dev/nandd: ***** FILE SYSTEM WAS MODIFIED*****
then upgrade successfully.
and then it goes to desktop

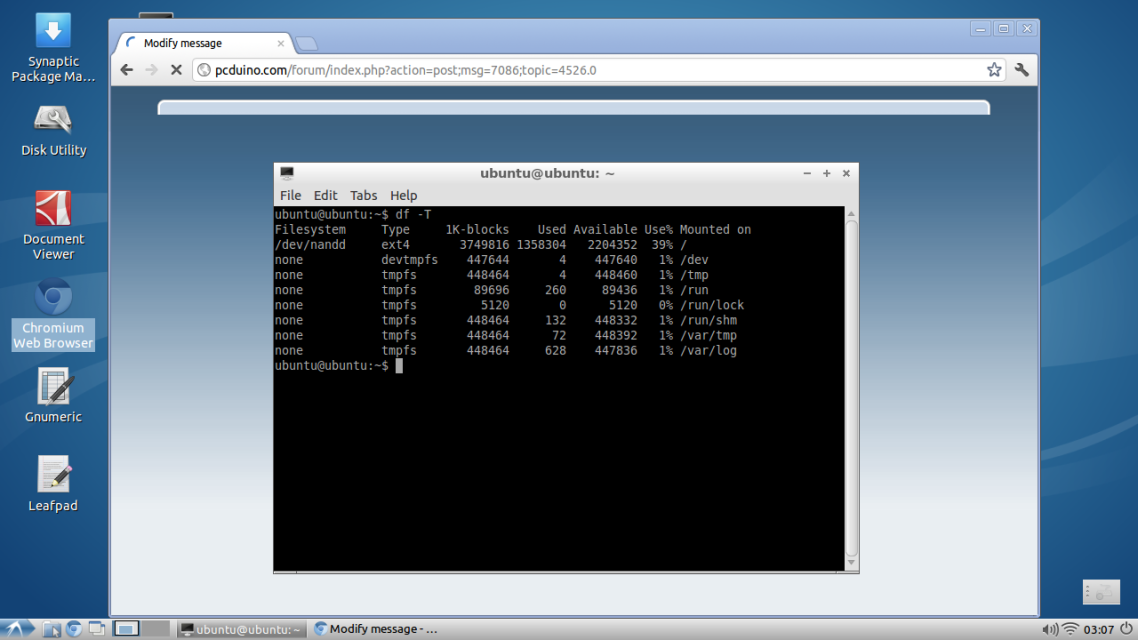
Step 7: Upgrade to Ext 4
Type ” df -T” agian on Terminal:
ubuntu@ubuntu:~$ df -T
Filesystem     Type     1K-blocks    Used Available Use% Mounted on
/dev/nandd     ext4       3749816 1358304   2204352  39% /
none           devtmpfs    447644       4    447640   1% /dev
none           tmpfs       448464       4    448460   1% /tmp
none           tmpfs        89696     260     89436   1% /run
none           tmpfs         5120       0      5120   0% /run/lock
none           tmpfs       448464     132    448332   1% /run/shm
none           tmpfs       448464      72    448392   1% /var/tmp
none           tmpfs       448464     628    447836   1% /var/log
Leave a Reply
You must be logged in to post a comment.