[vc_row][vc_column width=”1/1″][vc_tour][vc_tab title=”Hardware List” tab_id=”1433465846-1-69″][vc_column_text]1. Raspberry Pi2
2. 8G 10 class Micro SD card
3. LCD monitor( If it’s VGA , we need a HDMI to VGA adapter.)
4. Mouse
5. PC which running Windows 10.[/vc_column_text][/vc_tab][vc_tab title=”Software” tab_id=”1433465846-2-41″][vc_column_text]1. Windows 10 IoT for Raspberry Pi2(Windows_IoT_Core_RPI2_BUILD.zip)
You can download here:
https://connect.microsoft.com/windowsembeddedIoT/Downloads/DownloadDetails.aspx?DownloadID=57782
Extracting the file flash.ffu and save in your PC.
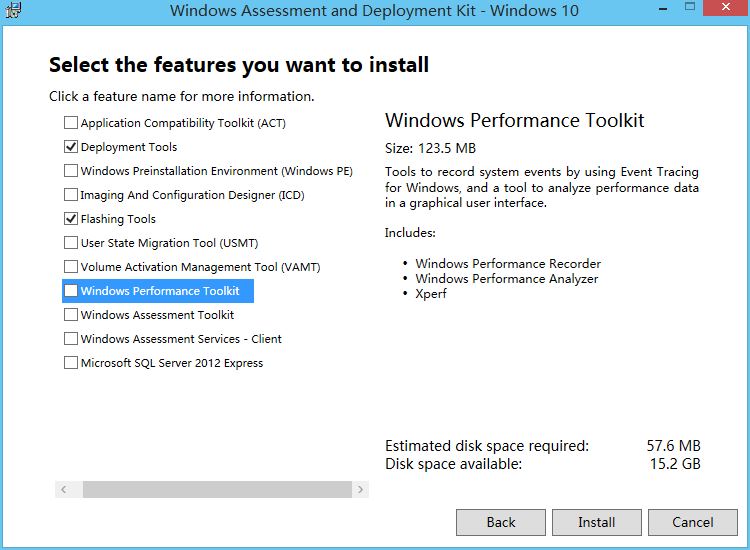
2. Windows ADK
Install Visual Studio 2015 RC, then you will have the tools.
Or you can download and install separately, Just install Deployment tools and Flashing tools.
It’s need about 57.6M space.
Here is the download link:
https://go.microsoft.com/fwlink/p/?LinkId=526740
 [/vc_column_text][/vc_tab][vc_tab title=”Burn Windows 10 IoT” tab_id=”1433466449087-2-6″][vc_column_text]1. Open command prompt(Admin)
Use the command to check the sd card’s number.
diskpart
list disk
exit
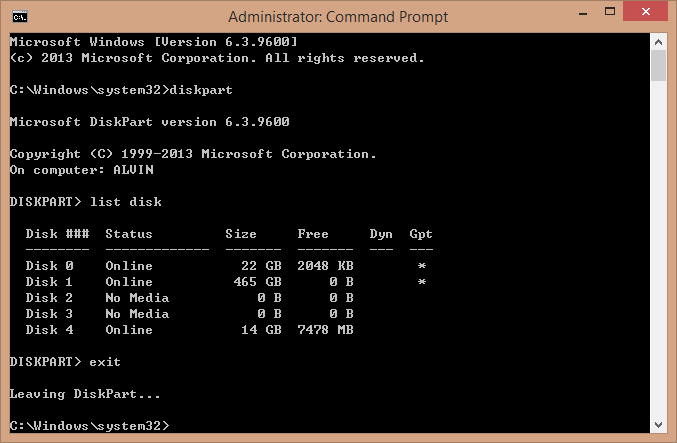
You can see the SD card’s number is 4.
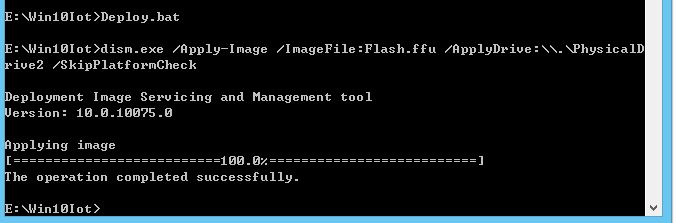
2. Burn Windows10 IoT
Use cd command change to the directory where the file flash.ffu is.
The use the command to burn the firmware.
Note: Must use your SD card’s number. For example, my SD card’s number is 4, then it should be /ApplyDrive:\\.\PhysicalDrive4
dism.exe /Apply-Image /ImageFile:flash.ffu /ApplyDrive:\\.\PhysicalDriveN /SkipPlatformCheck
3. Windows 10 IoT start up
Plug the SD into Raspberry Pi2 and then power on.
If everything goes well, you will see Windows 10 logo. And then the screen will turn black for several minutes.

Support mouse, but only two place can be controlled, one is Device setting and the other one is Power on or off.

[/vc_column_text][/vc_tab][/vc_tour][/vc_column][/vc_row]
Leave a Reply
You must be logged in to post a comment.